Mon - Fri: 8 am - 4 pm MT

About Backcountry Journeys
Why Choose Backcountry Journeys
If you're considering a photography trip, hear why Backcountry Journeys delivers the best experience in the industry.Frequently Asked Questions
If you're new to photography trips, or new to BCJ, you can find our common travel questions here.Fitness Levels
Our trips vary on physical intensity, and by reviewing our fitness levels, you can find out which trips may be more challenging, or aligned more closely with your comfort level.Meet The Crew
We've built an amazing team of experienced guides, and dedicated office staff that elevate your travel experience. Get to know their backgrounds, and hear their stories.Loyalty Program
We reward our frequent photo adventurers with exclusive discounts on amazing photography trips.Contact Us
If you need to get in touch with our office staff, or have additional business inquiries, you can find our information here.Refer a Friend
Know someone perfect for one of our tours? Recommend them through this quick form.Stay Up To Date On All Things
Backcountry Journeys
Backcountry Journeys
Our Photography Community
Our Webinars
Our regularly hosted webinars provide photography instruction from our own guides on a wide range of topics.Our Education Portal
Explore our library of articles that cover everything from common questions, to in-depth guides on how to achieve that perfect shot.Community Testimonials
We're proud to foster an amazing group of photo travelers, and here you can find their stories from their past adventures.Resources For Photographers
About Our Company
Resources For Photographers
About Our Company
Why You SHOULD Be Using the Histogram
Published July 14, 2020
Overview
The Histogram is one of the most important tools when it comes to crafting the perfect exposure, yet it is sometimes overlooked by photographers. This is mainly due to either a lack of understanding or just plain not knowing this thing called a Histogram exists.
In my opinion, understanding the histogram and the exposure triangle are crucial to progressing as a photographer. This article is meant to instruct and show you how useful and easy a Histogram is to use. I, along with many, many other photographers, use the Histogram for every single image I capture and you should be using it too!
If you want to learn more about the exposure triangle, you can do that here.
What is a Histogram?
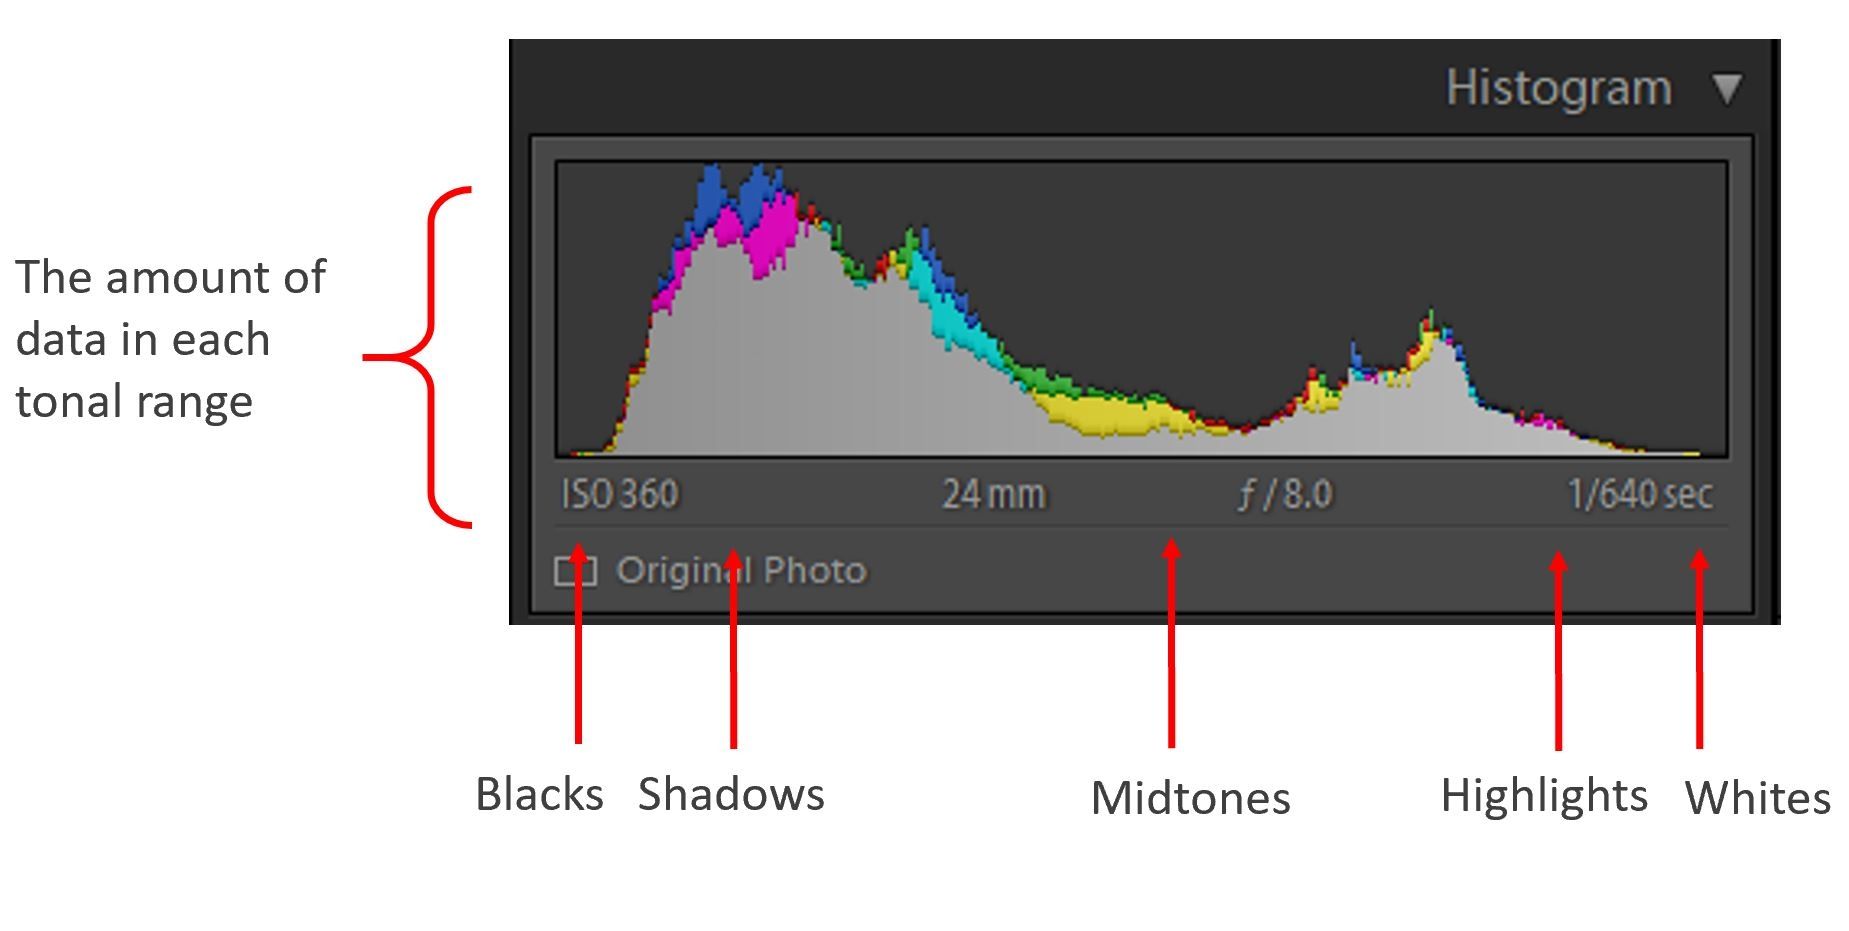
A Histogram is simply a graphical representation of data – that data being luminosity (brightness) and color values of an image. We are most concerned with the luminosity Histogram and that will be our main focus throughout the article.
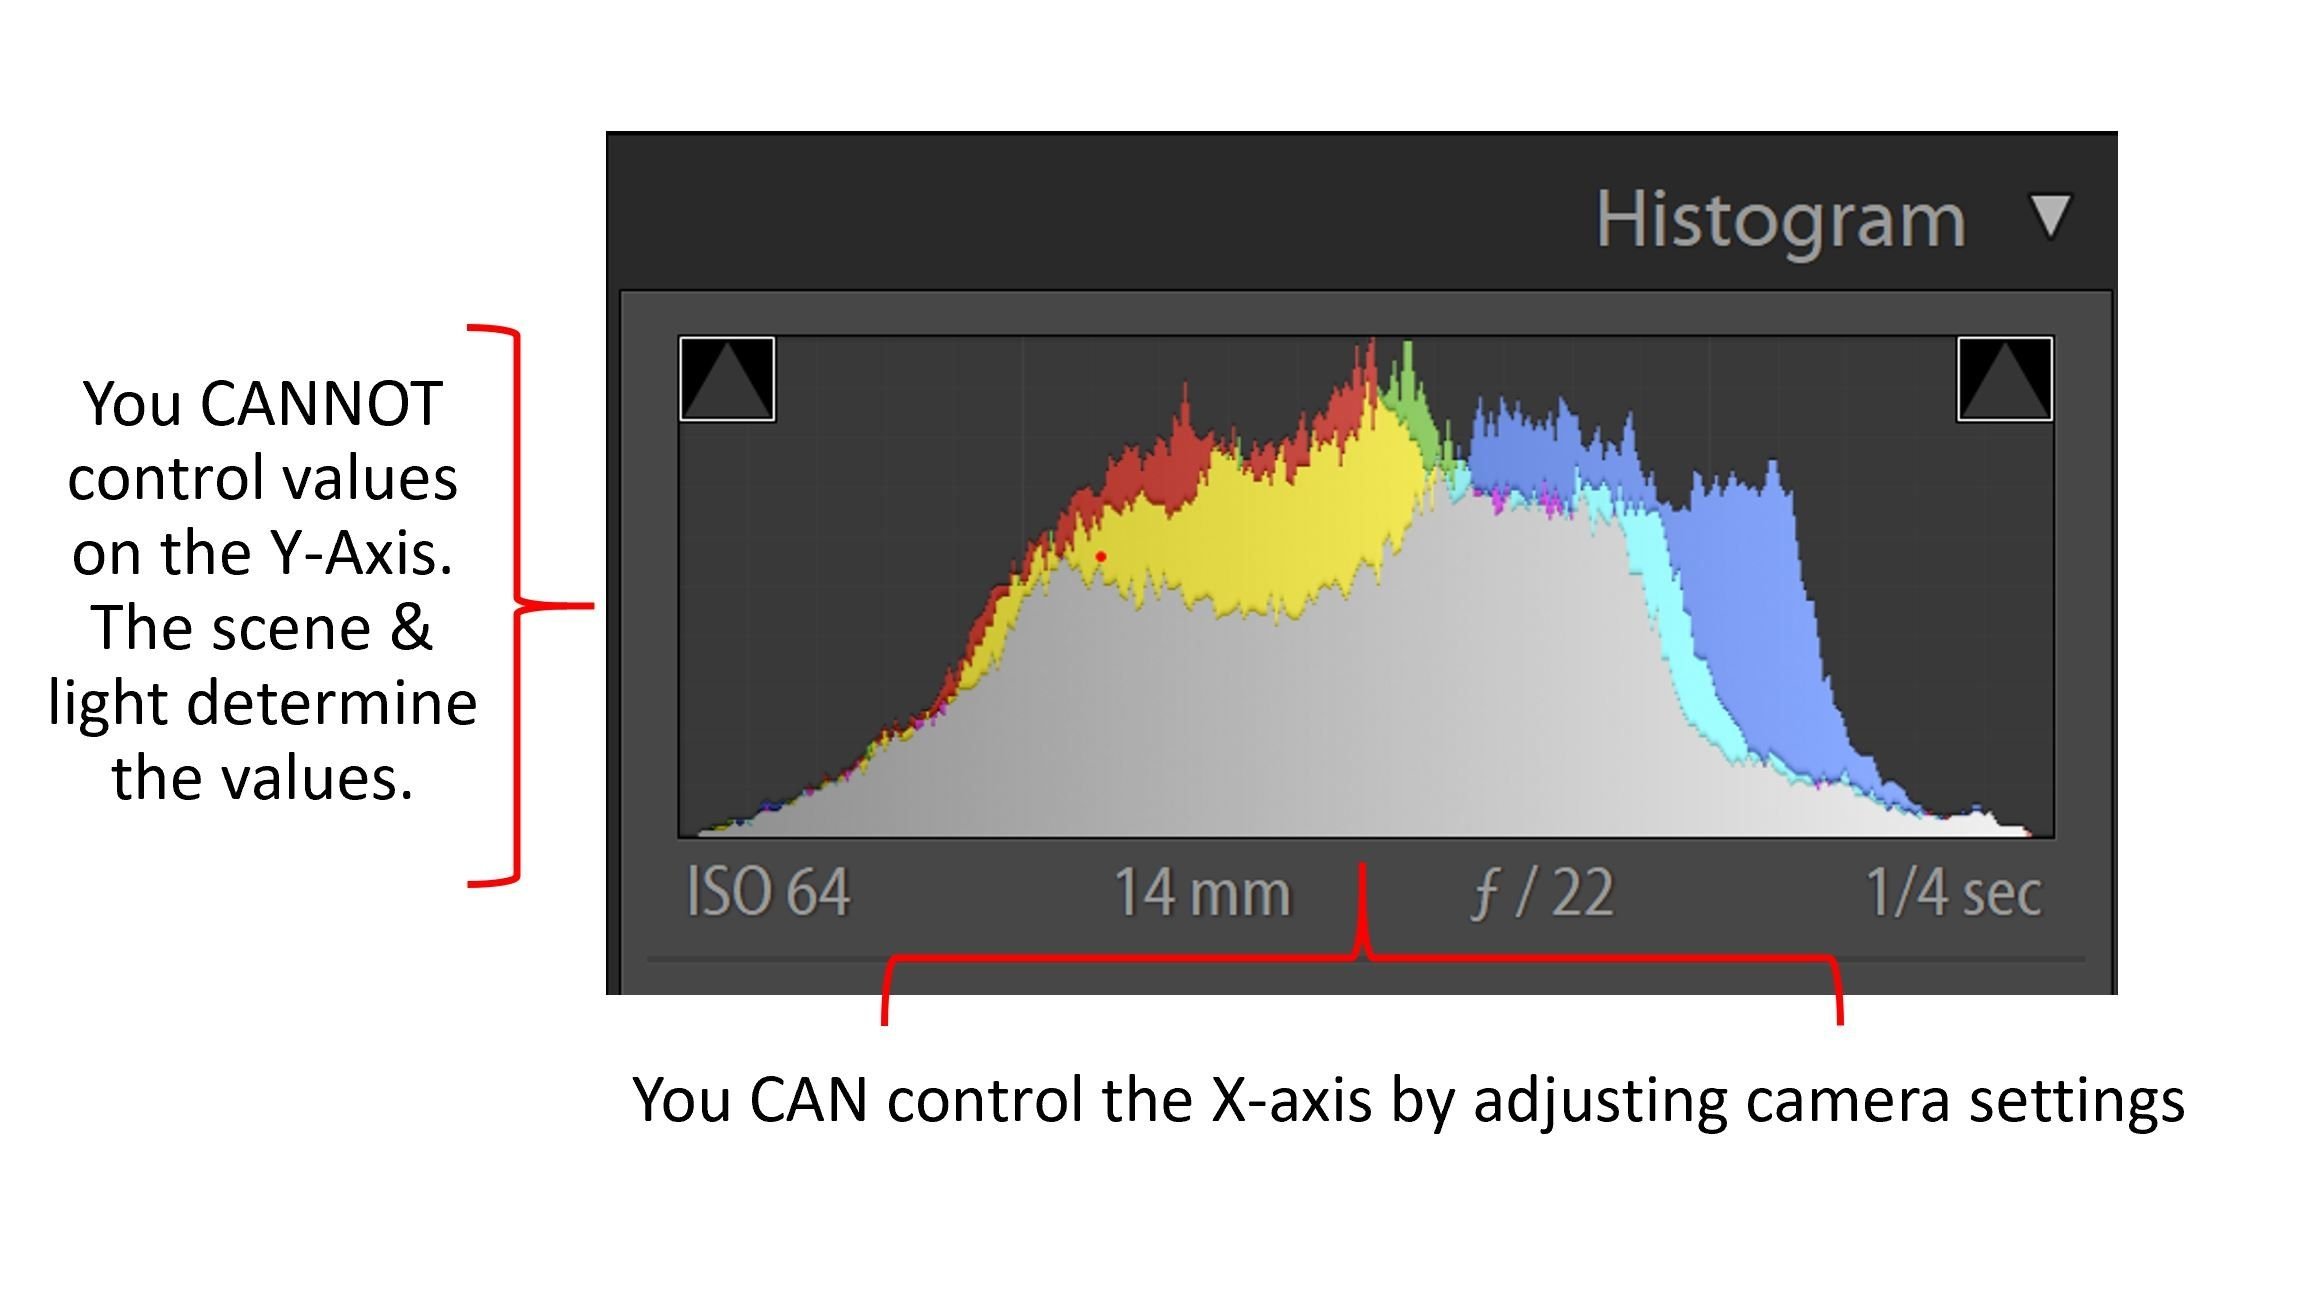
The X-axis of the Histogram represents luminosity sections. If you think of the X-axis ranging from 0 to 100, then 0 is the blacks (darkest parts of an exposure) and 100 is the whites (brightest parts of an exposure), midtones are in the middle at 50. The Y-axis of a Histogram represents the amount of tones in each of those luminosity sections mapped on the X-axis.
How to Use the Histogram
A Histogram is used to assess exposure, specifically the brightness of an exposure. Once learned, a Histogram is an easy way to quickly identify if you need to change your camera settings to brighten or darken an exposure.
A key to understanding the Histogram is to realize that you can only control how data is distributed on the X-axis. Remember, that’s the luminosity sections. So, when we set our camera settings for a specific shot, we determine how the data of an exposure is placed into each one of those tonal buckets (blacks, shadows, midtones, highlights, whites). When we adjust our camera settings, the distribution of data on the X-axis of the histogram also changes. We CANNOT control the Y-axis, that’s the amount of values in each of those tonal buckets.
Quick summary – adjusting camera settings allows us to control the distribution of data, but not the amount. If this is confusing to you, we will discuss specific examples and scenarios that will help you better understand the histogram.
So, how do you use the histogram?
In general, I check the histogram after every exposure I take, doing this ensures my camera settings and exposure are optimal. For instance, if I take an exposure and the histogram is telling me that the image is too dark, I can compensate with some type of setting correction. To brighten the image, I would either choose a slower shutter speed, a higher ISO, a more open aperture, or some type of combination.
Just like me, you should be using a histogram after every shot to check your exposure. That begs the question, what does an ideal histogram look like? Well, let’s take a look and cover some other common scenarios.
Histogram Scenarios
When an exposure is ‘perfect’, all data on the X-axis will be contained between the left and right edge. On workshops, I often use the analogy of a field goal post. Think of the posts as the left and right edge of the histogram, you want ‘everything’ (data) to be contained within those two posts. Again, we can only control what the X-axis looks like, not the Y-axis.
This is what a perfect exposure looks like –
So, how do you use the histogram?
In general, I check the histogram after every exposure I take, doing this ensures my camera settings and exposure are optimal. For instance, if I take an exposure and the histogram is telling me that the image is too dark, I can compensate with some type of setting correction. To brighten the image, I would either choose a slower shutter speed, a higher ISO, a more open aperture, or some type of combination.
Just like me, you should be using a histogram after every shot to check your exposure. That begs the question, what does an ideal histogram look like? Well, let’s take a look and cover some other common scenarios.
Histogram Scenarios
- The Ideal Exposure
When an exposure is ‘perfect’, all data on the X-axis will be contained between the left and right edge. On workshops, I often use the analogy of a field goal post. Think of the posts as the left and right edge of the histogram, you want ‘everything’ (data) to be contained within those two posts. Again, we can only control what the X-axis looks like, not the Y-axis.
This is what a perfect exposure looks like –
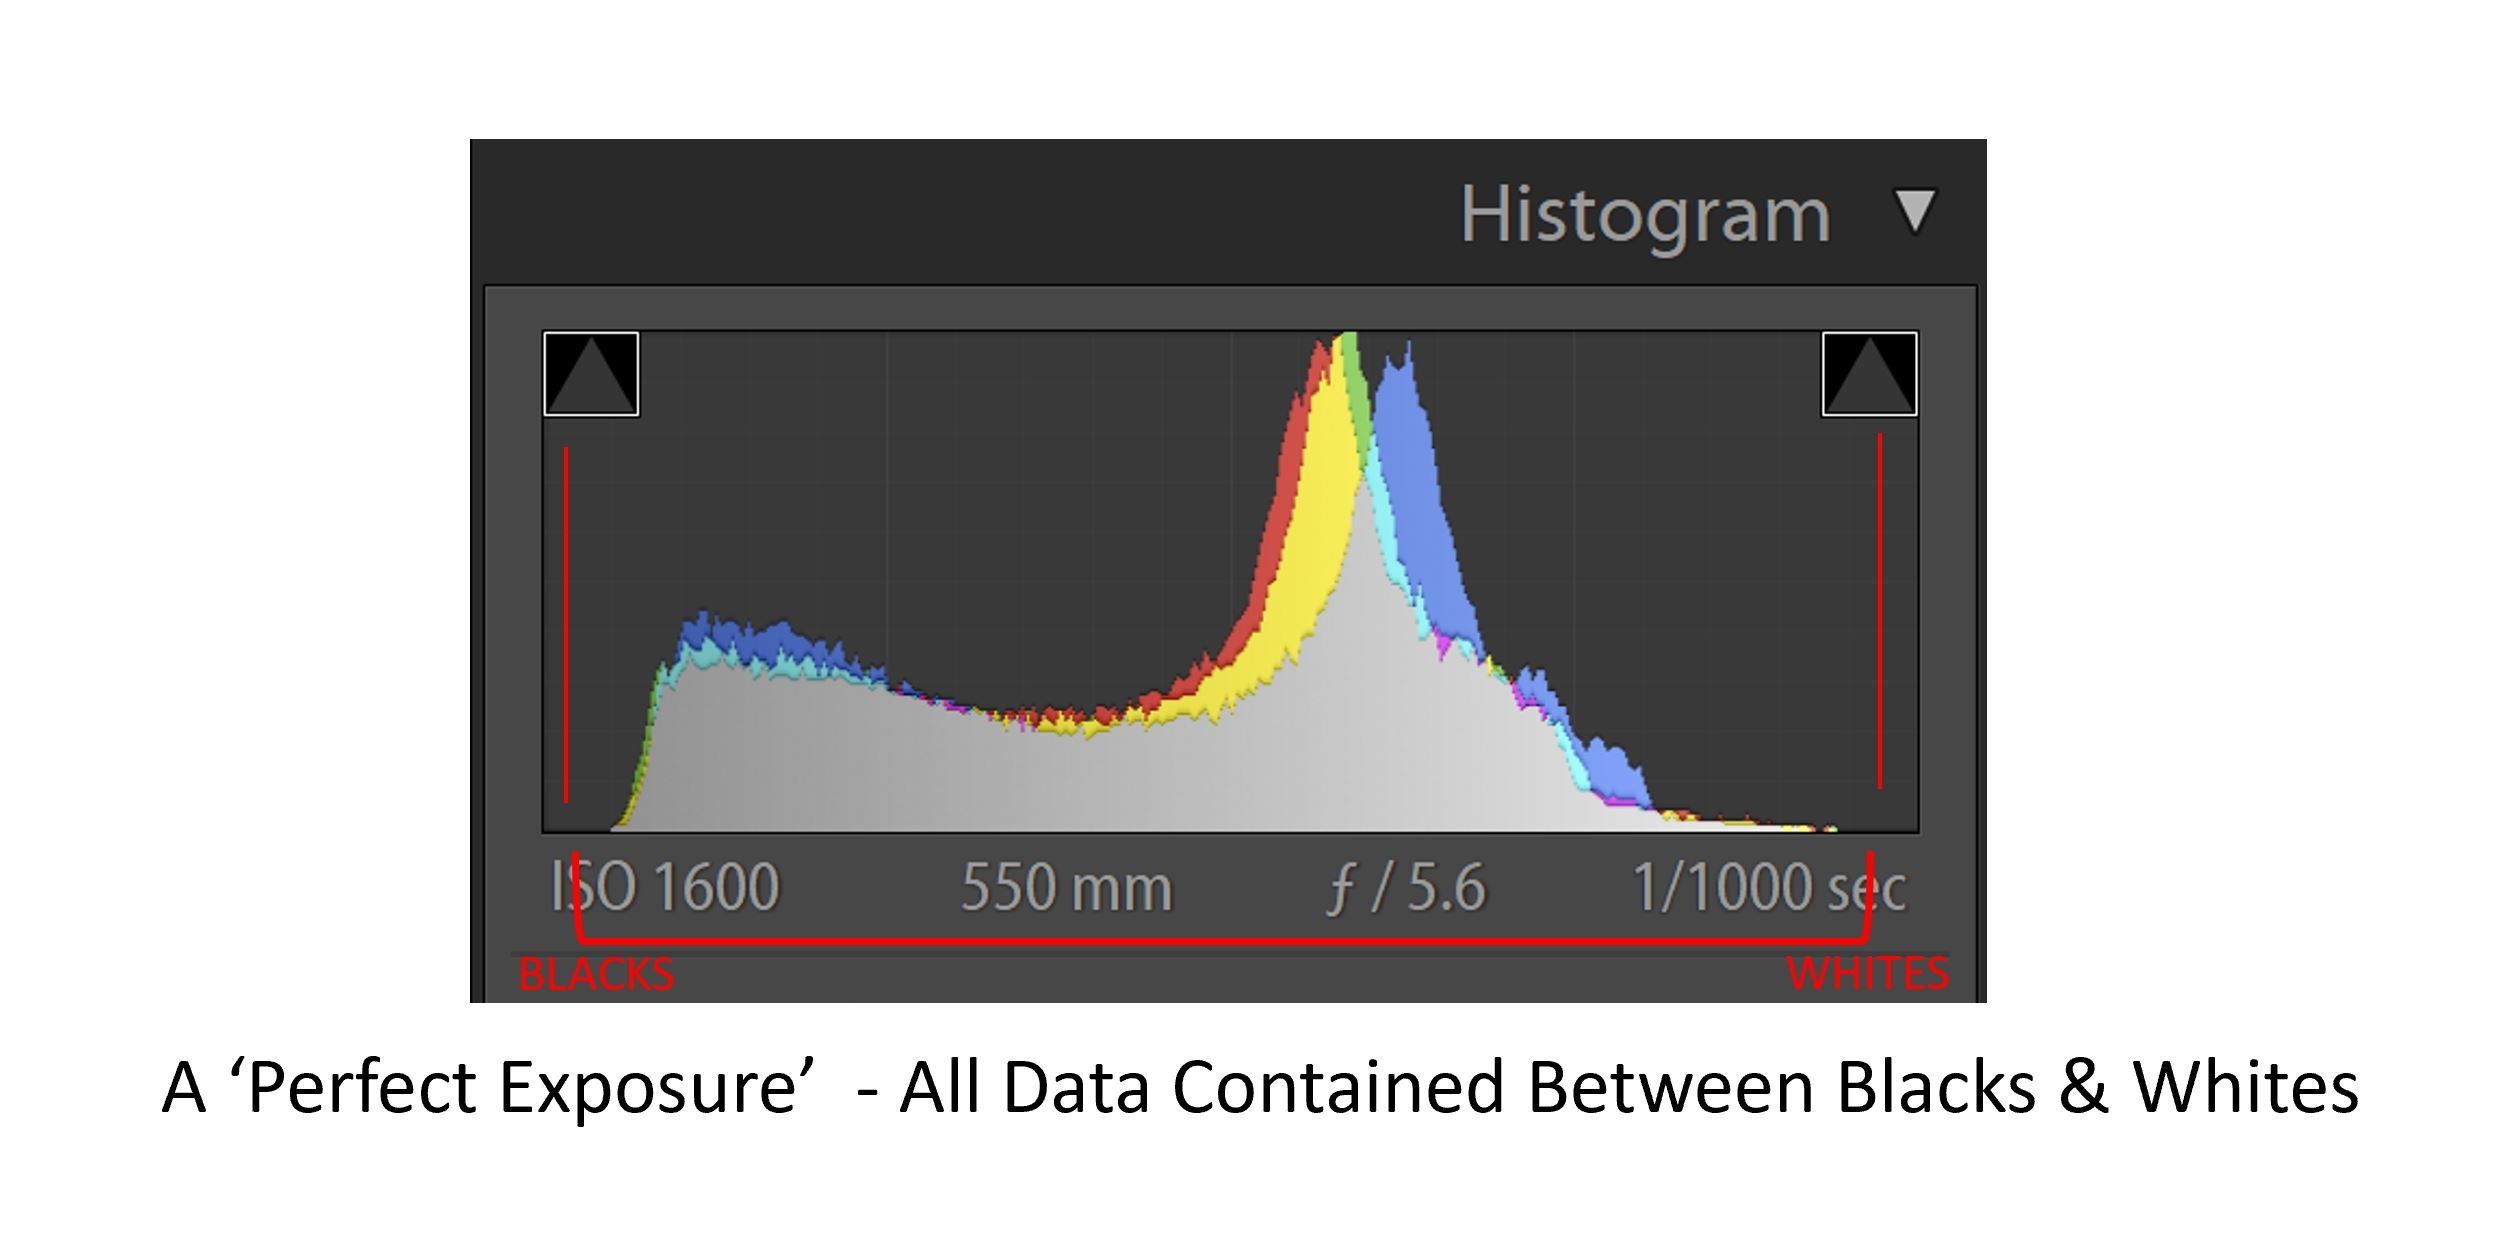
Notice how all the data is inside the left (darks) and right edge (lights) and there is no ‘clipping’ on either edge. Clipping is a very, very important term when it comes to deciphering a histogram. You will often hear terms like ‘clipping’ and ‘blown out’ when discussing a histogram. It simply means you have data piling up on either the left or right edge. We are going to talk about the consequences of clipping in the next two scenarios.
The big point here is an ideal exposure has data that is distributed between the left and right edge with no data piling up on either side of the histogram.
An overexposed image will be too bright and the histogram will display data piling up on the right edge, this is ‘clipping’. When data piles up on either side, it means that there are pixels in your exposure that are ‘blown out’. In the case of an overexposed image, the ‘clipped’ or ‘blown out’ pixels have no data, they are recorded as 100% white. You will not be able to recover the data using post processing software.
The big point here is an ideal exposure has data that is distributed between the left and right edge with no data piling up on either side of the histogram.
- Overexposed Image
An overexposed image will be too bright and the histogram will display data piling up on the right edge, this is ‘clipping’. When data piles up on either side, it means that there are pixels in your exposure that are ‘blown out’. In the case of an overexposed image, the ‘clipped’ or ‘blown out’ pixels have no data, they are recorded as 100% white. You will not be able to recover the data using post processing software.
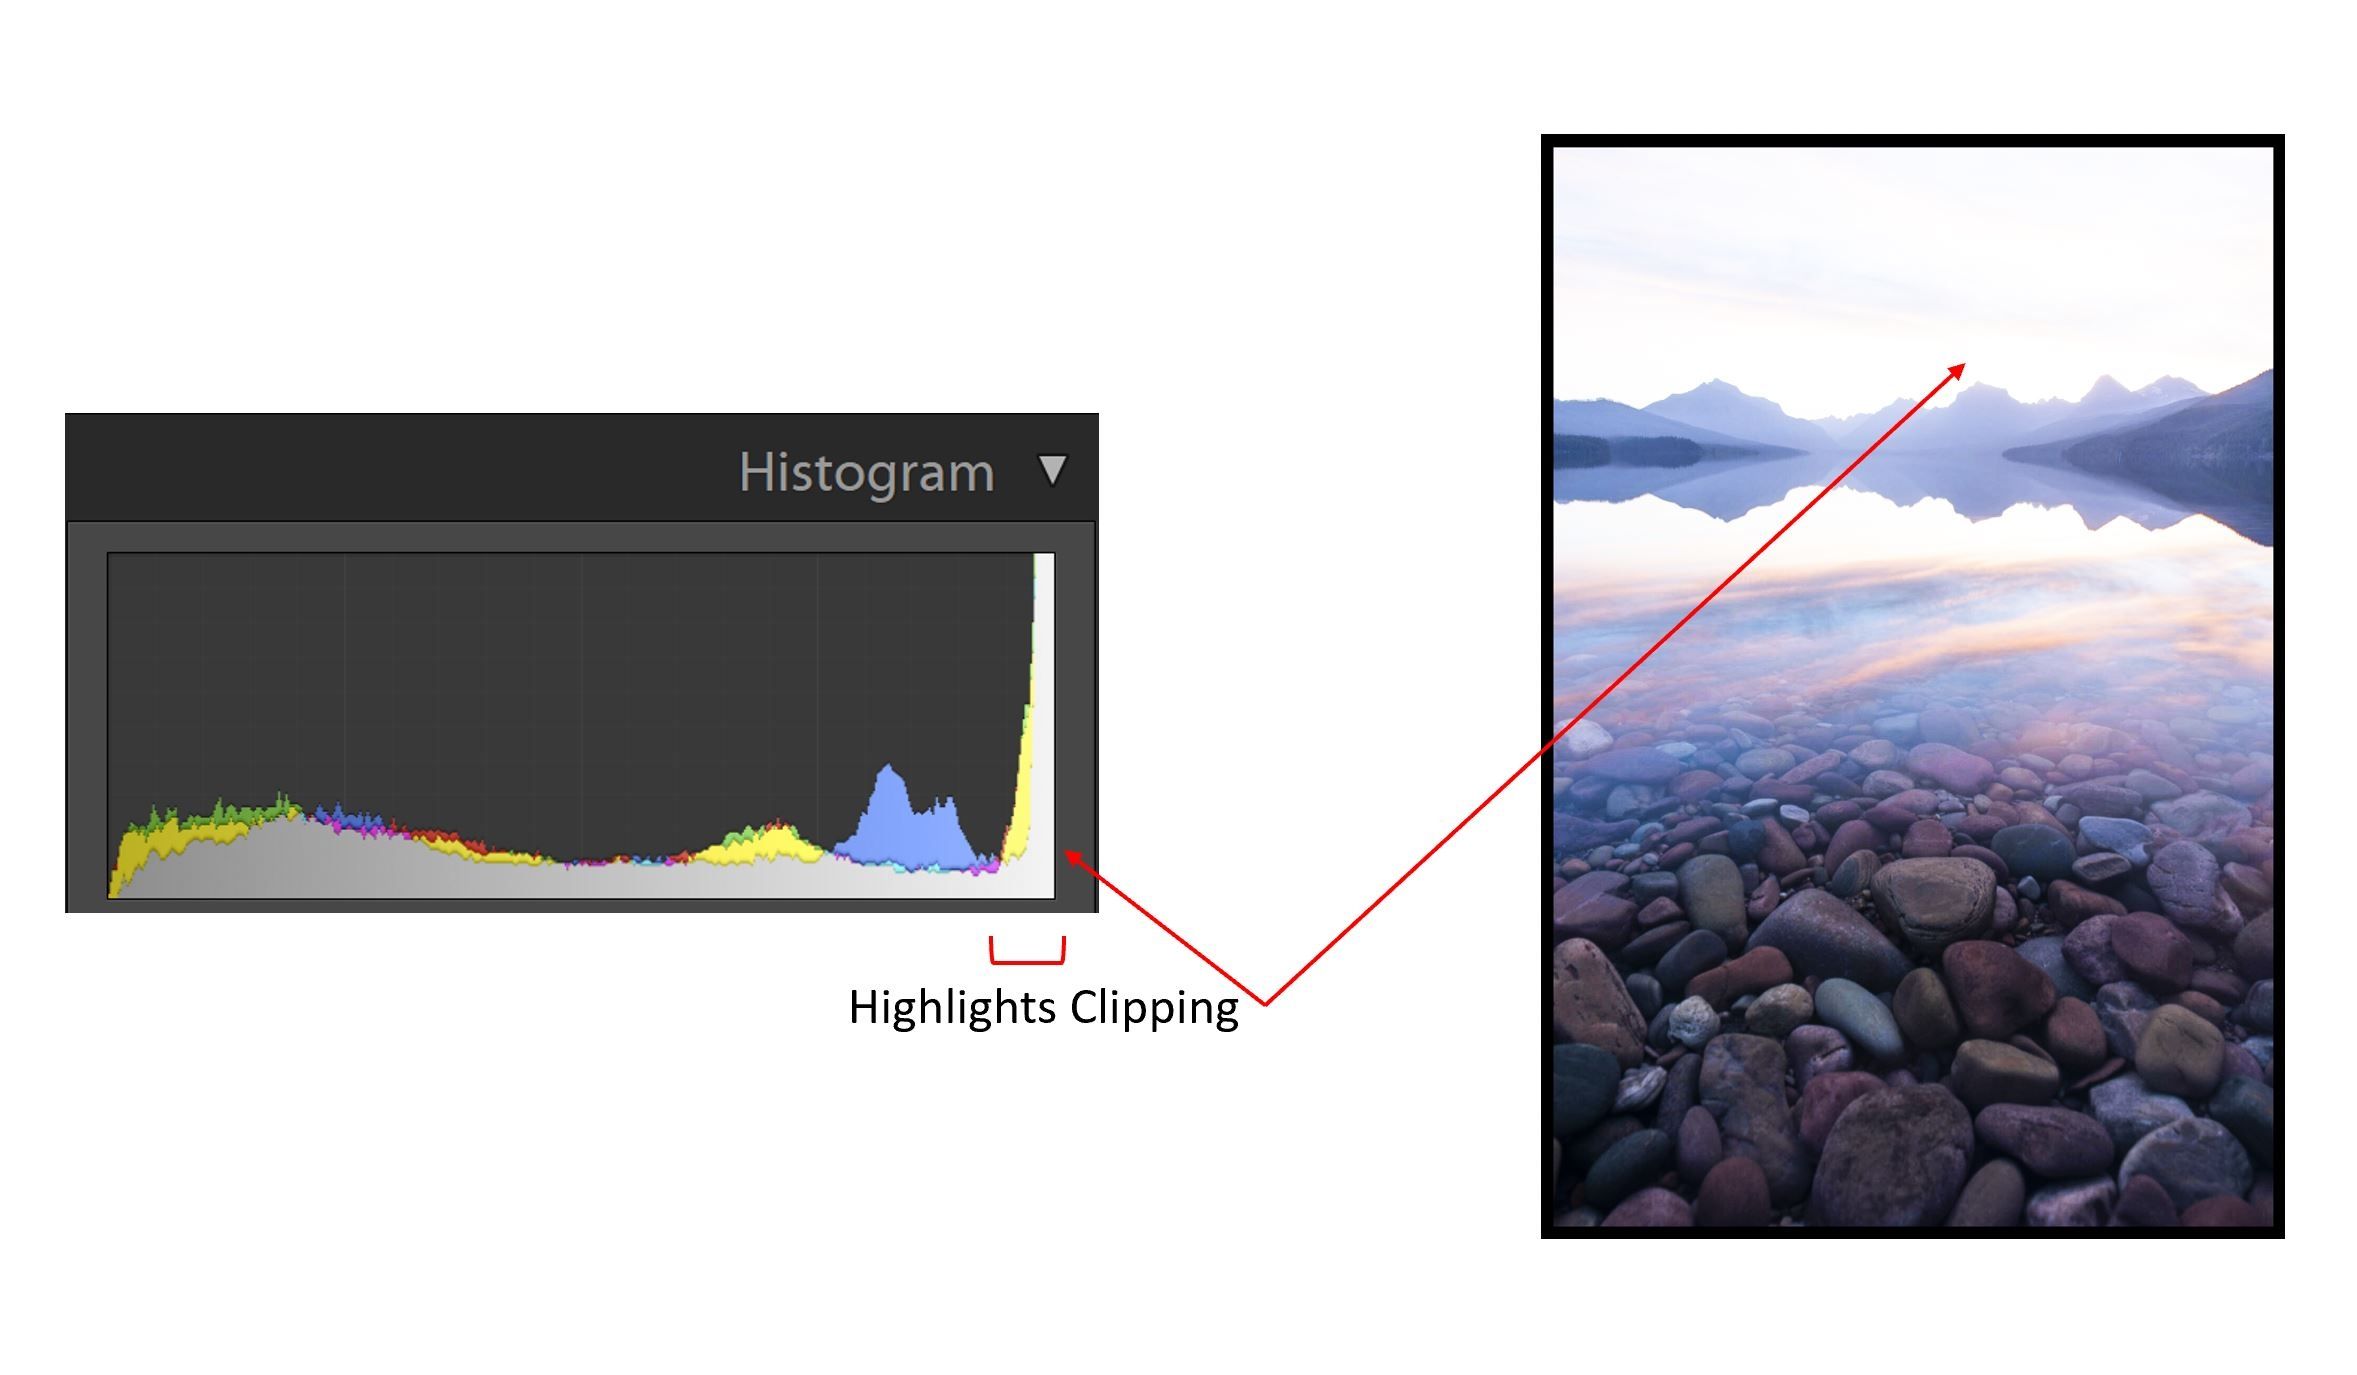
Solution: Darken your exposure using your camera settings – this can be done by decreasing your ISO, choosing a faster shutter speed, increasing your aperture, or doing some type of combination. Once settings are adjusted, take a new exposure and reexamine the histogram.
An underexposed image will be just the reverse of the overexposed example. The image will be too dark and the histogram will display data piling up on the left edge. Similarly to the overexposed image, the piling on the left edge means that there are pixels that are clipped and blown out. Those pixels have no data and are recorded as 100% black.
- Underexposed Image
An underexposed image will be just the reverse of the overexposed example. The image will be too dark and the histogram will display data piling up on the left edge. Similarly to the overexposed image, the piling on the left edge means that there are pixels that are clipped and blown out. Those pixels have no data and are recorded as 100% black.
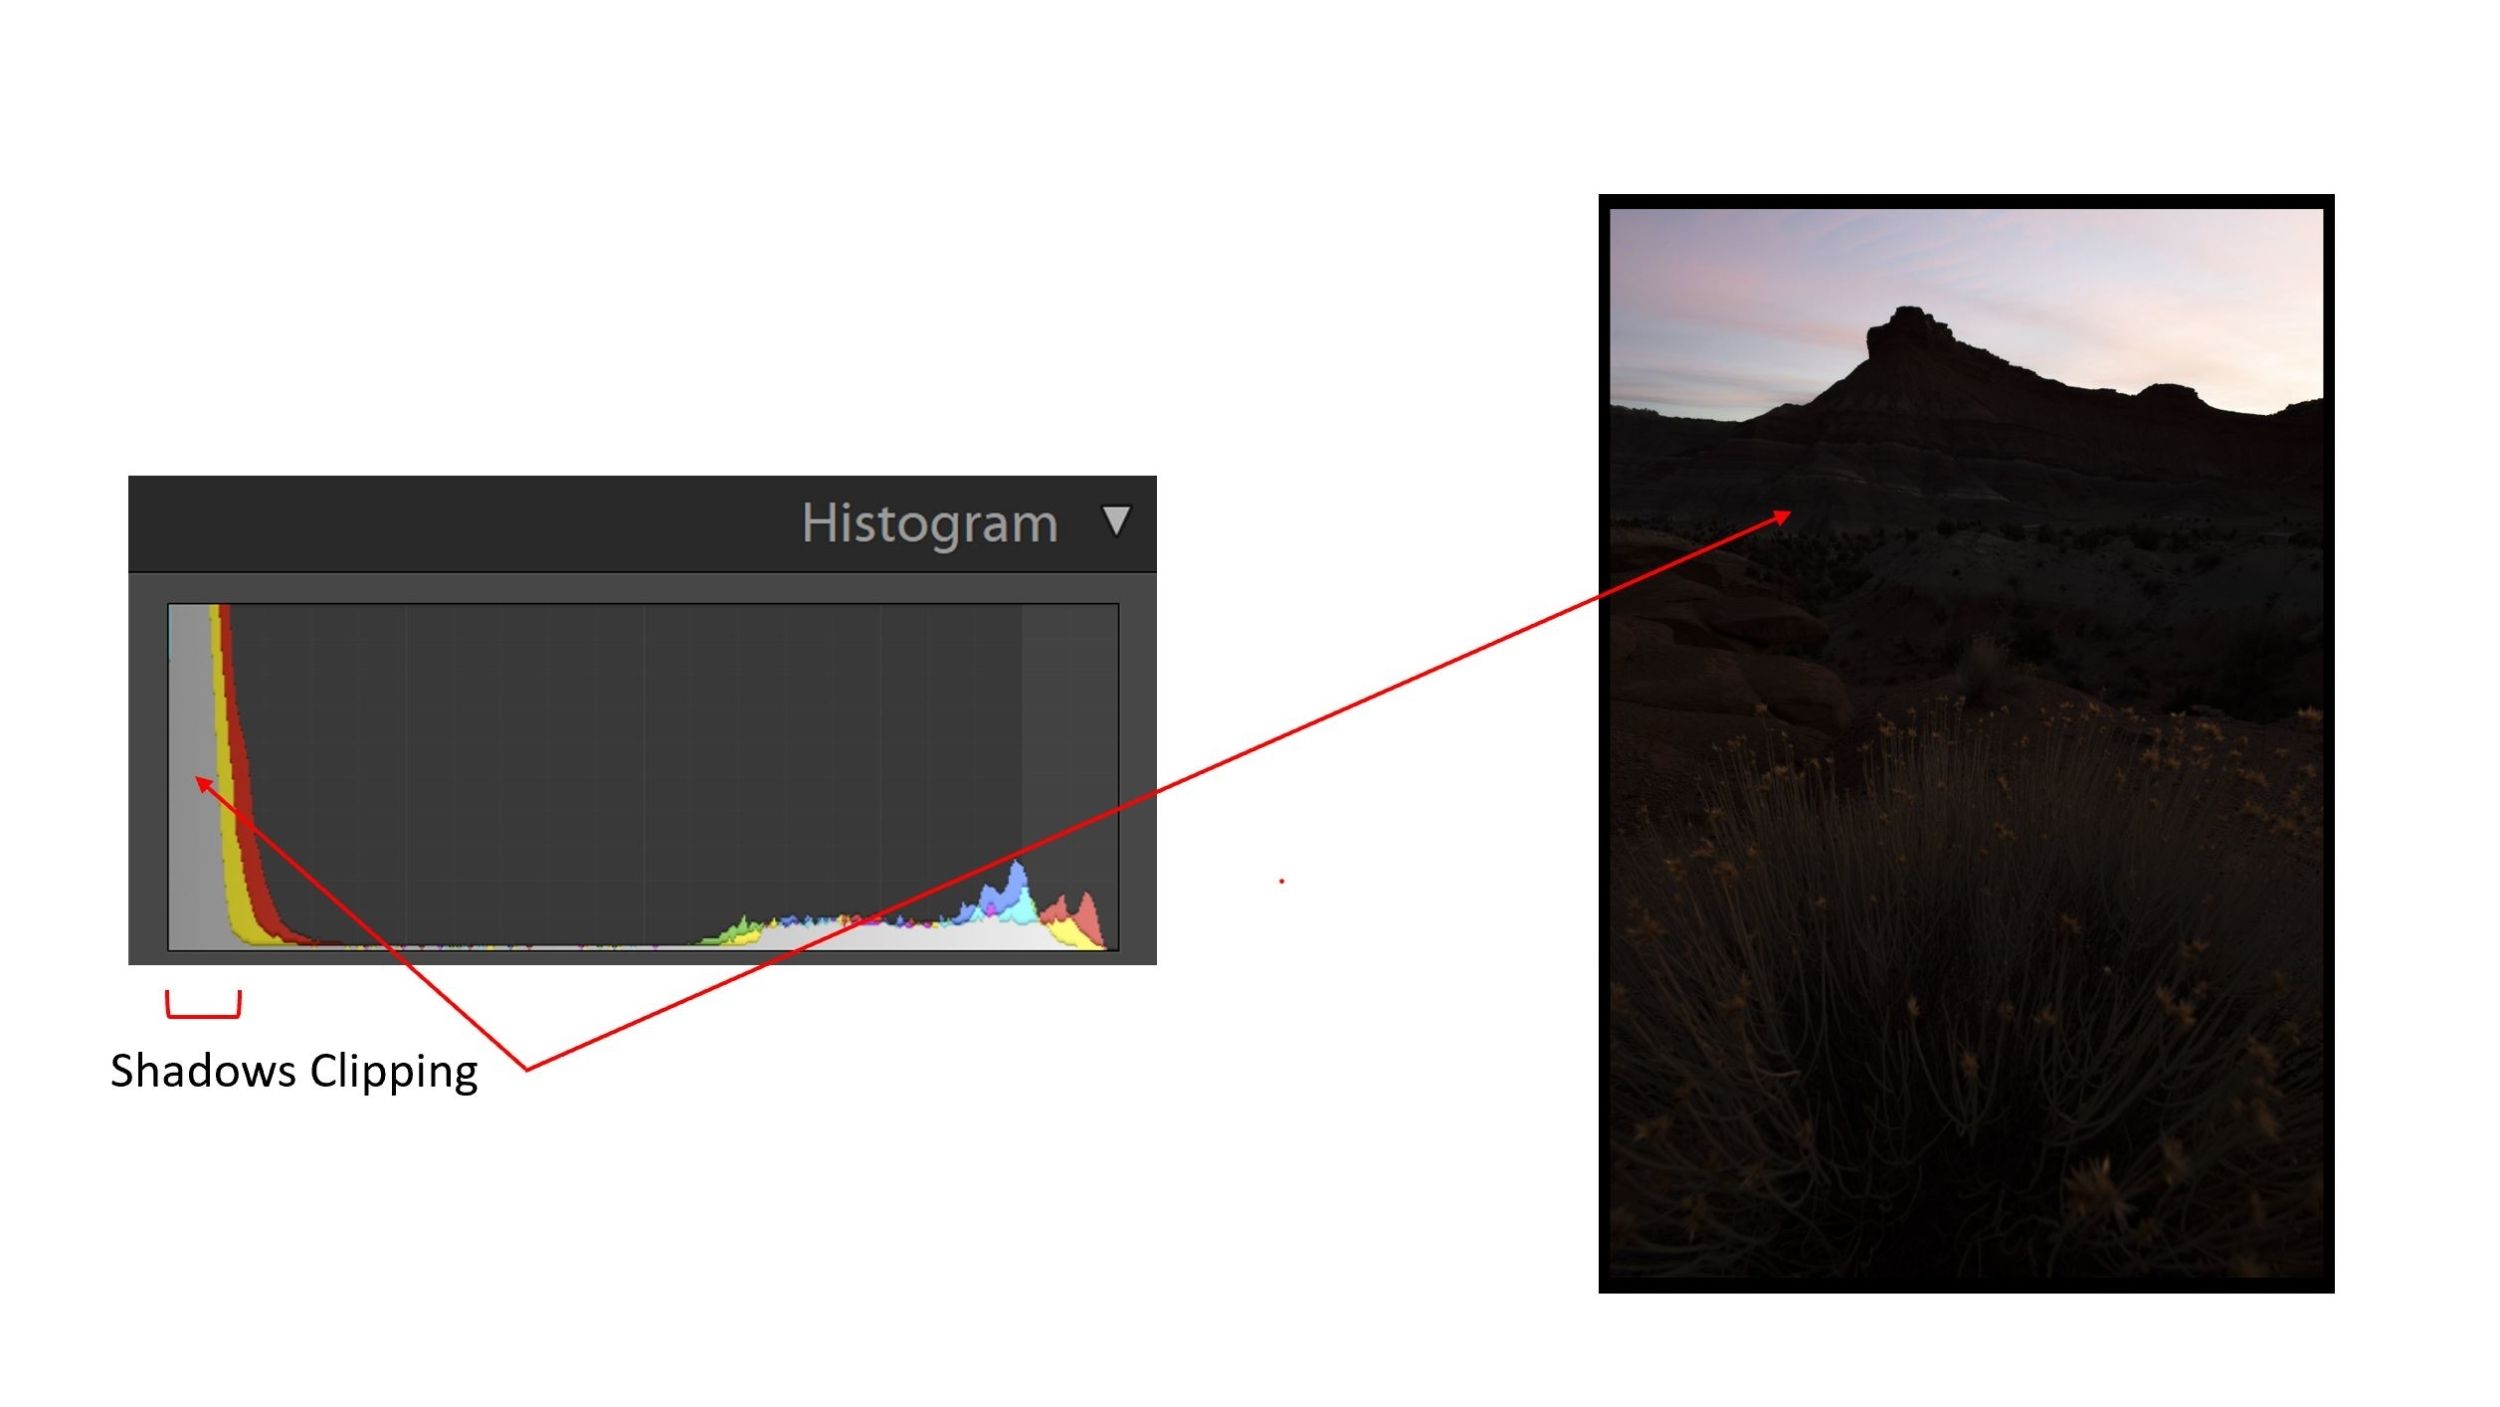
Solution: Brighten your exposure using your camera settings – this can be done by increasing your ISO, choosing a slower shutter speed, decreasing your aperture, or doing some type of combination. Once settings are adjusted, take a new exposure and reexamine the histogram.
Quick Tip
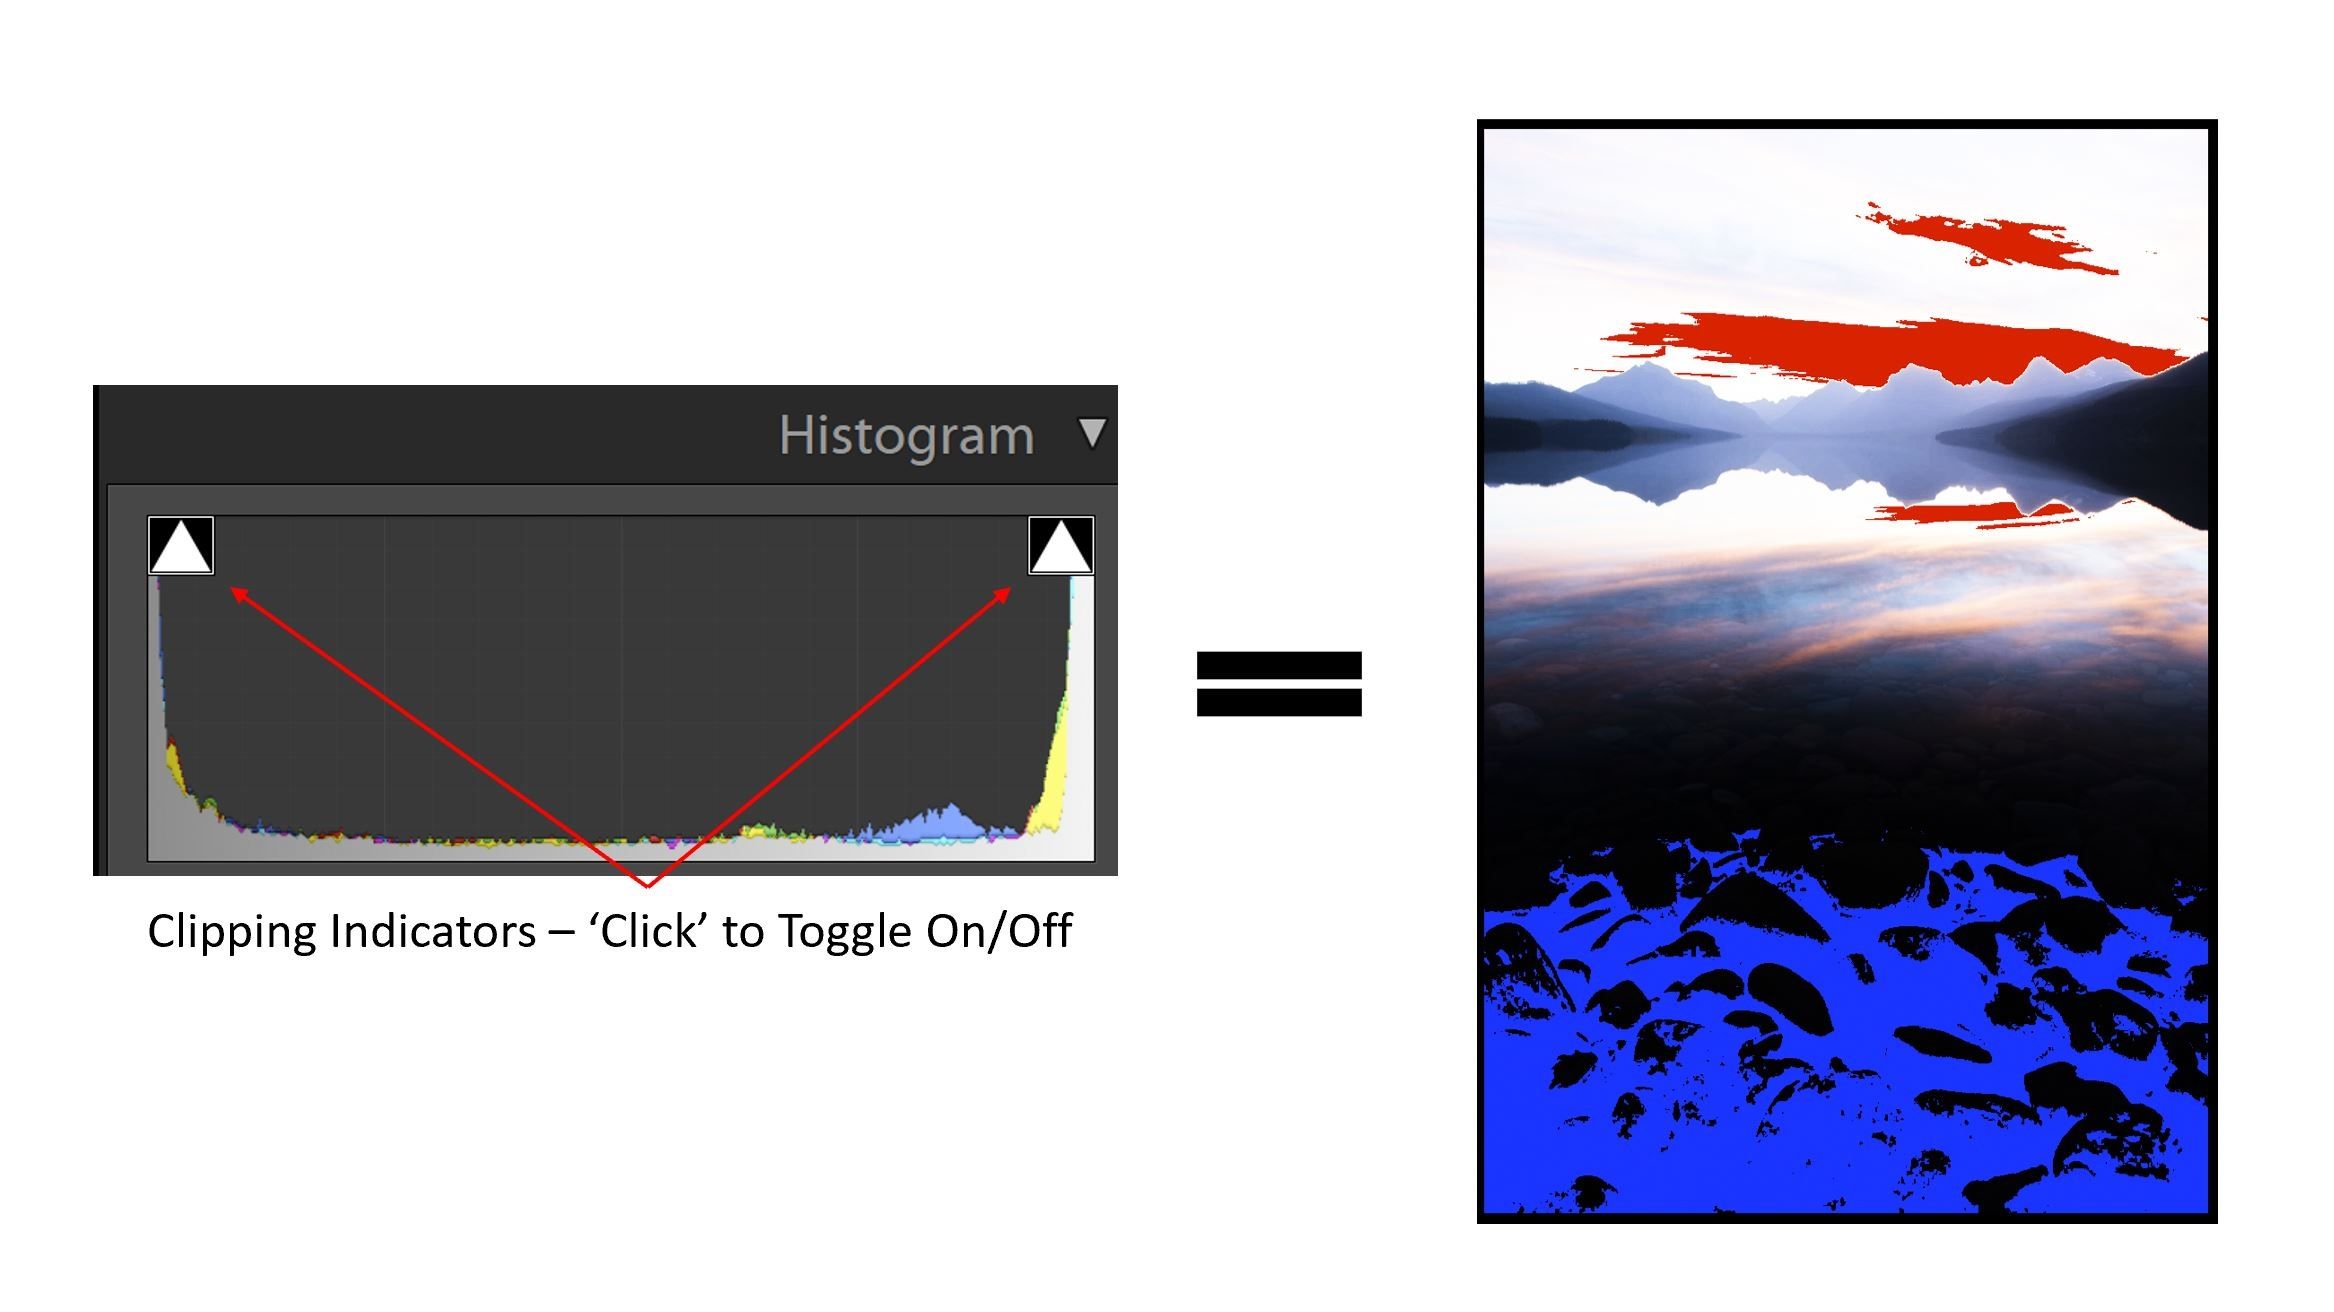
In Lightroom, you can use clipping indicators to add an overlay that shows you what pixels in an image are clipped. A red overlay shows clipped highlight areas and a blue overlay shows clipped dark area. The clipping indicators can be useful when processing an image, to ensure that no pixels are clipped and the maximum amount of data is retained.
Quick Tip
In Lightroom, you can use clipping indicators to add an overlay that shows you what pixels in an image are clipped. A red overlay shows clipped highlight areas and a blue overlay shows clipped dark area. The clipping indicators can be useful when processing an image, to ensure that no pixels are clipped and the maximum amount of data is retained.
Best Practices
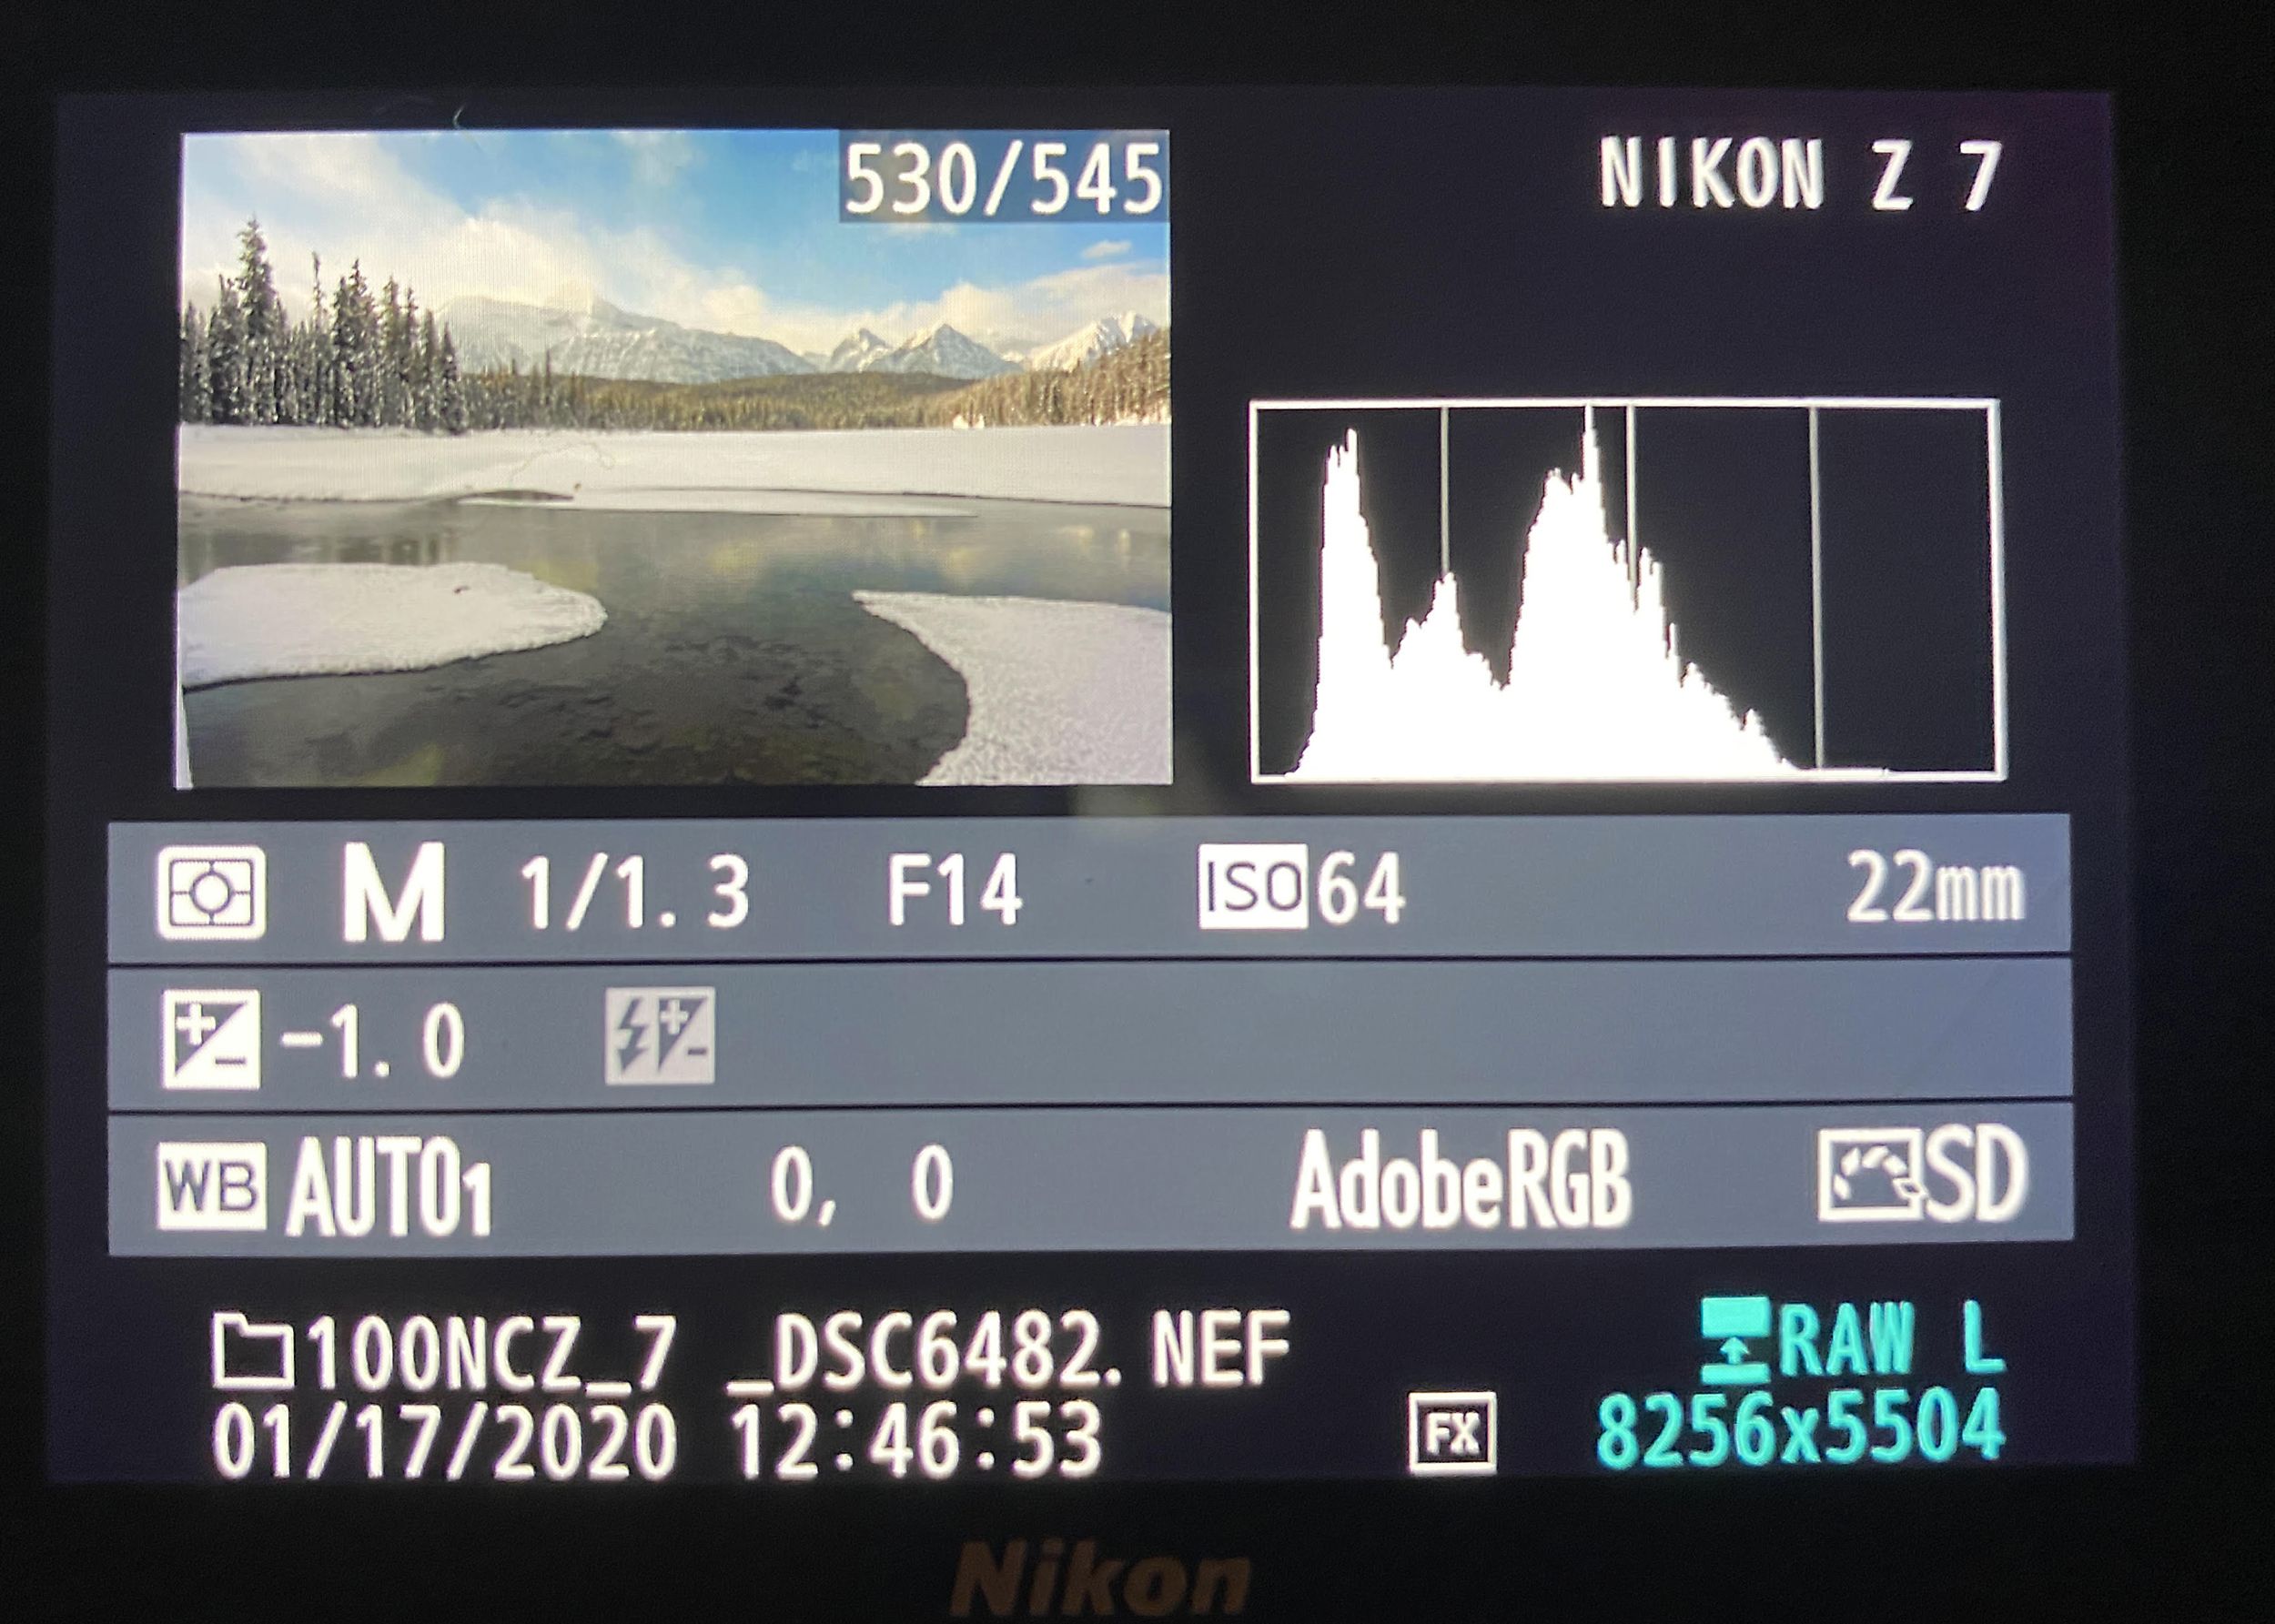
Most consumer and professional DSLRs and mirrorless cameras have the option to display a histogram either in Live View, via the EVF, or through a playback mode. I shoot mirrorless so I always enable the histogram display through the EVF. This allows me to see how the histogram reacts in real time to a change in my camera settings – super useful!
I also enable the playback/preview mode that displays a histogram (see below). When I shoot, I constantly go into playback/preview mode and review my recently taken shots. I always check the histogram to make sure the exposure is optimal. If not, I adjust my settings. One tip – do NOT trust your eyes, trust the histogram.
- Enable the Histogram on Your Camera
Most consumer and professional DSLRs and mirrorless cameras have the option to display a histogram either in Live View, via the EVF, or through a playback mode. I shoot mirrorless so I always enable the histogram display through the EVF. This allows me to see how the histogram reacts in real time to a change in my camera settings – super useful!
I also enable the playback/preview mode that displays a histogram (see below). When I shoot, I constantly go into playback/preview mode and review my recently taken shots. I always check the histogram to make sure the exposure is optimal. If not, I adjust my settings. One tip – do NOT trust your eyes, trust the histogram.
- Expose to the Right
One tip and best practice that has been around since the use of the histogram in photograph is, expose to the right. This means, make the brightest possible exposure you can, while not clipping your highlights. When you do that, the data in the histogram is pushed to the right edge, but again you do not want to make an exposure that is so exposed to the right that you clip some highlights.
The above example shows an image ‘exposed to the right’. Notice the small spacing between the brightest data in the histogram and the right edge of the histogram. The image was exposed as bright as possible, with no highlights clipping.
Exposing to the right is best practice for getting an optimal exposure. But, sometimes it is best to underexpose an image. Today’s cameras have phenomenal dynamic range, meaning you can recover multiple stops of highlight and shadow detail if necessary.
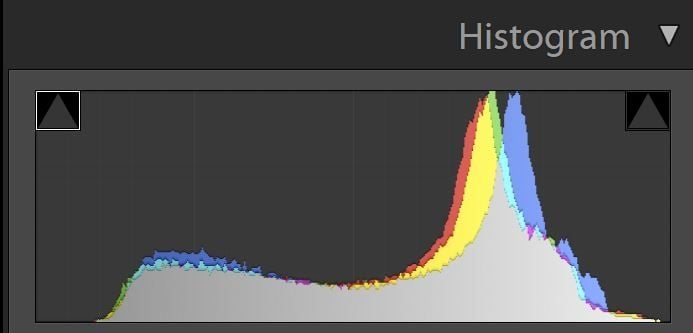
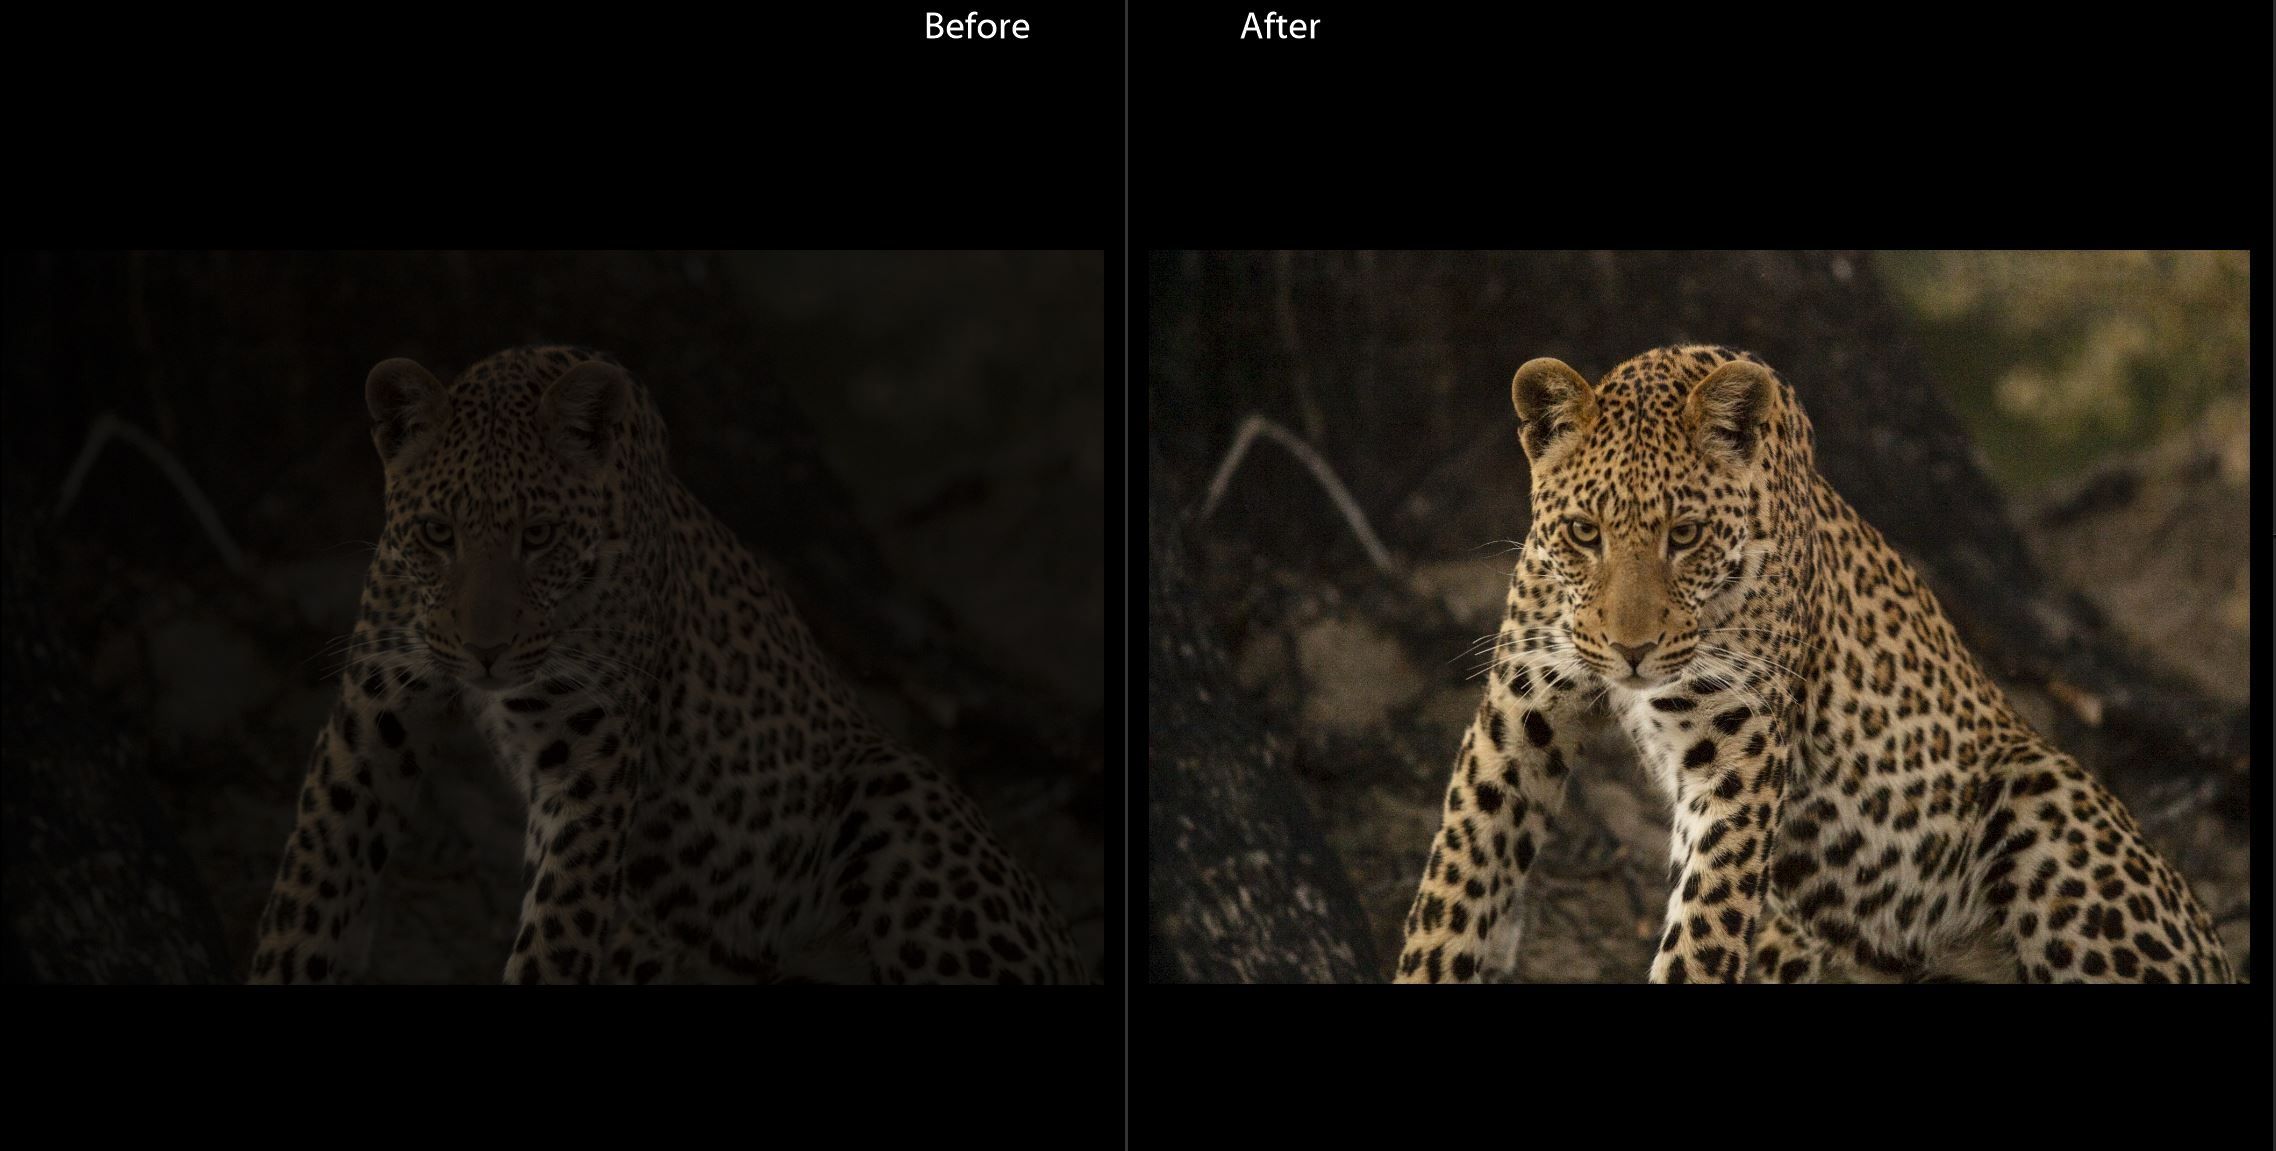
When shooting wildlife, shutter speed is the most important camera setting. It determines if the wildlife you are shooting is sharp or not, thus it takes priority over other settings. So, let’s say you’re shooting a bear at 200mm and light is low. You are struggling to hit a shutter speed that equals your focal length (1/200th of a second), you don’t want to increase your ISO because your are already at ISO 1600, and your aperture is wide open. This scenario occurs all the time. One effective technique is to deliberately underexpose your image. Doing this allows you to still achieve a fast enough shutter speed to freeze the bear, and you can recover all of the dark shadows during post processing. Now, this doesn’t mean underexpose so much that you are clipping blacks, it just means if you have to take an exposure that is fairly dark, that’s OK. Moving the Exposure slider to the right in Lightroom along with the Shadows slider will go a long way. Look at this image below that was underexposed to achieve a faster shutter speed, amazing what you can do while processing!
- It’s OK to Underexpose (Sometimes!)
Exposing to the right is best practice for getting an optimal exposure. But, sometimes it is best to underexpose an image. Today’s cameras have phenomenal dynamic range, meaning you can recover multiple stops of highlight and shadow detail if necessary.
When shooting wildlife, shutter speed is the most important camera setting. It determines if the wildlife you are shooting is sharp or not, thus it takes priority over other settings. So, let’s say you’re shooting a bear at 200mm and light is low. You are struggling to hit a shutter speed that equals your focal length (1/200th of a second), you don’t want to increase your ISO because your are already at ISO 1600, and your aperture is wide open. This scenario occurs all the time. One effective technique is to deliberately underexpose your image. Doing this allows you to still achieve a fast enough shutter speed to freeze the bear, and you can recover all of the dark shadows during post processing. Now, this doesn’t mean underexpose so much that you are clipping blacks, it just means if you have to take an exposure that is fairly dark, that’s OK. Moving the Exposure slider to the right in Lightroom along with the Shadows slider will go a long way. Look at this image below that was underexposed to achieve a faster shutter speed, amazing what you can do while processing!
I also sometimes underexpose landscape images to ensure that my highlights are preserved. I am effectively exposing to the right, but because there is so much dynamic range in the scene, there are areas of the image that are underexposed. That’s OK because I know I can using post processing applications to recover those areas.
Dealing with high dynamic range has some overlap with my last paragraph above. In HDR scenes (lots of bright and dark tones), highlights should always take precedence. Think about where your eye goes in an image, it always goes from dark to light. Thus, the highlights are always a key part of your image. When I have to choose between clipping blacks or highlights, I will always choose to clip my blacks and make sure that pixels in the highlights are preserved. Usually those darker areas have less detail and are less important to the image overall.
Below is a histogram from a HDR scene.
- Dealing with HDR (High Dynamic Range) Scenes
Dealing with high dynamic range has some overlap with my last paragraph above. In HDR scenes (lots of bright and dark tones), highlights should always take precedence. Think about where your eye goes in an image, it always goes from dark to light. Thus, the highlights are always a key part of your image. When I have to choose between clipping blacks or highlights, I will always choose to clip my blacks and make sure that pixels in the highlights are preserved. Usually those darker areas have less detail and are less important to the image overall.
Below is a histogram from a HDR scene.
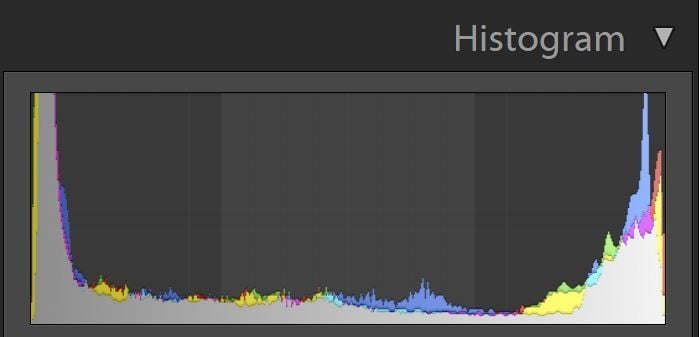
A histogram like this is generally seen when shooting sunrise/sunset, when there is a lot of highlights (beautiful sky) and a lot of shadows (foreground). There are a few ways you can approach this situation. One solution is to take multiple exposures and blend them (HDR blending or manual exposure blending). Take multiple exposures for the highlights and for the shadows then blend those images using software like Photoshop.
To learn more about exposure bracketing and blending, check out one of our past articles.
If you do not want to blend, the other option is to expose to the right the best you can in one exposure. This will result in preserved highlights, but clipped blacks. As I said above, this is OK, as you can recover some of those very dark shadow areas.
Shooting into the sun is very difficult, and it is the one scenario where I say don’t worry about clipping/blowing out your highlights. The sun is the brightest thing our eyes know and it is just as bright to our camera sensor. If the scene you are shooting is properly exposed, but the sun is blown out, that’s fine. I like to blow my sun out just a little because it works great to emphasis the sun as a focal point in your composition. Now, I don’t recommend excessively blowing out the sun, to the point where areas of the sky also become blown out.
Pro tip: Shooting into the sun is actually a great way to create an awesome image. One reason why is we can create starbursts that really draw the eye in, learn more about that technique here.
Overview
The histogram is a key tool for photographers. It helps craft a perfect exposure and should be used during every photo shoot. Its layout and data peaks can be confusing, but it is relatively simple to understand and easy to use once you take a more in-depth look.
I always use the histogram. I use it with my EVF, I use it while previewing exposures, and I use it while processing images. Understanding the histogram will help you become a better shooter. For you beginners out there, it will also help you gain a better understanding of how changing your camera settings actually affects your exposure. If you’re not using it already, get out there and try it! And don’t forget to let us know how it goes!
If you need some extra help, consider joining us for an in the field workshop!
To learn more about exposure bracketing and blending, check out one of our past articles.
If you do not want to blend, the other option is to expose to the right the best you can in one exposure. This will result in preserved highlights, but clipped blacks. As I said above, this is OK, as you can recover some of those very dark shadow areas.
- Don’t Worry About the Sun
Shooting into the sun is very difficult, and it is the one scenario where I say don’t worry about clipping/blowing out your highlights. The sun is the brightest thing our eyes know and it is just as bright to our camera sensor. If the scene you are shooting is properly exposed, but the sun is blown out, that’s fine. I like to blow my sun out just a little because it works great to emphasis the sun as a focal point in your composition. Now, I don’t recommend excessively blowing out the sun, to the point where areas of the sky also become blown out.
Pro tip: Shooting into the sun is actually a great way to create an awesome image. One reason why is we can create starbursts that really draw the eye in, learn more about that technique here.
Overview
The histogram is a key tool for photographers. It helps craft a perfect exposure and should be used during every photo shoot. Its layout and data peaks can be confusing, but it is relatively simple to understand and easy to use once you take a more in-depth look.
I always use the histogram. I use it with my EVF, I use it while previewing exposures, and I use it while processing images. Understanding the histogram will help you become a better shooter. For you beginners out there, it will also help you gain a better understanding of how changing your camera settings actually affects your exposure. If you’re not using it already, get out there and try it! And don’t forget to let us know how it goes!
If you need some extra help, consider joining us for an in the field workshop!

We offer world-class travel photography
experiences around the world.
Each tour is bundled with lodging, meals, and transportation between workshops included, allowing you to focus on photography instead of the stress of traveling.
experiences around the world.
Each tour is bundled with lodging, meals, and transportation between workshops included, allowing you to focus on photography instead of the stress of traveling.
Get Our Trip Catalog
Receive a trip catalog that highlights all of our upcoming photo tours and workshops.Schedule a Trip Consultation
Meet with a photo experience coordinator, and experience a personal touch to your booking experience.Landscape Guide
Receive a FREE Landscape Cheat Sheet Written By a Pro Photographer.Webinars
Our regularly hosted webinars provide photography instruction from our own guides on a wide range of topics.Education Portal
Explore our library of articles that cover everything from common questions, to in-depth guides on how to achieve that perfect shot.
Backcountry Journeys
Connecting Passionate People To
Exceptional Experiences.
Exceptional Experiences.
Business Hours:
Mon-Fri, 8AM-4PM MT
928-478-1521
adventure@backcountryjourneys.com
Mon-Fri, 8AM-4PM MT
928-478-1521
adventure@backcountryjourneys.com
arrow_drop_down_circle
Divider Text
All Images & Content Are Property Of Backcountry Journeys Photography Tours, Workshops & Safaris LLC - Copyright 2026
About Us
Receive a Digital Trip Catalog
Find an upcoming photography tour with our interactive catalog.