Mon - Fri: 8 am - 4 pm MT

About Backcountry Journeys
Why Choose Backcountry Journeys
If you're considering a photography trip, hear why Backcountry Journeys delivers the best experience in the industry.Frequently Asked Questions
If you're new to photography trips, or new to BCJ, you can find our common travel questions here.Fitness Levels
Our trips vary on physical intensity, and by reviewing our fitness levels, you can find out which trips may be more challenging, or aligned more closely with your comfort level.Meet The Crew
We've built an amazing team of experienced guides, and dedicated office staff that elevate your travel experience. Get to know their backgrounds, and hear their stories.Loyalty Program
We reward our frequent photo adventurers with exclusive discounts on amazing photography trips.Contact Us
If you need to get in touch with our office staff, or have additional business inquiries, you can find our information here.Refer a Friend
Know someone perfect for one of our tours? Recommend them through this quick form.Stay Up To Date On All Things
Backcountry Journeys
Backcountry Journeys
Our Photography Community
Our Webinars
Our regularly hosted webinars provide photography instruction from our own guides on a wide range of topics.Our Education Portal
Explore our library of articles that cover everything from common questions, to in-depth guides on how to achieve that perfect shot.Community Testimonials
We're proud to foster an amazing group of photo travelers, and here you can find their stories from their past adventures.Resources For Photographers
About Our Company
Resources For Photographers
About Our Company
Exposure Bracketing in Landscape Photography

Published June 2, 2020
If you’ve spent a great deal of time photographing landscapes, you’ve likely experienced the frustration of being in the ‘perfect location,’ watching a seemingly “perfect” sunset, right before your eyes as you struggle to photograph it correctly.
It can happen in certain lighting situations, and if you’ve been in one you’re familiar with the process. You’ve got your settings ‘right’ so as to capture all the detail in that fantastically colored sky, yet now the darker areas in the scene are way too dark. You’re losing all of the detail in the shadows. So, you then quickly fidget to adjust your shutter speeds in an attempt to get that foreground and mid-ground closer to correct, but in doing so you now have totally blown-out sky.
Frustration ensues. You might even put the camera down, snap the shot with your iPhone, and then sit down sulking, questioning why you bought that expensive camera, to begin with if you have to use your phone for such a moment like this one.
I’ve been there. You’ve likely been there. Problems with exposure are not something that only a novice can encounter, after-all. Learning techniques to find solutions to problems are what make us better photographers, and the solution to the problem described above is a technique called ‘Exposure Bracketing.’
Bracketing is not a difficult technique to grasp, or to pull off in the field, and is a valuable tool for every landscape photographer to have. In the following, we’ll look to define exposure bracketing and discuss when you’d use it in the field. We’ll discuss using your camera’s Auto Exposure Bracketing (AEB), how to bracket manually, and also touch on the final steps necessary to take in Lightroom. In the end, we’ll have solved a common landscape photography exposure problem, and have you on your way towards creating better images with happier outcomes.

What is Exposure Bracketing?
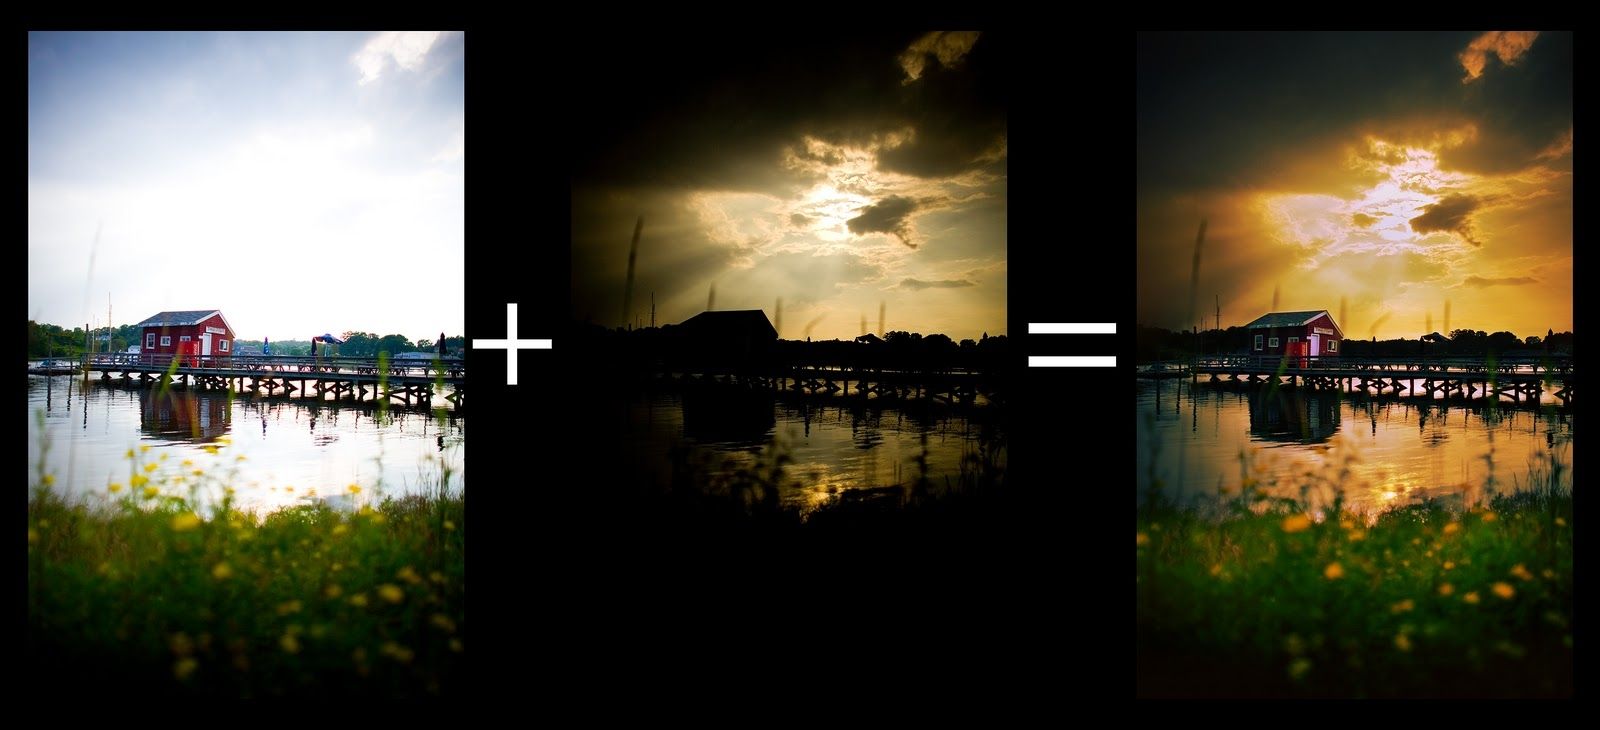
‘Exposure Bracketing,’ at its simplest, is taking the same photo in quick succession using different settings for different exposures. In doing so you will, in say three separate images, properly expose for your highlights, mid-tones, as well as shadows. Later, in post-processing, you’ll merge these three images into a single file to then edit.
When Would I use this in the Field?
Exposure bracket when you need to solve a dynamic range problem, posed often in landscape photography when the light is low and getting lower. Imagine yourself for a moment on the edge of the Grand Canyon in northern Arizona. The sun is setting and the Canyon is simply breathtaking. Yet, you’re noticing that down below the rim of the Canyon the beautiful and haunting rock formations are getting darker. Meanwhile, your sky is on fire. If you take a single shot of this challenging lighting situation, it is likely that you’ll struggle to get an image that has detail in the shadows while at the same time properly exposing the sky. You want so desperately to create an image representative of what you are witnessing, but your camera just won’t do it. This is when to use exposure bracketing. One image to properly expose for the mid-tones, one to get all of the detail and color in the sky, and one similarly for the inner canyon.
Higher-end DSLR and mirrorless camera models, like those we often see folks using while on Backcountry Journeys Photography Tours & Workshops, are getting better and better at capturing a large tonal range within a single image. Yet, it is still pretty commonplace to encounter lighting conditions that surpass the ability of your camera. No matter what camera you have, you will be able to exposure bracket. Some models have automatic bracketing modes (AEB) and others require this to be done manually, but both options are simple to apply.

Automatic Exposure Bracketing (AEB)
AEB will allow you to choose how many images you’d like in your bracket, as well as how many stops of light you’d want in between each. AEB then tells the camera to bracket the shot for you, which means that after you turn the feature on, you only need to press the shutter release once to get multiple exposures of the same scene. For example, you might want to set your AEB so that when you bracket your camera will take three separate images, one at 0, one at two stops underexposed, and one at two stops overexposed. You can certainly take more images, too, if necessary. Various combinations can be used such as a five or nine image series with one, two, or even three stops of light between each. We will not discuss in this piece step-by-step instructions on how to set up your camera’s AEB. This varies from one camera manufacturer to another and even from one model to another of the same manufacturer, some easier than others. For step-by-step instructions, we’d encourage you to check with your camera’s instruction manual.
Doing it Manually
If you are more of a manual person, or if your camera does not have AEB, the process can still be done easily – after each image, simply adjust your shutter speed to create your overexposed and underexposed images. Use shutter speed instead of aperture here because you’ll need consistency with your chosen depth of field in order to seamlessly blend your images. You’ll likely already be using a tripod due to slower shutter speeds, but it is crucial to utilize a tripod when exposure blending in order to get your images to line up later on in Lightroom.
Lightroom
So you’ve now taken care of the fieldwork and are now in front of your monitor wondering what is next. What to do with these three plus images of the same thing that you just took. Well, you may just discover that one of them looks great to you and you delete the others and edit the one. That is all fine and dandy, and by no means does that mean the process was wasted time. This tutorial, however, is for the more likely conclusion that you’ll need data from each file in order to get the final product you’d like. It is important to point out, too, that this process is not about creating some over-saturated image for a ‘wow’ factor. This is a technique used to create a higher-quality image by pulling every bit of detail that you saw in the field.
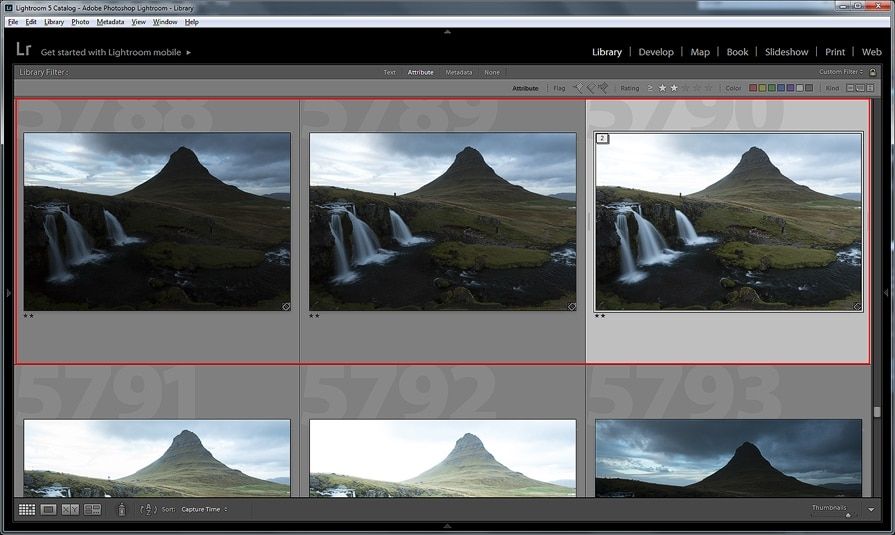
How do we do now merge our images in Lightroom? Let’s say you have three images to use. Highlight all three images by holding down the ‘shift’ key. Right-click, scroll down to ‘Photo Merge,’ then select ‘HDR.’ You’ll be given a preview at this point. Leave ‘auto-align’ and ‘auto settings’ selected. Leave the ‘De-ghost Amount’ at none. Hit ‘Merge.’ This will take a few seconds. Once Lightroom is finished, you’ll have your combined image. Now, edit as normal.
So you’ve now taken care of the fieldwork and are now in front of your monitor wondering what is next. What to do with these three plus images of the same thing that you just took. Well, you may just discover that one of them looks great to you and you delete the others and edit the one. That is all fine and dandy, and by no means does that mean the process was wasted time. This tutorial, however, is for the more likely conclusion that you’ll need data from each file in order to get the final product you’d like. It is important to point out, too, that this process is not about creating some over-saturated image for a ‘wow’ factor. This is a technique used to create a higher-quality image by pulling every bit of detail that you saw in the field.
How do we do now merge our images in Lightroom? Let’s say you have three images to use. Highlight all three images by holding down the ‘shift’ key. Right-click, scroll down to ‘Photo Merge,’ then select ‘HDR.’ You’ll be given a preview at this point. Leave ‘auto-align’ and ‘auto settings’ selected. Leave the ‘De-ghost Amount’ at none. Hit ‘Merge.’ This will take a few seconds. Once Lightroom is finished, you’ll have your combined image. Now, edit as normal.
That was a quick and dirty walk-through but will get your photo merged and ready to edit. If you’d like to learn more about using Adobe Lightroom, click here. And, of course, you are able to merge images in Photoshop, as well. Backcountry Journeys offers full-length courses on each of these post-processing applications, available in our exciting new and innovative format. Check it out today!

We offer world-class travel photography
experiences around the world.
Each tour is bundled with lodging, meals, and transportation between workshops included, allowing you to focus on photography instead of the stress of traveling.
experiences around the world.
Each tour is bundled with lodging, meals, and transportation between workshops included, allowing you to focus on photography instead of the stress of traveling.
Get Our Trip Catalog
Receive a trip catalog that highlights all of our upcoming photo tours and workshops.Schedule a Trip Consultation
Meet with a photo experience coordinator, and experience a personal touch to your booking experience.Landscape Guide
Receive a FREE Landscape Cheat Sheet Written By a Pro Photographer.Webinars
Our regularly hosted webinars provide photography instruction from our own guides on a wide range of topics.Education Portal
Explore our library of articles that cover everything from common questions, to in-depth guides on how to achieve that perfect shot.
Backcountry Journeys
Connecting Passionate People To
Exceptional Experiences.
Exceptional Experiences.
Business Hours:
Mon-Fri, 8AM-4PM MT
928-478-1521
adventure@backcountryjourneys.com
Mon-Fri, 8AM-4PM MT
928-478-1521
adventure@backcountryjourneys.com
arrow_drop_down_circle
Divider Text
All Images & Content Are Property Of Backcountry Journeys Photography Tours, Workshops & Safaris LLC - Copyright 2026
About Us
Receive a Digital Trip Catalog
Find an upcoming photography tour with our interactive catalog.