Mon - Fri: 8 am - 4 pm MT

About Backcountry Journeys
Why Choose Backcountry Journeys
If you're considering a photography trip, hear why Backcountry Journeys delivers the best experience in the industry.Frequently Asked Questions
If you're new to photography trips, or new to BCJ, you can find our common travel questions here.Fitness Levels
Our trips vary on physical intensity, and by reviewing our fitness levels, you can find out which trips may be more challenging, or aligned more closely with your comfort level.Meet The Crew
We've built an amazing team of experienced guides, and dedicated office staff that elevate your travel experience. Get to know their backgrounds, and hear their stories.Loyalty Program
We reward our frequent photo adventurers with exclusive discounts on amazing photography trips.Contact Us
If you need to get in touch with our office staff, or have additional business inquiries, you can find our information here.Refer a Friend
Know someone perfect for one of our tours? Recommend them through this quick form.Stay Up To Date On All Things
Backcountry Journeys
Backcountry Journeys
Our Photography Community
Our Webinars
Our regularly hosted webinars provide photography instruction from our own guides on a wide range of topics.Our Education Portal
Explore our library of articles that cover everything from common questions, to in-depth guides on how to achieve that perfect shot.Community Testimonials
We're proud to foster an amazing group of photo travelers, and here you can find their stories from their past adventures.Resources For Photographers
About Our Company
Resources For Photographers
About Our Company
Working in Lightroom Classic: Using Collections

Published December 22, 2019
Adobe Lightroom Classic is an extremely powerful photography-based application. Many photographers are aware of the impressive editing capabilities of Lightroom, but less know that Lightroom is one of the best photo organizing applications available. There are more applications available for processing and organizing photos than ever, but I still prefer and recommend Lightroom for both editing and organizing.
I want to cover a few basic tips and strategies for organizing your images in Lightroom and give you insight into what my organization process looks like. Editing is obviously one of the most important aspects of photography after shooting in the field, but that is not to say that organization isn’t important…it definitely is. In this article, I would like to cover Lightroom Collections and get into some key organizing strategies that hopefully will help you with your own photos.
What exactly is Lightroom?
At its core Lightroom is a RAW converter. It was designed to process the RAW data that is captured by our camera sensors. It processes that information and generates a preview, or picture that we can view and make adjustments to.
Lightroom has two important functions: acting as a database for images and offering the ability to post-process photos. We will focus on the first function in this article.
What’s a Catalog?
The foundation for Lightroom’s image management system is based around what Adobe calls, ‘the Catalog system.’ A Catalog (and a Lightroom Catalog for that matter) is a database that stores information about images. So when you import images into Lightroom, Lightroom doesn’t actually store the original files in its database, it stores a record of the images. The records contain three important pieces of information: a reference to the location of where the original photo/photo folder is stored, processing data (Develop Module adjustments), metadata – ratings, keywords, color labels, etc.
Here’s a visual of how the Catalog system works:
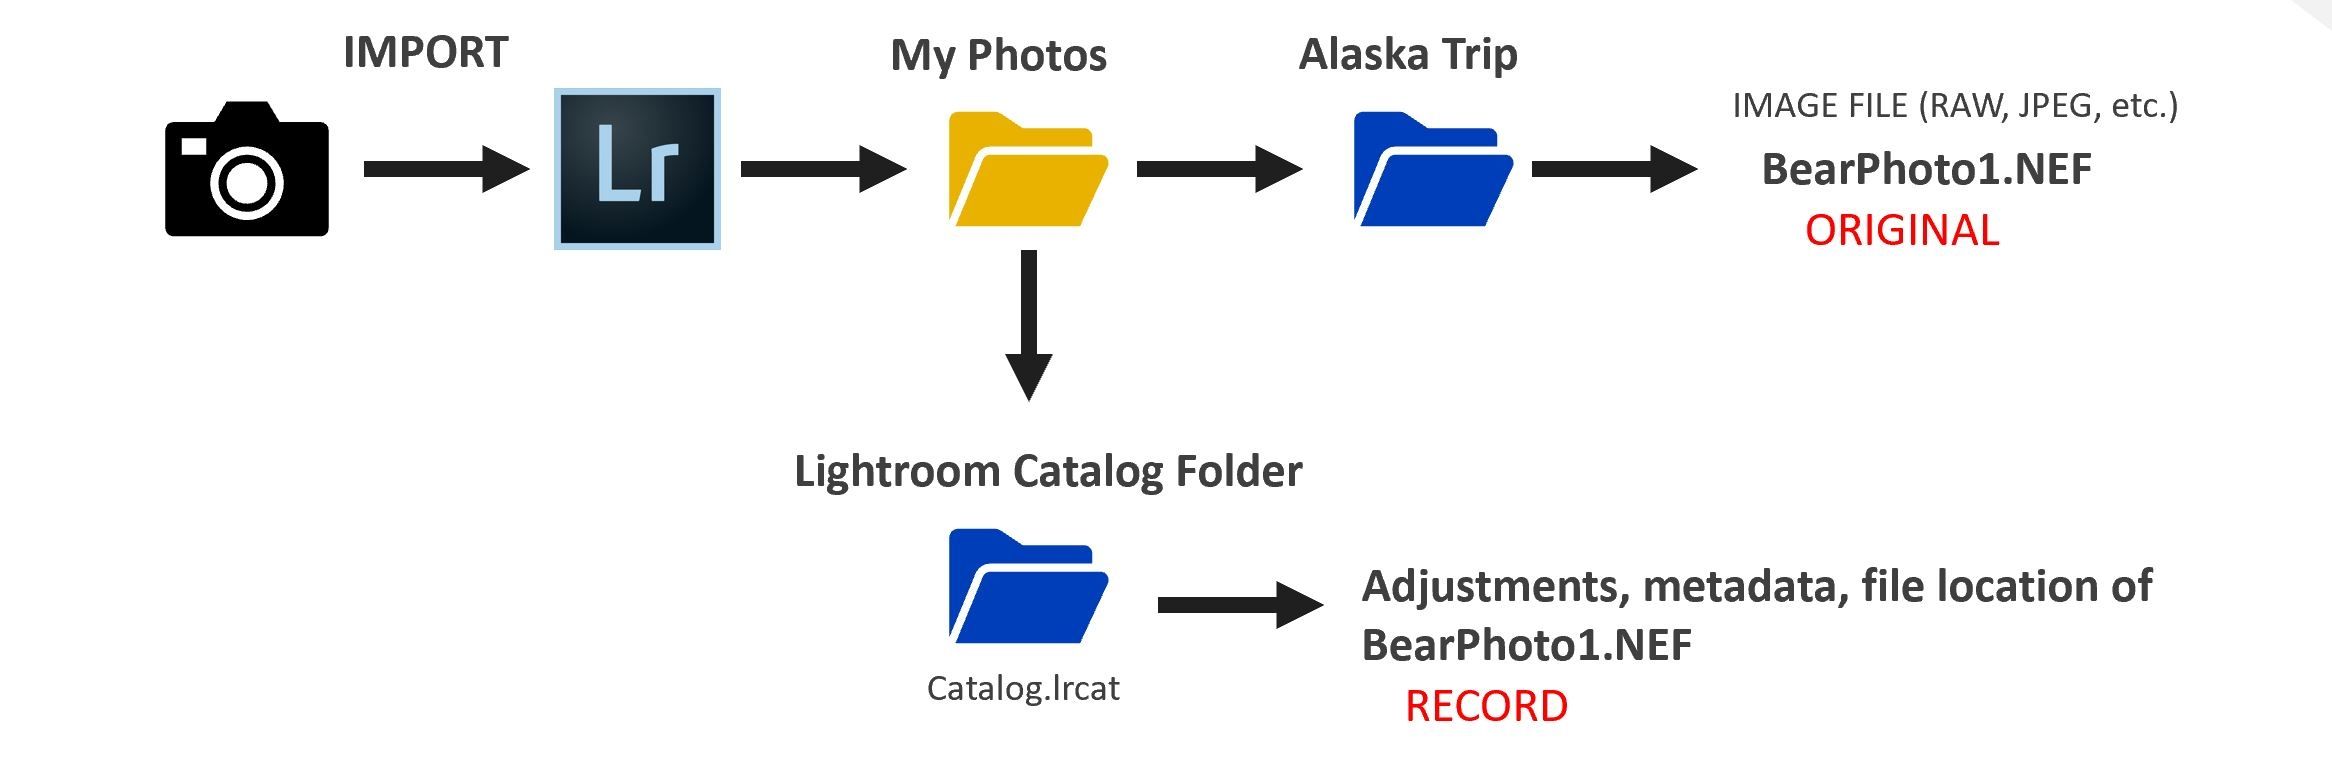
Because of the Catalog system, we are able to organize and edit images without actually ever affecting the original files, which is one of the key features of Lightroom.
What are Collections?
Collections are Lightroom-specific and a way to organize your images within Lightroom. They are a GREAT way to organize your images within the application. They are extremely powerful and can accommodate any organizing system you wish to use.
Collections never alter the location or information of your original images. You can think of Collections like music playlists. You can add songs to a playlist, but those songs are still located in your main music library, their location never changes and a playlist is not doing anything to the original file. But, a playlist IS organizing your songs in a way that you like. Collections are very similar.
I am sure many of you out there are using Lightroom Collections to organize, but I am also sure that there are many of you who are using Lightroom and not using Collections. I actually just started using Collections recently, and they have really improved my organization, workflow, and general editing efficiency. No matter if you are new to Collections or a seasoned vet, the following sections will have good information that you can apply to your own workflow.
Types of Collections
Collections are groups of photos within a catalog. They allow for easy access to photos but also represent the best way to organize photos in Lightroom. Collections do not create duplicates of photos, and photos can be in multiple collections. The ‘Collections’ tab in Lightroom remains in the left panel of Lightroom across all modules, allowing for quickly accessing different photos (it is the only tab to stay static from module to module).
There are four types of Collections:
- Collection Set
- A set that includes one or more collections.
- Regular Collection
- A group of any photos you choose to put in a group.
- Smart Collection
- Collections based on metadata rules that you define.
- For example, you can create a smart collection of all photos that have a 3-star rating and red color label.
- Smart collections automatically include all photos that meet the criteria.
- Photos cannot be added or removed manually.
- Quick collection
- A temporary group of photos that can be quickly added and removed.
- Only one Quick Collection per Catalog.
- The only collection type not housed within the Collection tab, it is found under the Catalog tab.
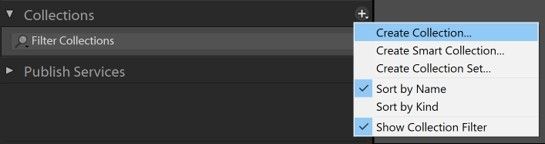
Creating Collections
Creating Collections is easy. You can either navigate to the Collections tab in the left panel or go to Library -> New Collection (or Smart Collection or Collection Set). You can choose to nest (or place) a Collection Set, Regular Collection, or Smart Collections into a previously created Collection Set.
Adding Photos to a Regular Collection
There are two ways to add photos to a Regular Collection.
- Select all photo(s) you want to be added and then create a Regular Collection.
- Drag and drop images from Grid View into the Regular Collection.
Adding Photos to a Smart Collection
Smart Collections are populated automatically by Lightroom based on whatever criteria you define.
There are many different criteria available – Rating, Pick Flag, Label Color, Label Text, Has Smart Preview, Has Snapshots, Source, File Name/Type, Date, Camera info, Location, Other Metadata, Develop, Size, and Color. The snapshot below shows the Smart Collection creation pop-up.

For instance, if you want to create a collection that includes all of your flagged photos in Lightroom, you would choose -> Pick Flag is Flagged. Lightroom will then automatically add all flagged photos to the Collection. When you import new photos and flag some of those, Lightroom will immediately add those photos to the collection as they are added. As you can see, Smart Collections are a very powerful organizing tool.
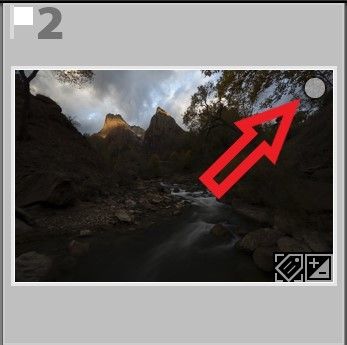
Adding Photos to a Quick Collection
To add a photo to the Quick Collection, Right-Click the photo and go to ‘Add to Quick Collection’ or click the circular icon in the top right of the photo thumbnail in the Filmstrip bar. You can also press ‘B’ on the keyboard to add photo(s) to the Quick Collection.
I tend to not use the Quick Collection often in my own workflow, but it can be useful. It is a way to quickly group photos. You can convert a Quick Collection to a Regular Collection at any time as well, by right-clicking the Quick Collection.
How I Organize Using Collections
I use Collections to organize my photos in the following way:
All trips (Collection Set) -> Specific Trip (Collection Set) -> All Photos (Regular Collection) + Favorite Photos (Smart Collection) + Edited Photos (Smart Collection)
For instance, my recent fall trip to Zion National Park is organized like this:
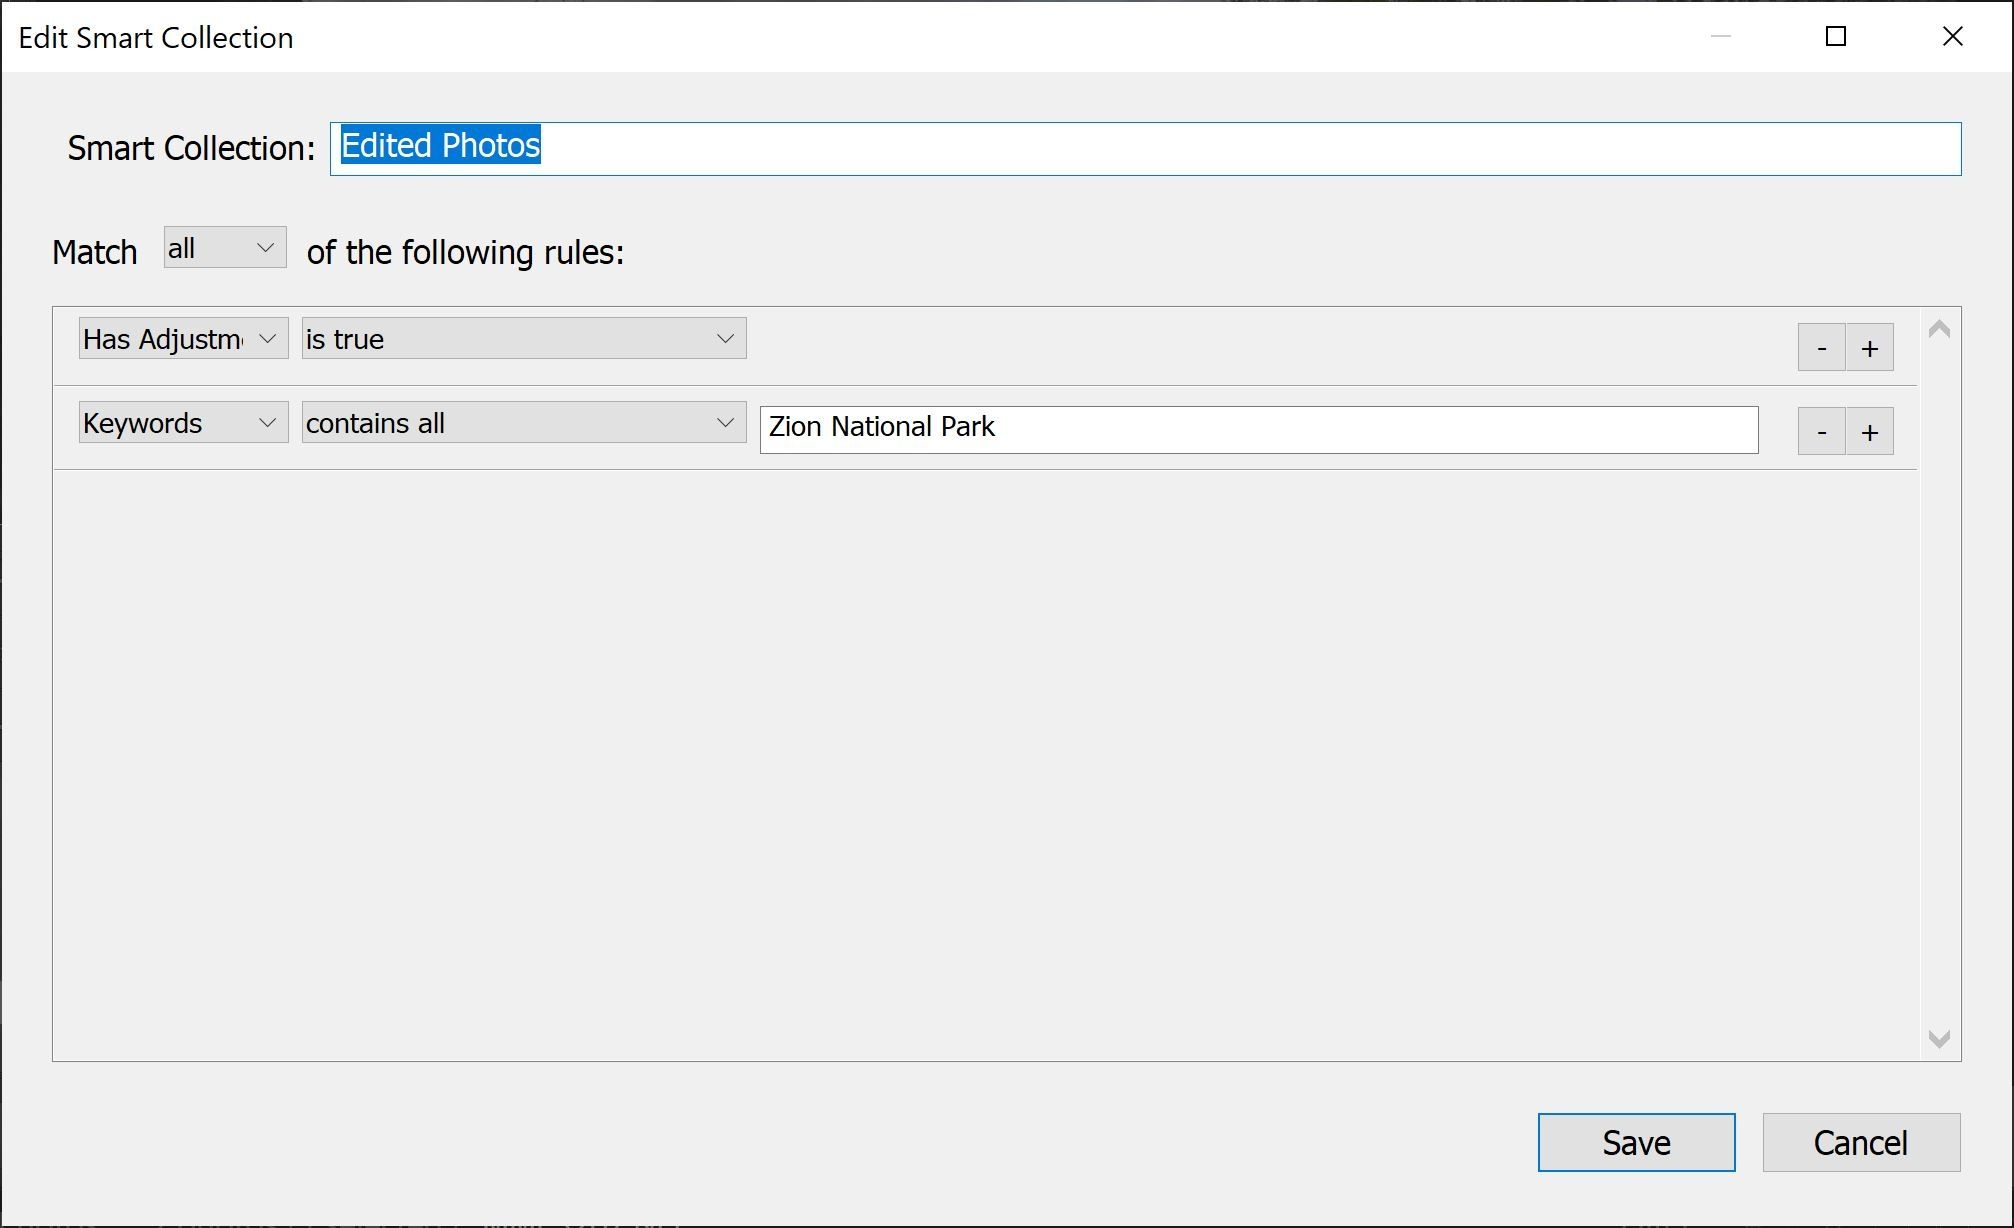
All trips (Collection Set) -> Zion National Park (Collection Set) -> All Photos (Regular Collection) + Favorite Photos (Regular Collection) + Edited Photos (Smart Collection)
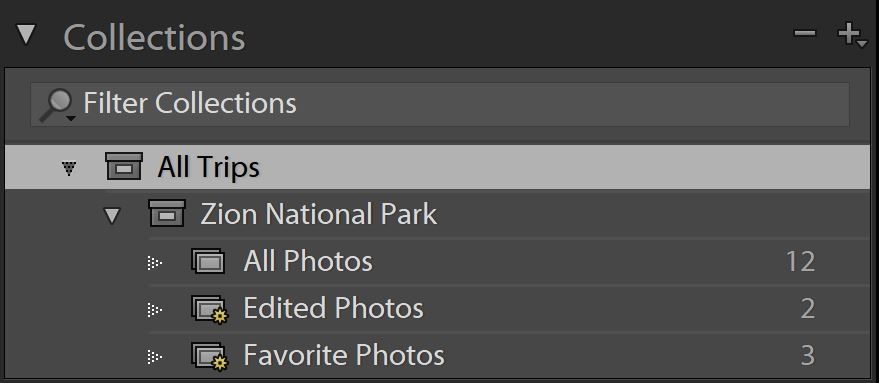
My top-level collection is ‘All Trips’, which is a Collection Set. This set contains photos from every single photo trip that I have taken. My specific trips are organized as Collection Sets as well (Zion National Park), but they are housed within my top-level Collection Set (All Trips). I then have one Regular Collection (All Photos) and two Smart Collections (Favorite Photos and Edited Photos) within each specific trip.
When I imported my photos from Zion National Park, I put all of them in ‘All Photos’ (Regular Collection). I then created two Smart Collections with the following criteria:
Favorite Photos
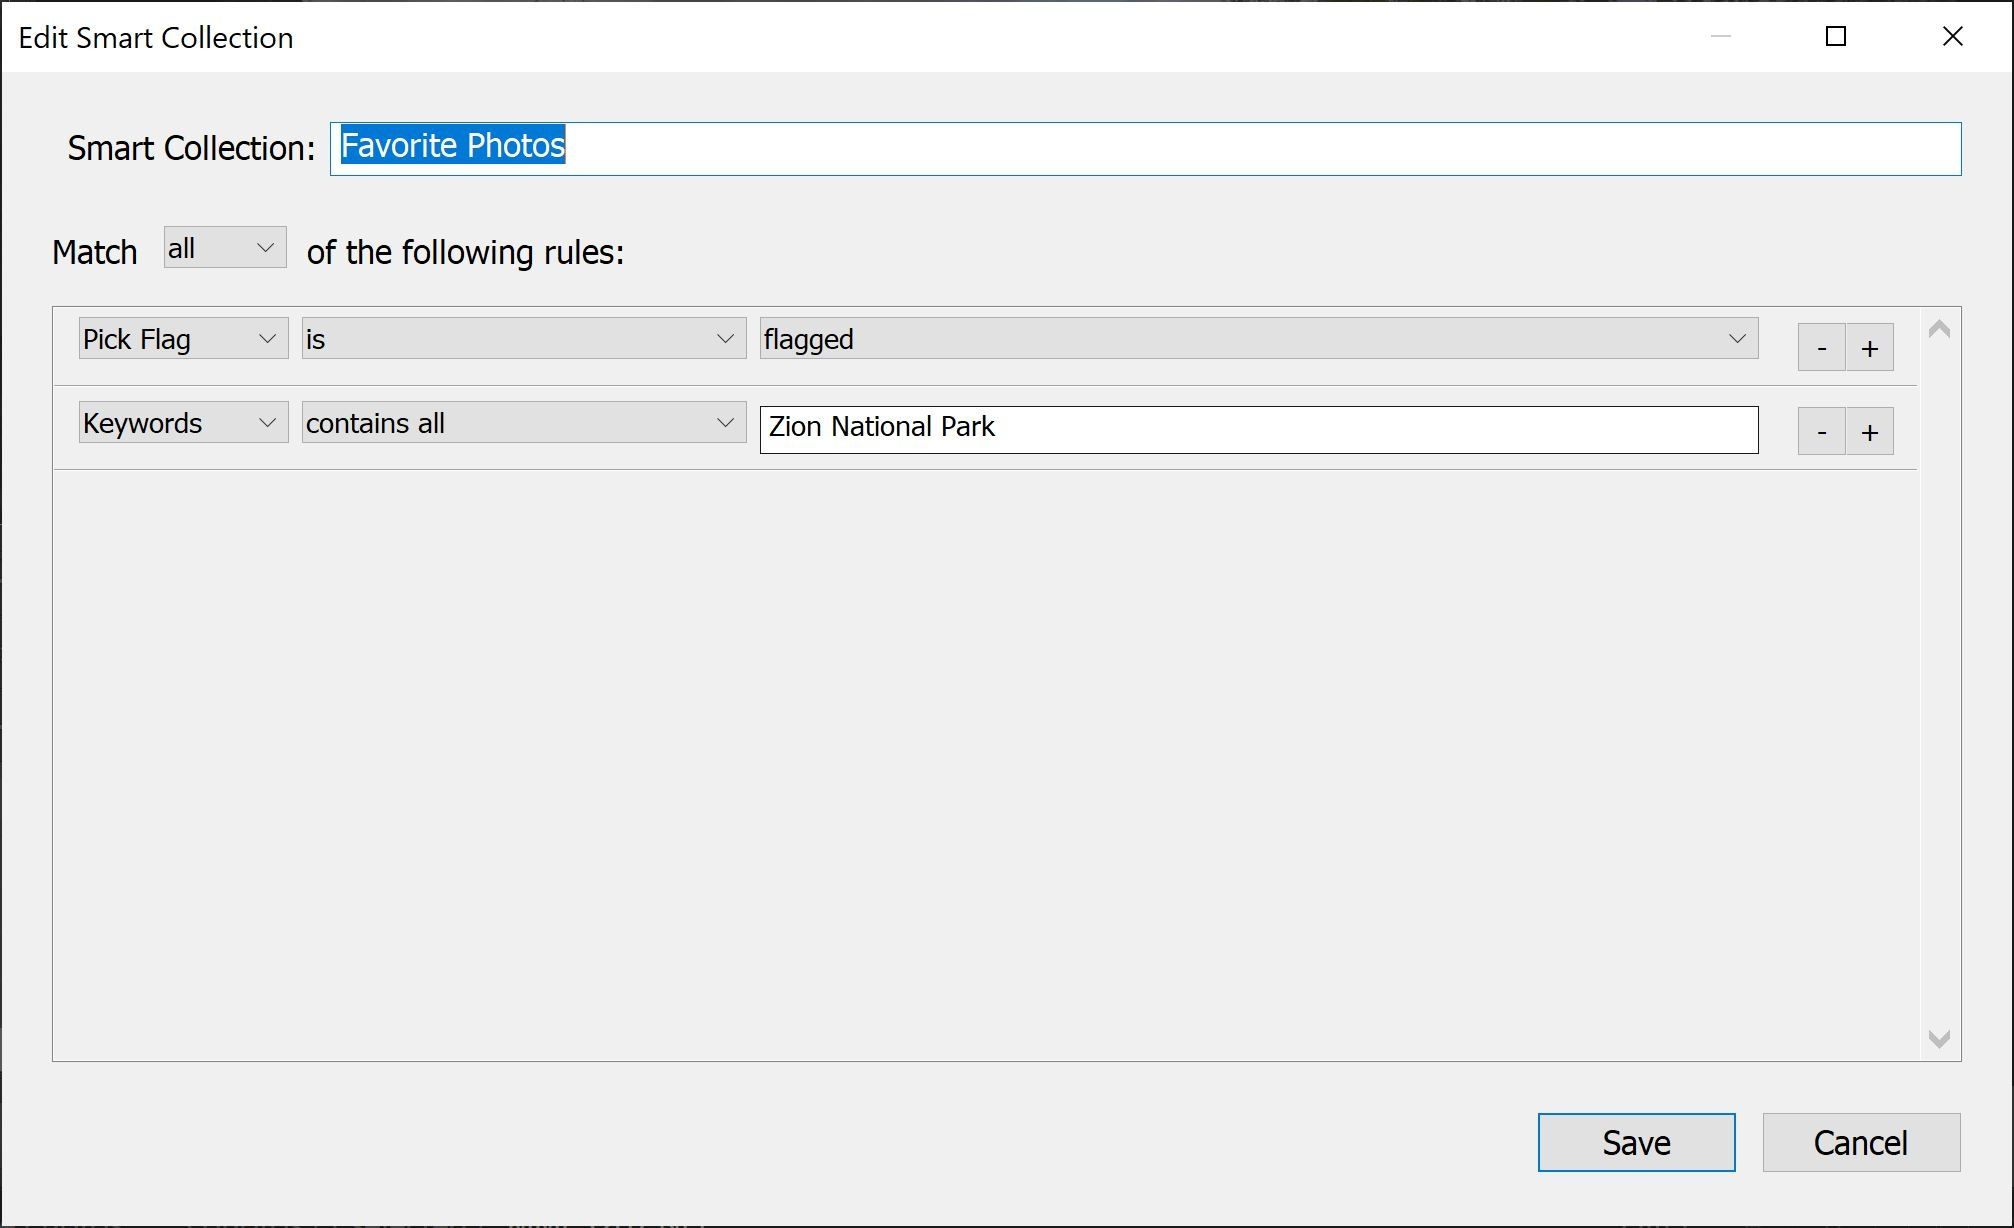
Edited Photos
The first Smart Collection, Favorite Photos, includes all of my flagged selections from Zion National Park. When I go through my photos from the trip, I turn on Auto-Advance by pressing the Caps Lock key and I then press ‘P’ to flag a favorite, or ‘X’ to reject an image. With Auto-Advance on, Lightroom will immediately go to the next photo in line after I press ‘P’ or ‘X’. All of my flagged photos, which I use to designate my favorites, go into the Favorite Photos Smart Collection.
I like to keep track of photos that I have edited or am editing so I create another Smart Collection to organize those, Edited Photos. With the set criteria, whenever I make adjustments in the Develop Module to a Zion National Park photo, it will go into that Smart Collection.
Keywords
Now, you will notice for the criteria in both Smart Collections, my second rule was ‘Keywords contains all Zion National Park.’ One of the only shortcomings of Smart Collections is they cannot be restricted to a specific Collection Set. So, if I didn’t include that keyword rule, the Smart Collection would contain every flagged photo in my Lightroom Catalog. I get around that by keywording my images during import or in the Library Module. For all the imported Zion National Park photos, I added the keyword tag ‘Zion National Park’ so I could restrict my Smart Collections to only include flagged and edited photos from Zion National Park (or in other words, only photos from the ‘All Photos’ Collection within the ‘Zion National Park’ Collection Set).
Hence, I recommend keywording your images if you use this example organizational structure. If you take multiple trips to a place, you will have to be more specific with your keywords, for example, ‘Zion National Park 2019’ or ‘Zion National Park Fall 2019’.
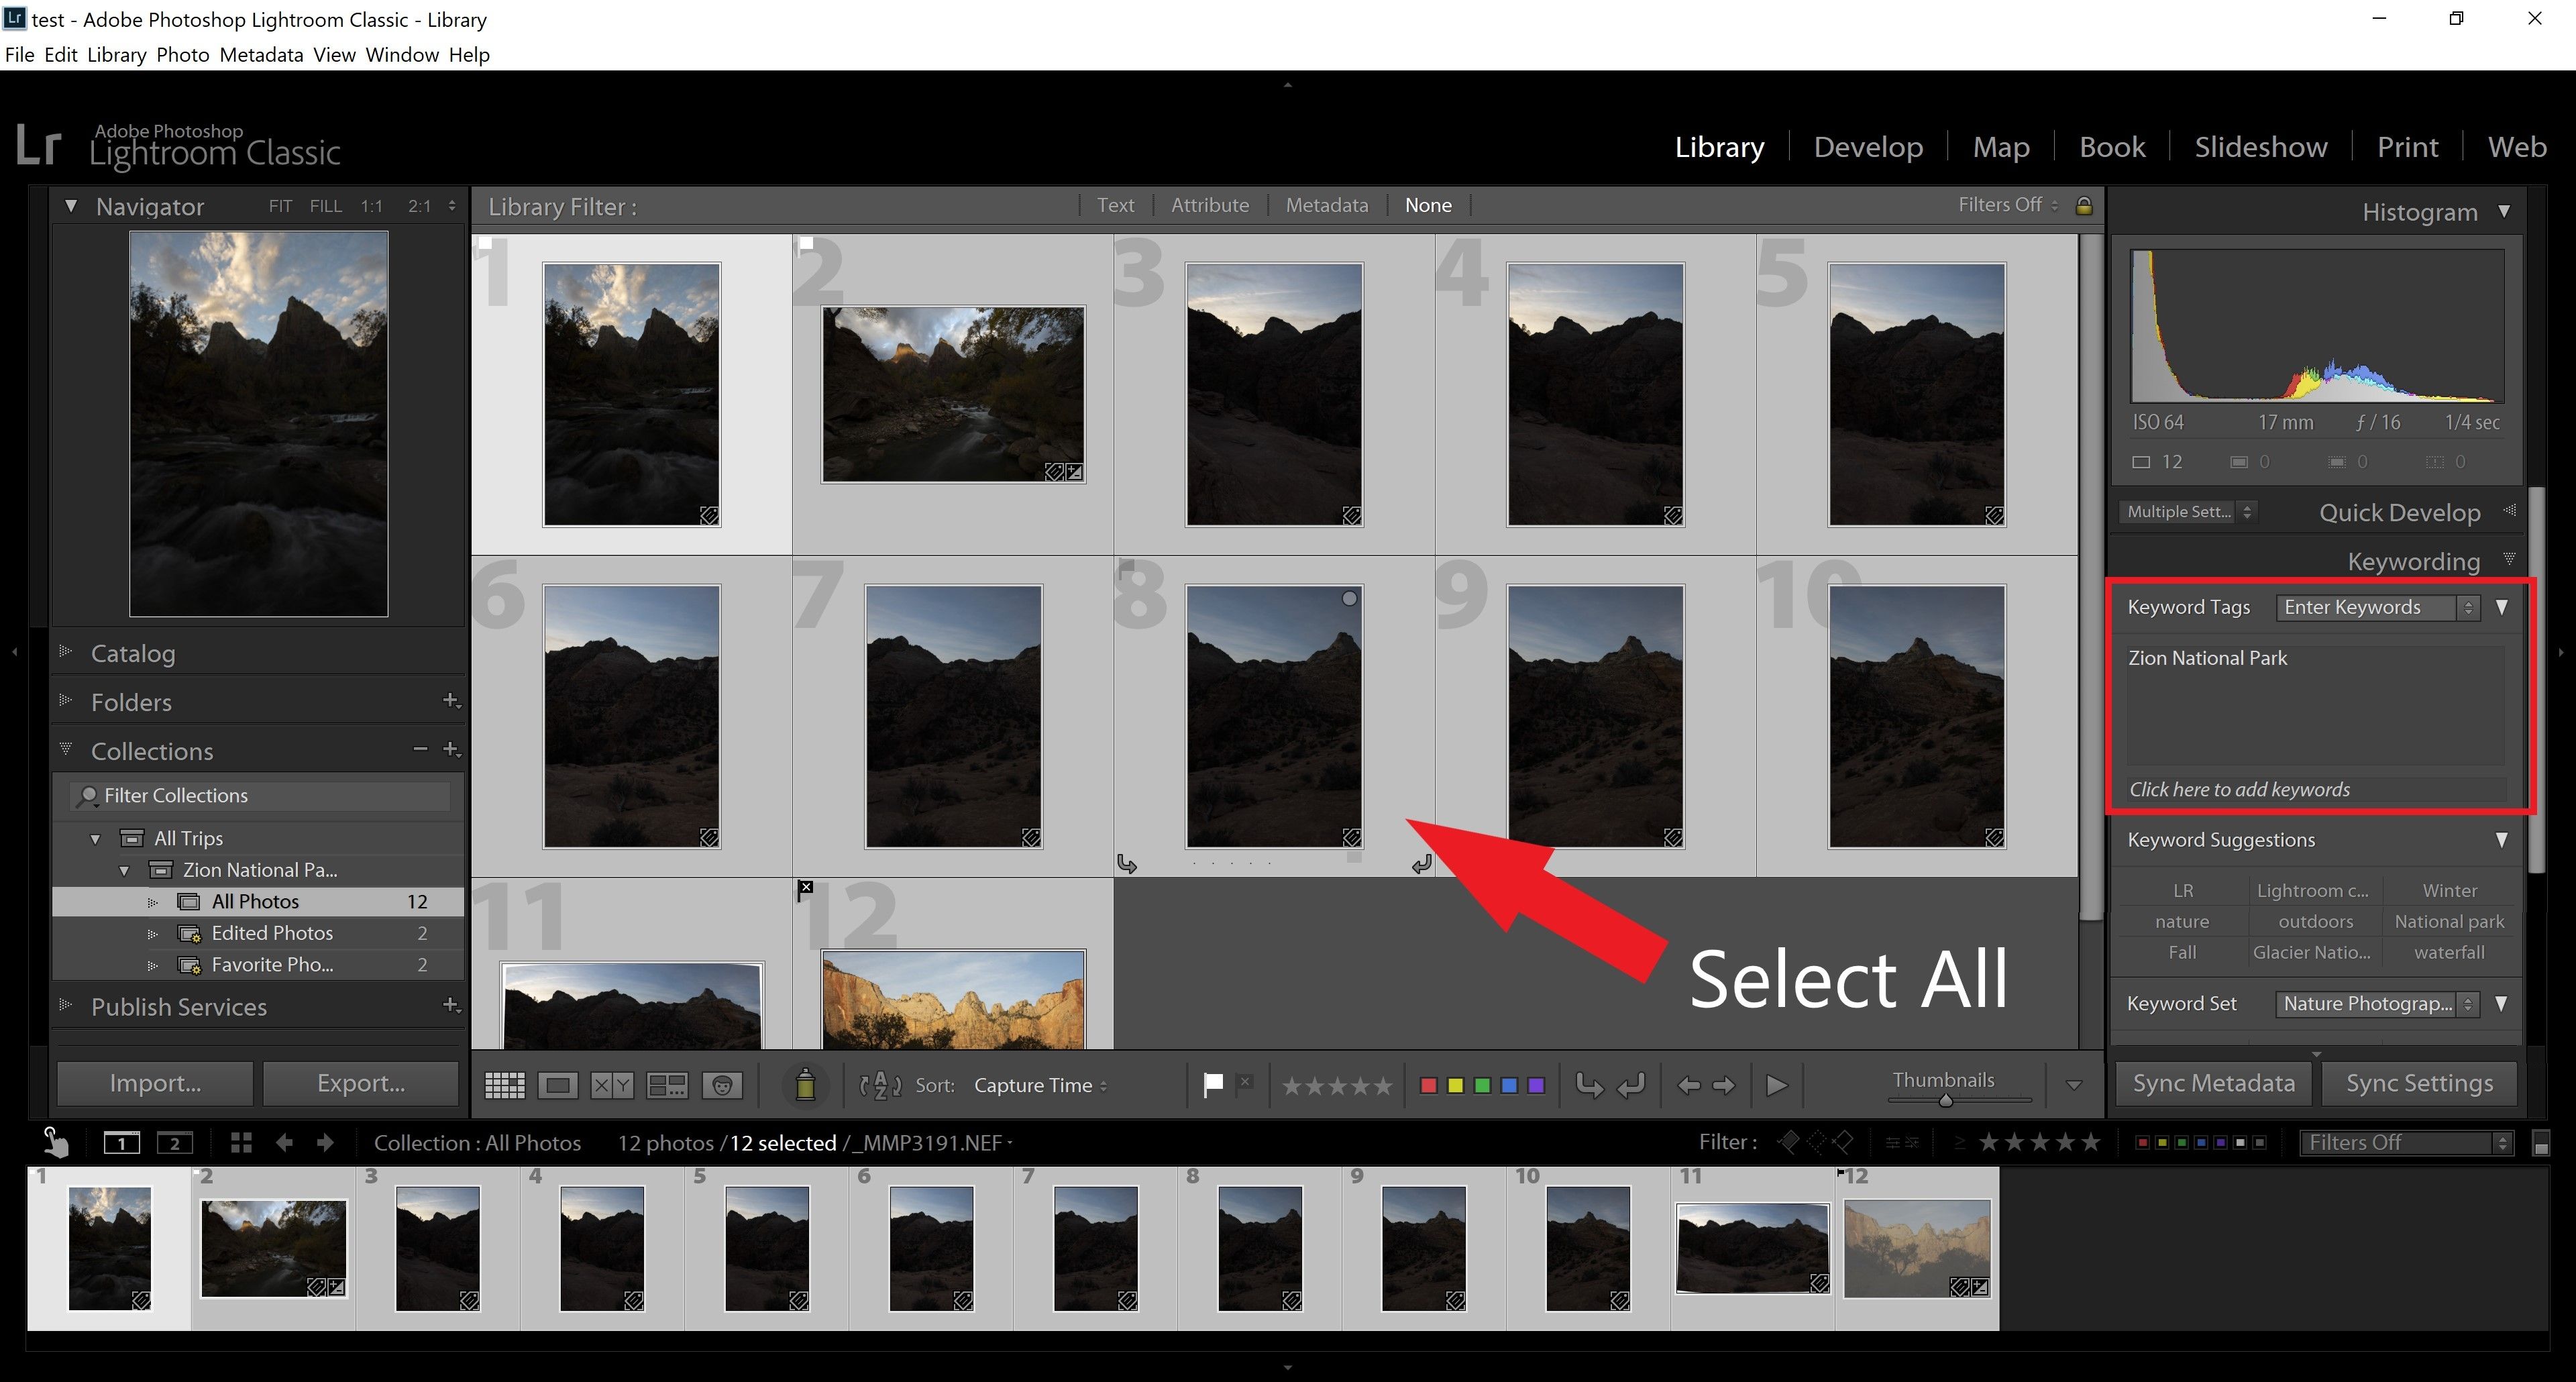
Keywording in the Library Module is relatively straightforward. I import all my photos, then add all my photos from a trip to the Regular Collection ‘All Photos’ within the respective trip Collection Set. I then select that ‘All Photos’ Collection to bring up the photos I just added. From there, I go into Grid View in the Library Module and select all photos by selecting one photo and pressing Ctrl+A (Command+A on Mac OS). After that, I go to the Keywording section in the right panel and add my keyword tags. See below for an example photo.
The Target Collection
Lightroom also has what’s called a designated Target Collection. There can only be one Target Collection and it can be set to any Collection in your Catalog. By default, the Quick Collection is the set Target Collection of Lightroom. When a Collection other than the Quick Collection is the designated Target Collection, a photo is added to the Target Collection when you press ‘B’ on the keyboard or click the circular icon in the top right corner of the thumbnail (instead of the Quick Collection). I leave the Quick Collection as the set Target Collection, but if you want to quickly add photos to a Regular Collection, I recommend designating that respective Collection as your target.
Summary
Collections are straightforward to use and one of Lightroom’s best features. Of course, editing our photos is the number one priority, but using Lightroom’s powerful organizational tools will make your workflow more efficient and save you time that you can put towards actual editing.
The Collection organizational structure I’ve laid out here is just one of the hundreds of different ways you can organize your photos. If it makes more sense for you to organize your Collections based on a star rating, color label, or specific keywords…you can do that. The possibilities are literally endless.
Let us know if this helped, and also if you use a specific organization system within Lightroom that you have found to work really great.

We offer world-class travel photography
experiences around the world.
Each tour is bundled with lodging, meals, and transportation between workshops included, allowing you to focus on photography instead of the stress of traveling.
experiences around the world.
Each tour is bundled with lodging, meals, and transportation between workshops included, allowing you to focus on photography instead of the stress of traveling.
Get Our Trip Catalog
Receive a trip catalog that highlights all of our upcoming photo tours and workshops.Schedule a Trip Consultation
Meet with a photo experience coordinator, and experience a personal touch to your booking experience.Landscape Guide
Receive a FREE Landscape Cheat Sheet Written By a Pro Photographer.Webinars
Our regularly hosted webinars provide photography instruction from our own guides on a wide range of topics.Education Portal
Explore our library of articles that cover everything from common questions, to in-depth guides on how to achieve that perfect shot.
Backcountry Journeys
Connecting Passionate People To
Exceptional Experiences.
Exceptional Experiences.
Business Hours:
Mon-Fri, 8AM-4PM MT
928-478-1521
adventure@backcountryjourneys.com
Mon-Fri, 8AM-4PM MT
928-478-1521
adventure@backcountryjourneys.com
arrow_drop_down_circle
Divider Text
All Images & Content Are Property Of Backcountry Journeys Photography Tours, Workshops & Safaris LLC - Copyright 2026
About Us
Receive a Digital Trip Catalog
Find an upcoming photography tour with our interactive catalog.