Mon - Fri: 8 am - 4 pm MT

About Backcountry Journeys
Why Choose Backcountry Journeys
If you're considering a photography trip, hear why Backcountry Journeys delivers the best experience in the industry.Frequently Asked Questions
If you're new to photography trips, or new to BCJ, you can find our common travel questions here.Fitness Levels
Our trips vary on physical intensity, and by reviewing our fitness levels, you can find out which trips may be more challenging, or aligned more closely with your comfort level.Meet The Crew
We've built an amazing team of experienced guides, and dedicated office staff that elevate your travel experience. Get to know their backgrounds, and hear their stories.Loyalty Program
We reward our frequent photo adventurers with exclusive discounts on amazing photography trips.Contact Us
If you need to get in touch with our office staff, or have additional business inquiries, you can find our information here.Refer a Friend
Know someone perfect for one of our tours? Recommend them through this quick form.Stay Up To Date On All Things
Backcountry Journeys
Backcountry Journeys
Our Photography Community
Our Webinars
Our regularly hosted webinars provide photography instruction from our own guides on a wide range of topics.Our Education Portal
Explore our library of articles that cover everything from common questions, to in-depth guides on how to achieve that perfect shot.Community Testimonials
We're proud to foster an amazing group of photo travelers, and here you can find their stories from their past adventures.Resources For Photographers
About Our Company
Resources For Photographers
About Our Company
Understanding Aperture – Part 1

Published January 28, 2019
Aperture is an often overwhelming concept for the budding photographer. Numbers, ratios, and mathematics can often complicate a fairly simple concept.
There’s an endless amount of conversation that can result in a lot of head scratching when trying to understand aperture, but hopefully I can shed some light on what it is that your aperture is doing, what effect it has on your images, and why it is crucial to creating powerful and compelling photographs.
What is Aperture?
If you recall the intro to our “How to” series, Welcome to Photography, you’ll already be familiar with the format for referencing your camera’s aperture setting. But you may be wondering, why do we use that format, and where does the “f/” come from? Why can’t we simply say the aperture is 4? Why don’t we say A4? Well, to understand that, you’ll need to understand what an aperture does.
Webster’s dictionary defines aperture as “the opening in a photographic lens that admits the light.” This definition refers to aperture as a physical object, and is referring to a mechanical component inside each camera lens. Aperture can also be referred to as a setting in the camera, and as such is defined as “The diameter of the stop in an optical system that determines the diameter of the bundle of rays traversing the instrument.”
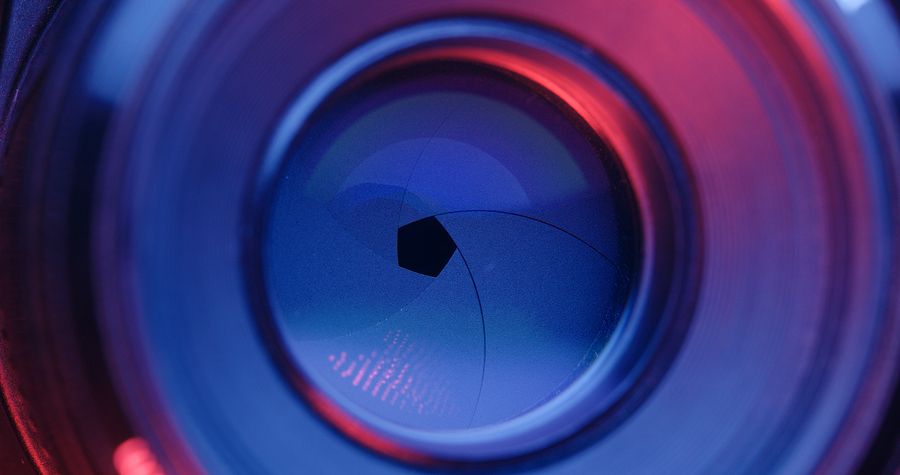
An up close look at the aperture opening and the blades that help to adjust the size of that opening.
Both definitions are accurate, but reference different things. One is simply referencing the mechanized opening in the lens, while the other is referencing the size of that opening. As we move forward, both definitions will be used interchangeably, but for the most part, we will be referencing the second definition, referring to the size of the opening in the lens as it relates to your camera’s settings and the effect had on an image.
In a lens, the aperture is responsible for managing the functional quantity of light emitted through the lens. Where ISO effects the camera’s sensor, and shutter speed effects how long that sensor is exposed to light, the aperture is entirely contained within the lens and is mechanism for adjusting light emitted through the lens. Aperture is also a value determined by focal length in relation to the diameter of the opening allowing light to hit the sensor, given as a ratio f/x. The “f” in your aperture value stands for Focal Length. Your aperture value is determined by the lens’ focal length divided by the diameter of the aperture opening. Thus, a 100mm focal length lens with an aperture opening of 50mm would result in an aperture value of 2.
Going back to high school algebra, we can replace the focal length with a value “f” and know that as long as the aperture diameter is half the focal length, the given “f/” value is still 2. The result of this formula allows a 200mm lens to allow the same amount of light through at f/4 as a 50mm lens will at f/4. Since the 50mm lens is capturing light from a wider area, it receives more light initially, but the smaller aperture diameter will manage the volume of light so that the image isn’t blown out. A 200mm lens will have a smaller space that it is capturing light from, but the larger opening offsets this discrepancy and you can be sure both images will then receive the same effective quantity of light.
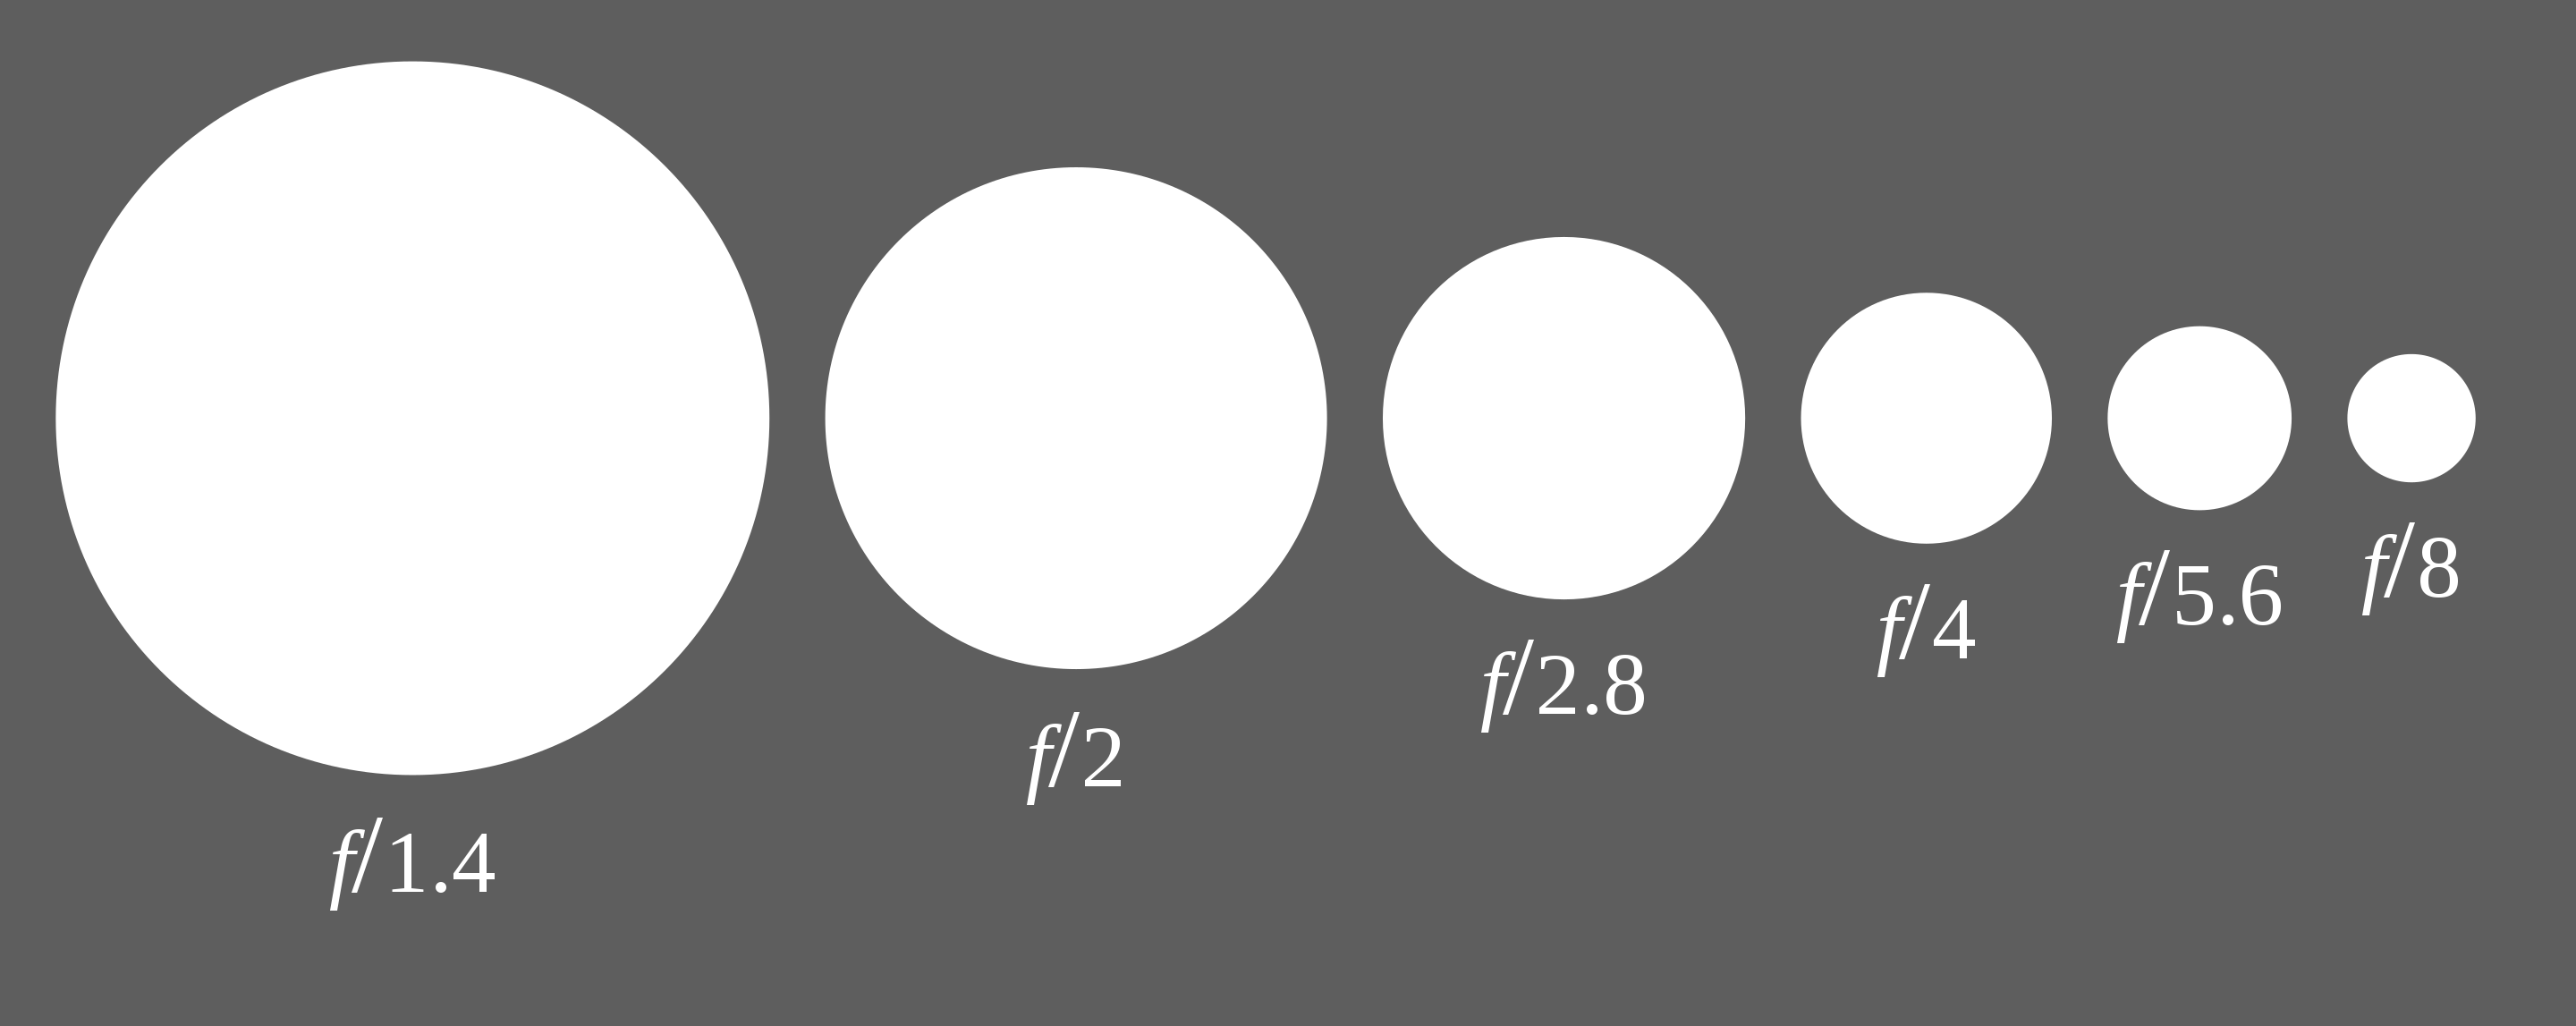
Here you can see the different sizes associated with different aperture values. Each “stop” doubles the diameter of the opening. Credit: Wikimedia Commons
While this is certainly bound to confuse more than a few readers, the important thing to understand is that aperture diameter changes at different focal lengths in order to maintain the same aperture value (and thus the same effective quantity of light). Think of it as an equation with f representing your focal length in millimeters, over a set aperture value (ie 2.8), which will give you a set aperture diameter in millimeters, which correlates to light projection through an object. This sort of conceptual mathematics is also what should help you to understand that the lower the aperture value number (ie. f/2.8), the MORE light will be allowed through the lens, while a higher aperture value number (f/22) will let LESS light through the lens. This is due to the inverse nature of dividing the focal length by the size of the opening. As the opening shrinks (referred to as a narrower aperture) the resulting number gets larger.
If you’re thoroughly confused, talk to your high school math teacher, or just know that with aperture, smaller numbers equate to more light and wider openings, while higher numbers mean less light due to smaller openings. It’s backwards. And it’s math. But most importantly, know that it’s backwards. As far as I know, this is the only place in photography that this happens, and as such can be tough to wrap your head around, but once you get it, hopefully it will stick.
What is an F Stop?
While studying aperture and aperture values, you may have heard the term F stop thrown around from time to time, and may be wondering what that’s all about. While a “stop” change amounts to twice or half the amount of light, regardless of the mechanism used to make that change, the term “F stop” is referring to a stop of light as it relates to aperture, or effectively the difference in quantity of light when doubling the aperture value. As such, F stop and aperture value are often used interchangeably.
The term stop can be used when adjusting ISO, shutter speed or aperture, and as such can be a little misleading when only referring to a camera’s aperture value or “F stop.” It can get even more confusing because most modern cameras allow the user to change aperture values in increments of ⅓ stop values. Therefore, while f/2.8 to f/4 is considered one full stop (as the size of the aperture effectively doubles, thus doubling the amount of light), to change your F stop from f/4 to f/4.5 is not a full stop.
This can be a little misleading for folks when they start trying to change their F stop one stop. As a result, I typically use the term aperture value, and avoid using the term “stop” unless I mean to have someone actually double their exposure.

The f/ value break down of a system that allows ⅓ stop adjustments in aperture with full stops highlighted in blue. Each full stop adjustment will double your total light exposure.
What can I do with aperture?
Now that you understand what an aperture is, and what’s happening inside your camera when you change it, you may be wondering what to do with this new knowledge. There are two main things that happen when changing your aperture. The first, mentioned above, is that you can change the amount of light hitting your camera’s sensor. This will help you to balance your use of the exposure triangle by giving you an additional tool for changing the overall exposure of your image. Similar to shutter speed and ISO, aperture allows you a technique for brightening or darkening an image in accordance with the varying values.
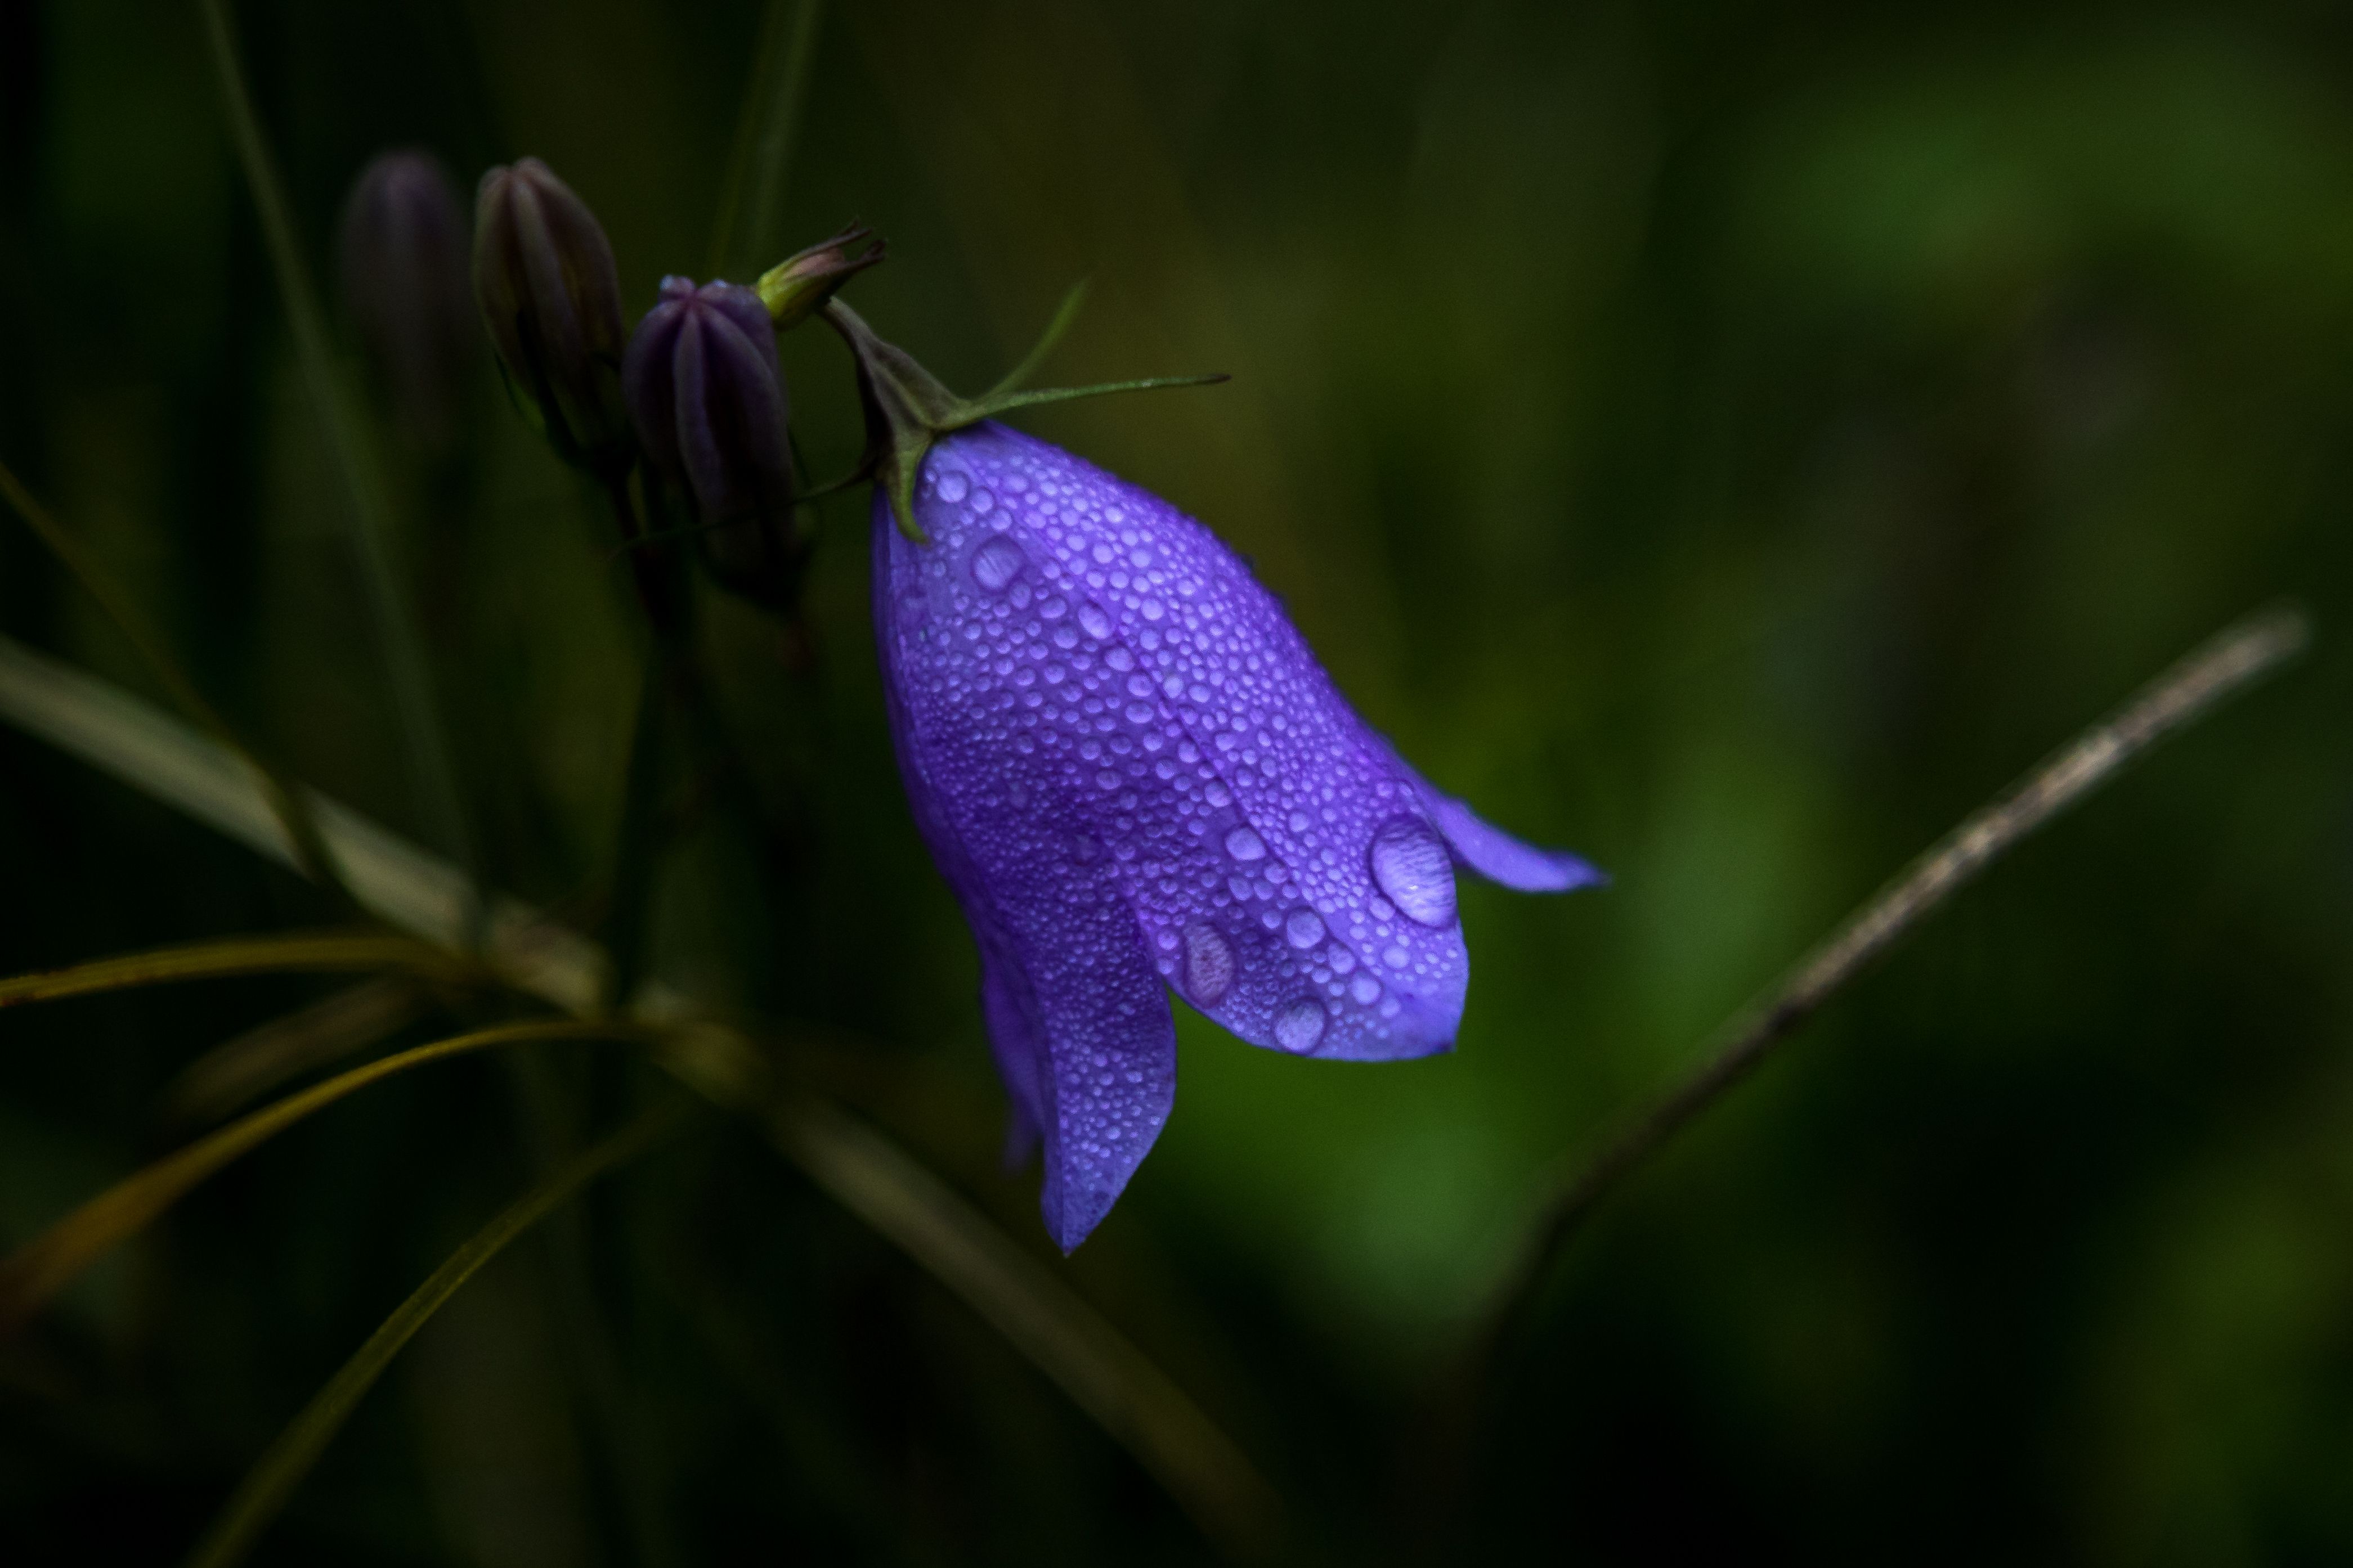
This Harebell was captured at f/2.8 at 35mm to ensure an extremely high depth of field to isolate the flower from the background. Photo Credit: Chris Gheen
The other thing that happens as you change your aperture is you will begin to notice variations in your image’s depth of field. Depth of field is what allows the photographer to separate their subject from the foreground or background through the use of blur known as bokeh (pronounced Boh-kay). By maximizing your depth of field, the photographer can present an image that is less distracting and emphasizes a given subject exclusively (see my recent post on understanding composition to understand why this is beneficial). This is done at low (or wide) aperture values, and is exaggerated at longer focal lengths. As the diameter of the aperture opening, and as a result, the aperture value change, the depth of field will change also due to the size of the space the light is moving through. Wide apertures have a shallower depth of field (meaning less of the frame is in focus) while narrow apertures (higher numbers) have a broader depth of field (more of the frame is in focus. In landscape photography, typically it is better to use higher aperture values, to ensure more of your frame is in focus. When shooting wildlife or portraits however, it’s often better to use lower aperture values to help isolate the subject. We’ll discuss in more detail the methods of managing the depth of field in part 2 of our Understanding Aperture post.
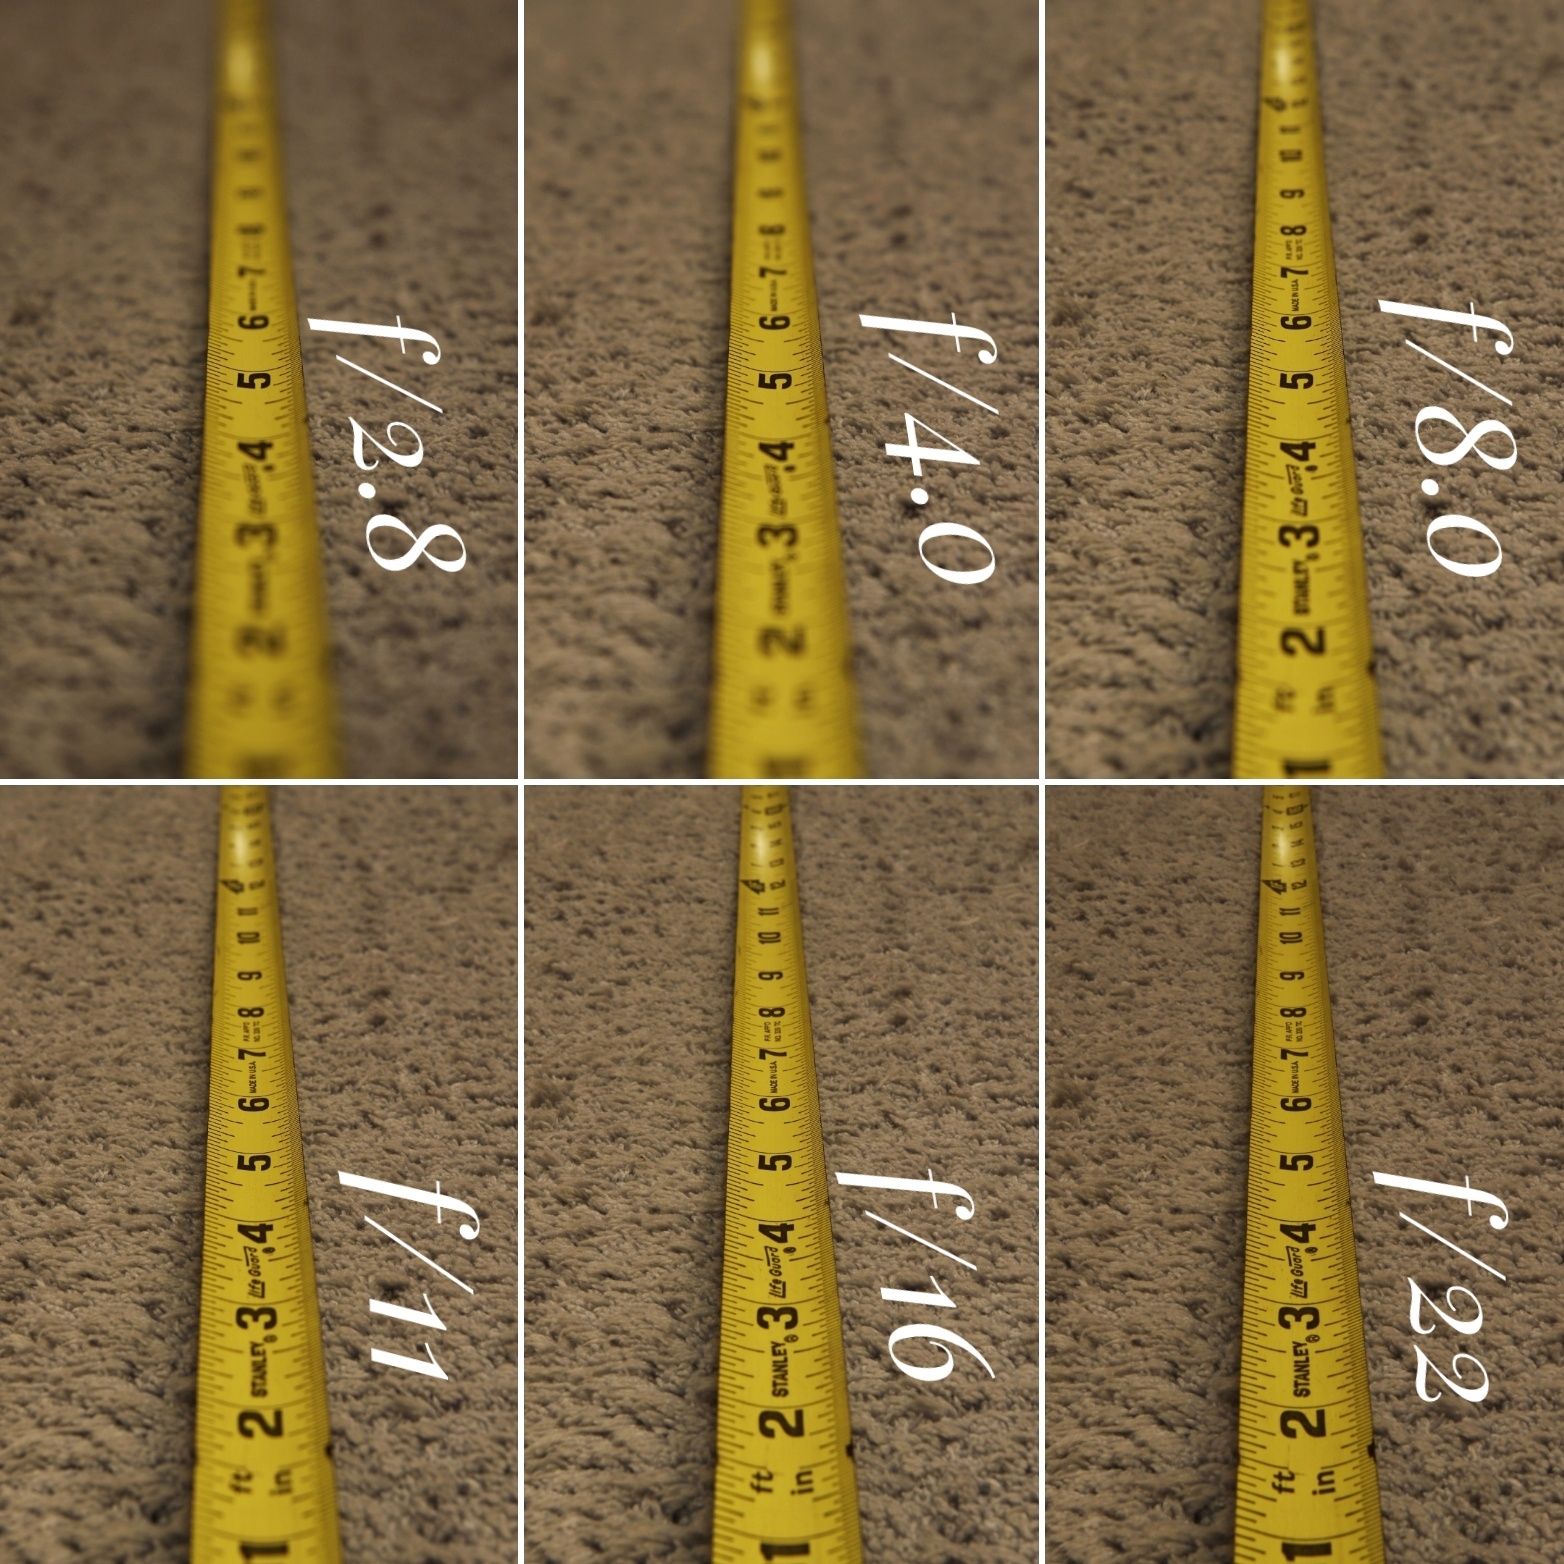
This diagram shows the change in depth of field at various aperture values. These images were all shot on aperture priority mode to ensure the same exposure at the varying aperture values. The focus point was fixed on the 5 inch mark at 35mm and shot in portrait orientation on a Canon 7D Mkii. Photo Credit: Chris Gheen
At any given aperture value, the separation between subject and background is also more prevalent at longer focal lengths. As you zoom in, the depth of field will get shallower (creating more separation), while maintaining the same f/ value because the camera is able to further isolate the subject, and because of the math mentioned above. When you look at high caliber animal portraits, you’ll often notice that there is great separation between subject and background, and this is due to the often high focal length and low aperture value used on the lens that the image was captured with. This is why we often encourage guests on our Yellowstone Wildlife Safari to bring as long of a lens as they can get their hands on, with as low of an aperture as possible.
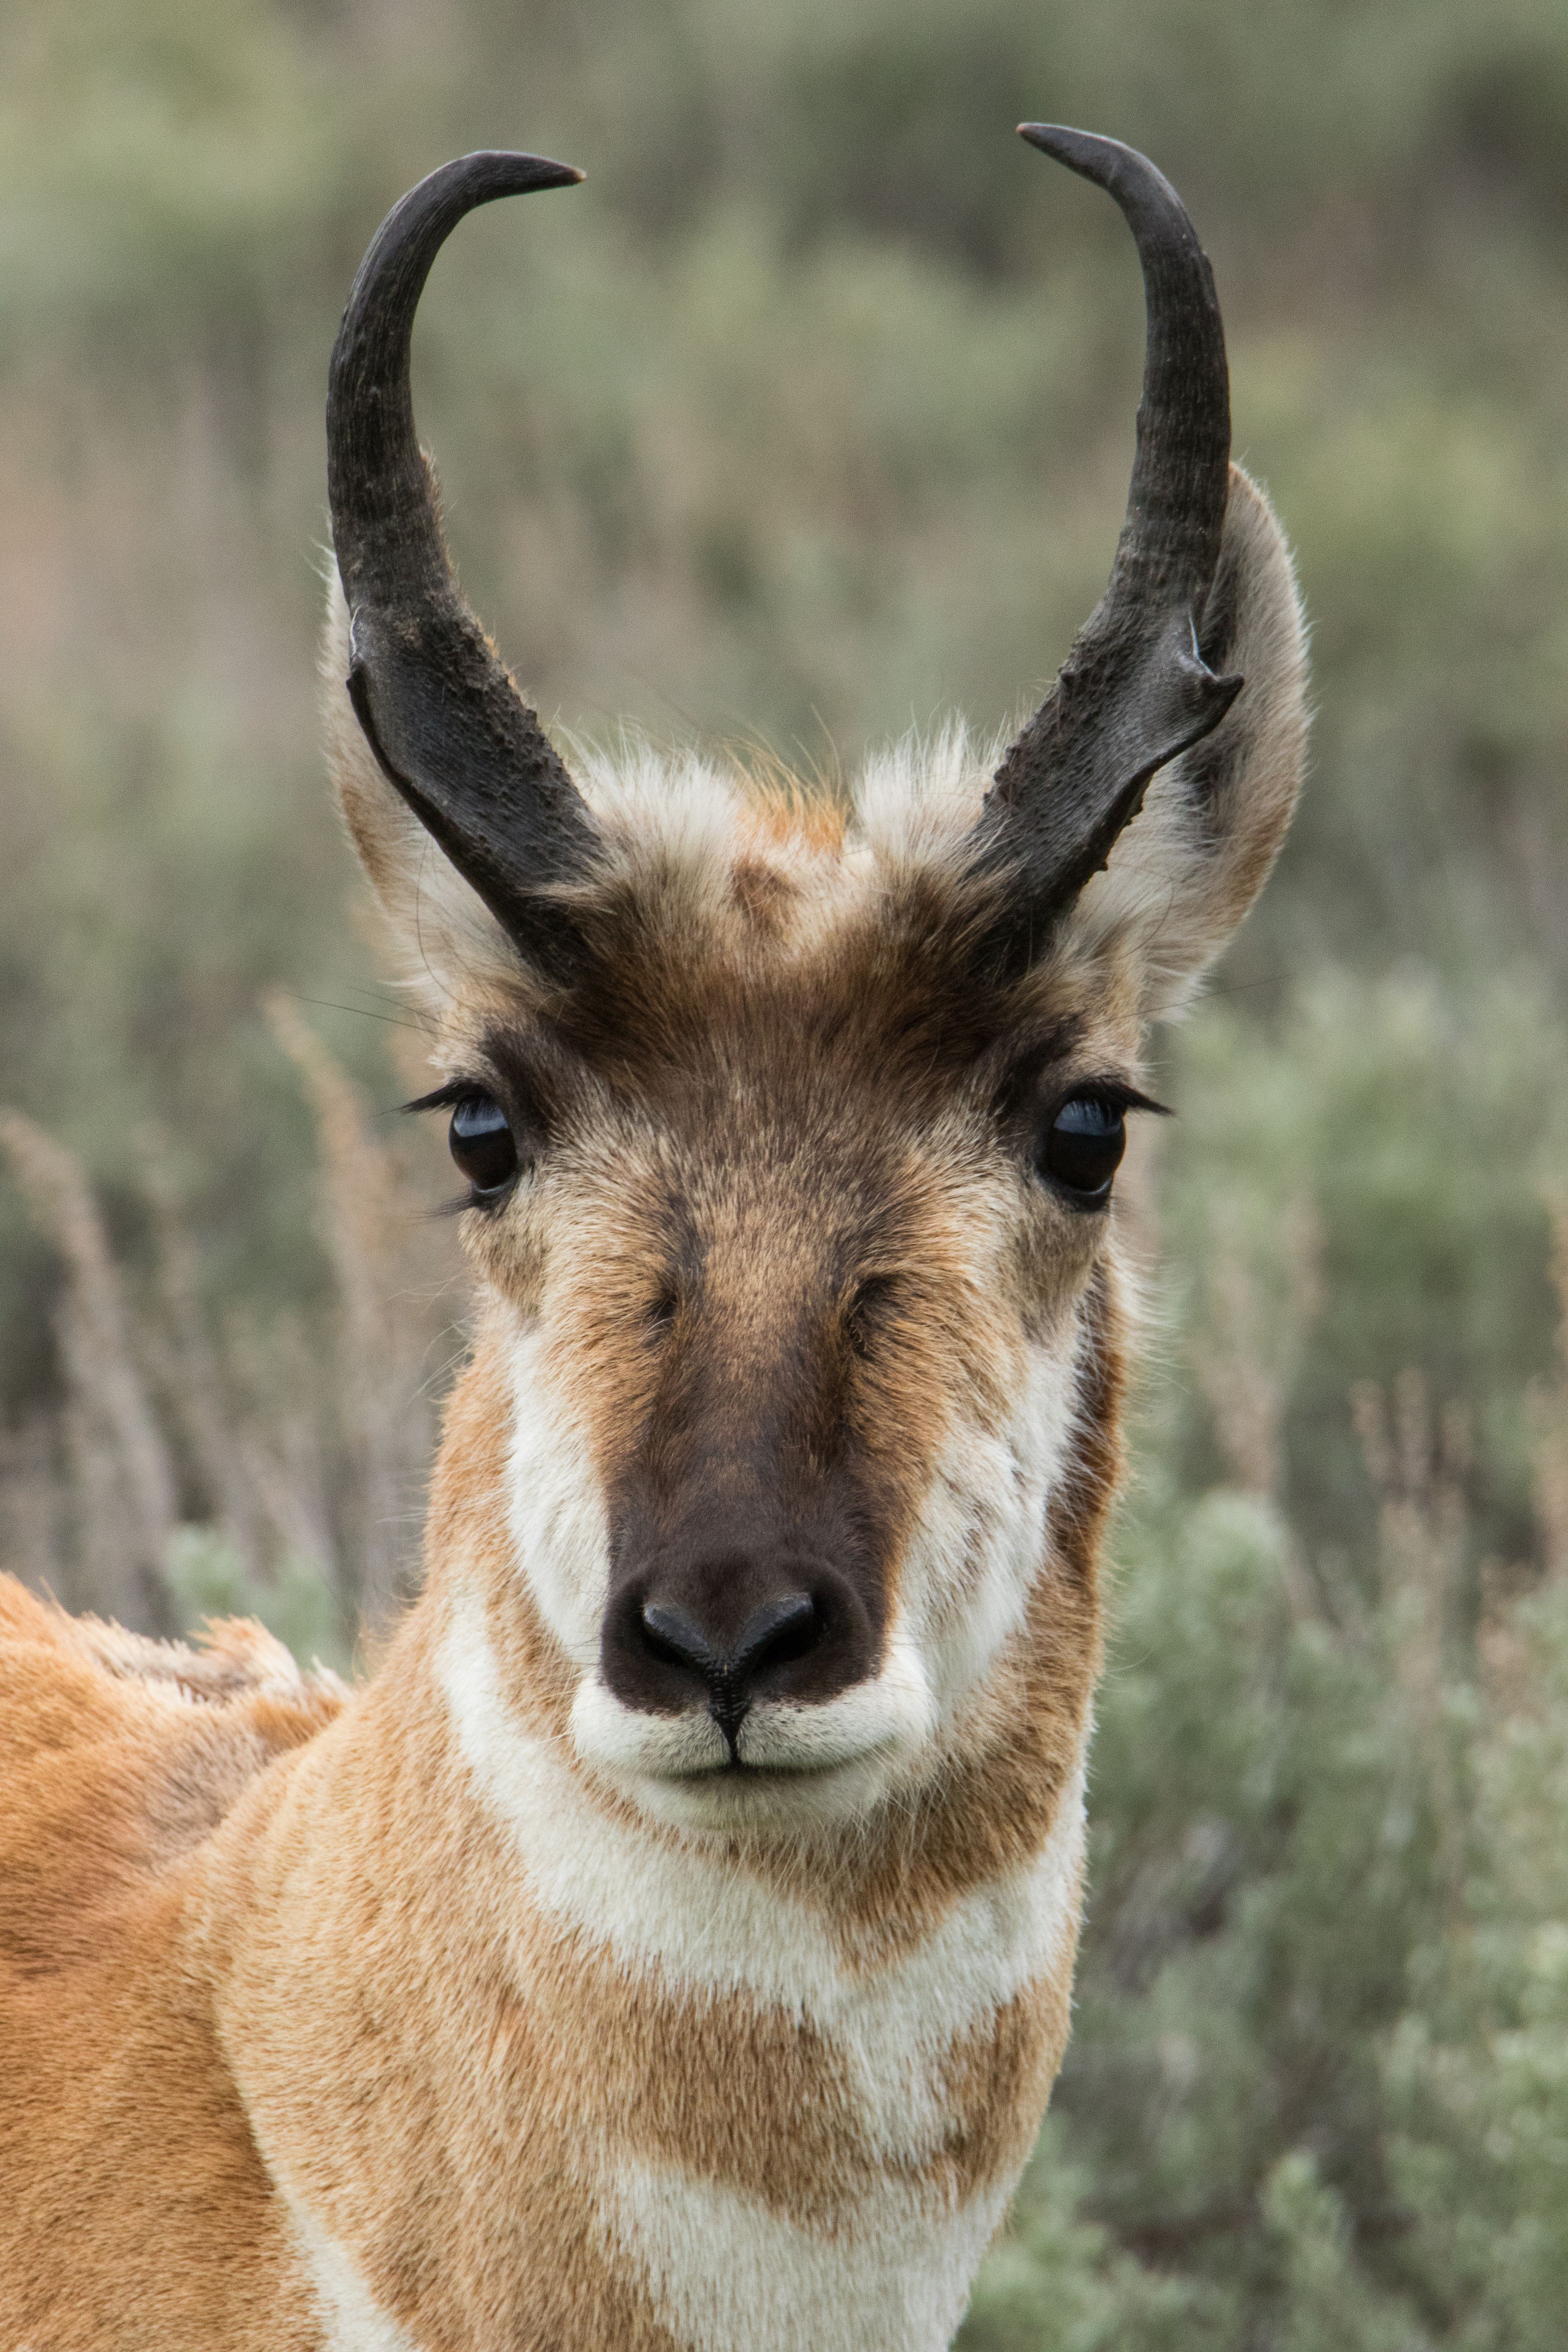
While this pronghorn was shot at a relatively high aperture of f/9, by shooting at 600mm there is still substantial separation between subject and background due to the higher depth of field found at such a long focal length. Photo Credit: Chris Gheen
These lenses come at a price though, as the dramatically increased depth of field is worth a pretty penny, but know that they will make a huge difference when it comes to subject isolation and increased depth of field, not to mention the fact that a lower aperture will also allow you to shoot at higher shutter speeds to freeze all of the action.
Now that you have an idea of how to utilize your aperture, and why certain techniques are beneficial in various applications, it’s time to start making intentional moves towards more impactful imagery. In my next post in this series, I’ll discuss how to utilize aperture as a tool and when and where to get a wide variety of effects using your camera’s aperture.
We’ll discuss the specifics of shooting wildlife, landscape, nightscape and sun bursts, so check back next week for some tips on maximizing your ability to use aperture to your advantage. But until then, get out and shoot a bit, playing with depth of field and overall lighting adjustments by managing your aperture. Shoot in aperture priority to maintain consistency in your exposure while changing your aperture to influence your depth of field. Be intentional with your use of various aperture values and most of all, have fun.
Happy shooting!

We offer world-class travel photography
experiences around the world.
Each tour is bundled with lodging, meals, and transportation between workshops included, allowing you to focus on photography instead of the stress of traveling.
experiences around the world.
Each tour is bundled with lodging, meals, and transportation between workshops included, allowing you to focus on photography instead of the stress of traveling.
Get Our Trip Catalog
Receive a trip catalog that highlights all of our upcoming photo tours and workshops.Schedule a Trip Consultation
Meet with a photo experience coordinator, and experience a personal touch to your booking experience.Landscape Guide
Receive a FREE Landscape Cheat Sheet Written By a Pro Photographer.Webinars
Our regularly hosted webinars provide photography instruction from our own guides on a wide range of topics.Education Portal
Explore our library of articles that cover everything from common questions, to in-depth guides on how to achieve that perfect shot.
Backcountry Journeys
Connecting Passionate People To
Exceptional Experiences.
Exceptional Experiences.
Business Hours:
Mon-Fri, 8AM-4PM MT
928-478-1521
adventure@backcountryjourneys.com
Mon-Fri, 8AM-4PM MT
928-478-1521
adventure@backcountryjourneys.com
arrow_drop_down_circle
Divider Text
All Images & Content Are Property Of Backcountry Journeys Photography Tours, Workshops & Safaris LLC - Copyright 2026
About Us
Receive a Digital Trip Catalog
Find an upcoming photography tour with our interactive catalog.