Mon - Fri: 8 am - 4 pm MT

About Backcountry Journeys
Why Choose Backcountry Journeys
If you're considering a photography trip, hear why Backcountry Journeys delivers the best experience in the industry.Frequently Asked Questions
If you're new to photography trips, or new to BCJ, you can find our common travel questions here.Fitness Levels
Our trips vary on physical intensity, and by reviewing our fitness levels, you can find out which trips may be more challenging, or aligned more closely with your comfort level.Meet The Crew
We've built an amazing team of experienced guides, and dedicated office staff that elevate your travel experience. Get to know their backgrounds, and hear their stories.Loyalty Program
We reward our frequent photo adventurers with exclusive discounts on amazing photography trips.Contact Us
If you need to get in touch with our office staff, or have additional business inquiries, you can find our information here.Refer a Friend
Know someone perfect for one of our tours? Recommend them through this quick form.Stay Up To Date On All Things
Backcountry Journeys
Backcountry Journeys
Our Photography Community
Our Webinars
Our regularly hosted webinars provide photography instruction from our own guides on a wide range of topics.Our Education Portal
Explore our library of articles that cover everything from common questions, to in-depth guides on how to achieve that perfect shot.Community Testimonials
We're proud to foster an amazing group of photo travelers, and here you can find their stories from their past adventures.Resources For Photographers
About Our Company
Resources For Photographers
About Our Company
Timelapse Photography: An Introduction
Published May 27, 2020
I would assume that most people reading this article know what timelapse photography is. We’ve all seen the dramatic sequences in Planet Earth with stars and clouds whizzing across the frame, of little saplings crawling up from the jungle floor, wriggling like snakes, and then ascending up a tree trunk. In its simplest definition, timelapse photography is the manipulation of time. It is done by stringing together a series of still photographs and playing them back at a faster (usually much faster) rate than the one at which they were captured. Simple right? In this article, I am going to introduce some of the basic tools and processing techniques for creating timelapse photography, as well as get into some of the nuances that make it such a magical yet accessible photographic technique. And just like all things worth doing, getting going is fairly easy, but mastery can take years.
Now, first let me say that I know to the uninitiated that learning any new photographic technique can be challenging, especially when we are talking about introducing the idea of motion into what has possibly always been an art of standalone still images for you. But, if you are anything like me, it is the manipulation of time that makes photography such an interesting art form and such a passion to pursue; the ability to turn water into folds of flowing white cotton, to make stars into trails of light, to freeze the wings of a hummingbird in flight, or forever encapsulate a moment of pure emotion in an image. And timelapse is taking this concept to the next level. But, instead of dealing with units of time in the millisecond or even minutes for long exposures, we are going to be looking at units of time in hours and even days! And just like by how looking at slow-motion video of fast action we can gain insight into what took place, speeding up slow events can have that same illuminating effect. Scientists have learned an incredible amount about the lives of plants, coral reefs, and other “inanimate” life by shooting timelapse. Using timelapse as a tool for investigation, they have shown us that these lifeforms are all but inanimate! Plants in the Amazon battle each other with thorn and strangling vine and coral colonies wage all-out war with each other, but just at a much slower speed than lifeforms living at our pace of life. Once you see these sequences of timelapse, it will challenge your very concept of what “conscious” life looks like, and raise some very serious questions about the nature of self-awareness. But, that’s for another day.
Let’s get into the basic techniques. First off, many people’s favorite part of photography: The tools!
I remember when I was in my first year of film school and I got my hands on a 16mm Bolex for the first time (this camera would leave such an impression on me that I now have one tattooed on my back!). One of the first things I did was check out the Bolex brand intervalometer from the school’s equipment rental and set up to shoot my first sequence of timelapse that night from my back porch on 16mm film. Let’s just say that my first go of it didn’t go so well, and I lost some money in the processing and purchase of my film stock. But, luckily we aren’t going to be shooting our timelapse on film. We are going to be capturing sequences of hundreds, maybe thousands of images and the modern digital SLR and mirrorless systems are ideal for this.
Equipment Needed:
Your tripod choice is important, as even the slightest changes in the camera’s position, either by a tripod getting bumped or by the tripod head drooping, can ruin your timelapse sequence. So, choose a tripod that is sturdy and with a head that can easily support the weight of your camera and lens combo. So, even though we are all in love with our lightweight carbon fiber tripods, for timelapse, it is often the old heavy metal one that will help us create our best sequences.
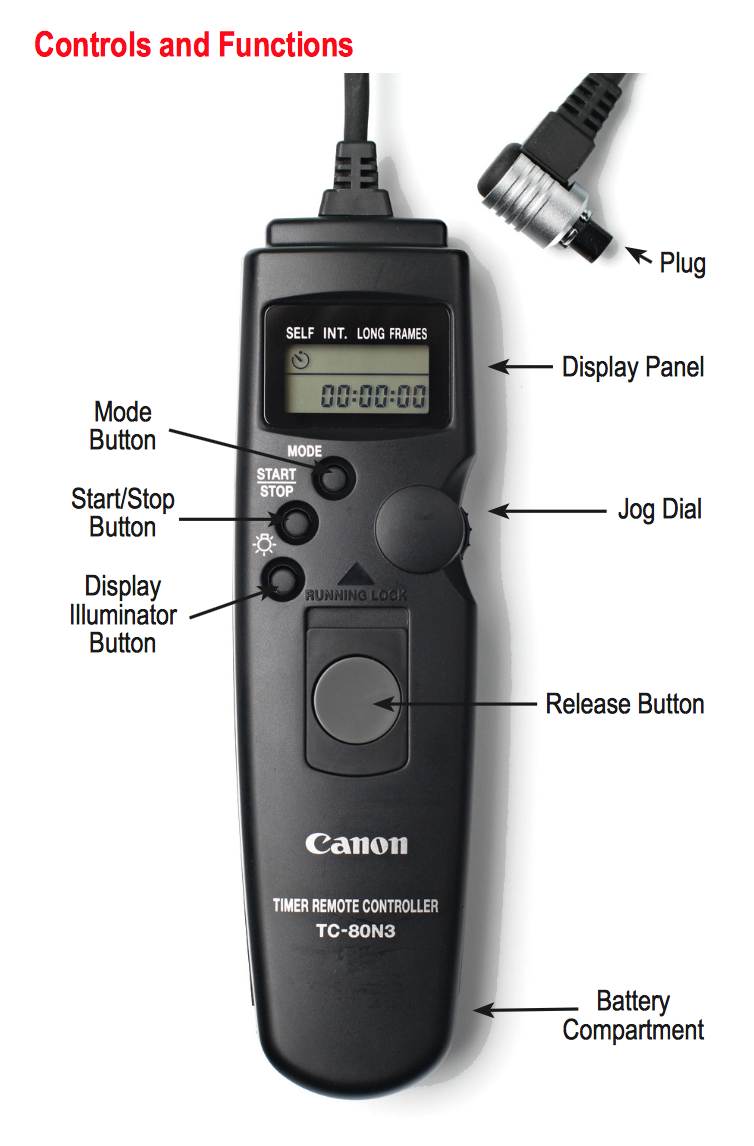
The intervalometer is at the heart of shooting timelapse. Now, I know that some cameras (Nikon) come with firmware intervalometers built into the camera, and though I am sure those work great, we are going to focus on using an external intervalometer for now. An intervalometer is exactly what it sounds like; it is an interval meter, a tool for measuring and controlling the intervals between frames. But, the intervalometer also has the ability to control the duration of your exposure, the number of exposures, or set as a remote and self-timer. For now, though, we are going to focus on the intervalometer’s primary function, which is to control the interval between frames and trigger the camera’s shutter at the designated time.
I shoot on Canon, and so I use the Canon TC-80N3 intervalometer. It costs around $130, and one should be all that you ever need. There are also several third-party intervalometers that cost a little less but do the exact same thing. Overall, they are inexpensive tools and one is mostly like another.
Step 1: Compose
Now that you have your tools, let’s pick a subject matter. An obvious choice for your first timelapse sequence would be clouds. They have a mostly consistent rate of speed throughout a single day and are fairly interesting to observe in timelapse. But, just like how in still photography composition is everything, the same is true in video and timelapse. So, don’t just point your camera skyward and start shooting clouds.
Firstly, sit for a moment and observe the direction that the clouds are moving. You want to choose a perspective that doesn’t just have the clouds moving straight across the frame (X-axis only). For our first go, we want to try to choose a perspective that shows the clouds moving along the Y and Z axes. The Y axis is going to be up and down in the frame and the Z-axis refers to the perceived depth of the frame. The most interesting perspective will be of clouds moving towards or away from the camera, which would be along the Y and Z axes.
Next, pick a foreground! We don’t want to show just clouds. We want to create intrigue within the image by contextualizing the sequence both in terms of scale and locale. Your foreground could be a grassy plateau, a cityscape, a mountain range, or anything else that is fairly static. What you may want to avoid (unless its what you’re trying to capture) is placing objects in the immediate foreground that move around a lot, such as a flower in the breeze. Because, once you string your images together, that flower will be twitching around chaotically. So, it is generally better to think wide-angle with big vistas.
With your composition framed, lock your camera down on the tripod and make sure the tripod is secure and not going to fall over or droop over time. If you have a sandbag or other kind of tripod stabilizer, these are great ideas too.
Step 2: Camera Settings
Now that we’ve got a composition, it’s time for everyone’s favorite topic: Camera settings! Firstly, we want to be shooting in Manual (M) Mode. This is very important to reduce flicker. If shooting in an automatic setting, there will be fluctuations in how your camera interprets the scene, creating slight variations in exposure from image to image. The result of this once your images are strung together is a flickery sequence. If lighting conditions change naturally within the scene, hopefully, they will happen gradually enough that it will be a smooth change within the image sequence. Now, let’s pause for a moment and say that rule does not apply when shooting a scene that will have the amount of light changing dramatically, such as sunrise and sunset. The easy workaround for those situations is to shoot in Aperture Priority and try to reduce any flickering in post. There are some tools out there to specifically designed for shooting sunrise and sunset, and there is a technique called ‘blamping,’ but for now, let’s just assume that the lighting is going to remain fairly constant, in which case we want to be shooting in Manual Mode.
Next, we are going to meter the scene and shoot some test images. This is where the ND filter comes into play. We want to stop down the scene with our ND filter because for smooth, fluid motion, longer exposure time will be important to help create a bit of motion blur. The following settings will be a starting point. You will need to tweak your shutter speed to properly expose for the scene.
These are just some starting points for your camera settings. Each scene will obviously be different, and I understand that you will need to tweak. But, a good rule of thumb is that you want your ISO as low as possible, your aperture in that sweet spot, and your shutter as slow as possible so that you can introduce some motion blur into the frames, improving the fluidity of the sequence.
Step 3: The Intervalometer
Now, first let me say that I know to the uninitiated that learning any new photographic technique can be challenging, especially when we are talking about introducing the idea of motion into what has possibly always been an art of standalone still images for you. But, if you are anything like me, it is the manipulation of time that makes photography such an interesting art form and such a passion to pursue; the ability to turn water into folds of flowing white cotton, to make stars into trails of light, to freeze the wings of a hummingbird in flight, or forever encapsulate a moment of pure emotion in an image. And timelapse is taking this concept to the next level. But, instead of dealing with units of time in the millisecond or even minutes for long exposures, we are going to be looking at units of time in hours and even days! And just like by how looking at slow-motion video of fast action we can gain insight into what took place, speeding up slow events can have that same illuminating effect. Scientists have learned an incredible amount about the lives of plants, coral reefs, and other “inanimate” life by shooting timelapse. Using timelapse as a tool for investigation, they have shown us that these lifeforms are all but inanimate! Plants in the Amazon battle each other with thorn and strangling vine and coral colonies wage all-out war with each other, but just at a much slower speed than lifeforms living at our pace of life. Once you see these sequences of timelapse, it will challenge your very concept of what “conscious” life looks like, and raise some very serious questions about the nature of self-awareness. But, that’s for another day.
Let’s get into the basic techniques. First off, many people’s favorite part of photography: The tools!
I remember when I was in my first year of film school and I got my hands on a 16mm Bolex for the first time (this camera would leave such an impression on me that I now have one tattooed on my back!). One of the first things I did was check out the Bolex brand intervalometer from the school’s equipment rental and set up to shoot my first sequence of timelapse that night from my back porch on 16mm film. Let’s just say that my first go of it didn’t go so well, and I lost some money in the processing and purchase of my film stock. But, luckily we aren’t going to be shooting our timelapse on film. We are going to be capturing sequences of hundreds, maybe thousands of images and the modern digital SLR and mirrorless systems are ideal for this.
Equipment Needed:
- Camera Body and lens (DSLR or mirrorless)
- Tripod (sturdy!)
- Intervalometer
- Memory Card
- ND Filter
Your tripod choice is important, as even the slightest changes in the camera’s position, either by a tripod getting bumped or by the tripod head drooping, can ruin your timelapse sequence. So, choose a tripod that is sturdy and with a head that can easily support the weight of your camera and lens combo. So, even though we are all in love with our lightweight carbon fiber tripods, for timelapse, it is often the old heavy metal one that will help us create our best sequences.
The intervalometer is at the heart of shooting timelapse. Now, I know that some cameras (Nikon) come with firmware intervalometers built into the camera, and though I am sure those work great, we are going to focus on using an external intervalometer for now. An intervalometer is exactly what it sounds like; it is an interval meter, a tool for measuring and controlling the intervals between frames. But, the intervalometer also has the ability to control the duration of your exposure, the number of exposures, or set as a remote and self-timer. For now, though, we are going to focus on the intervalometer’s primary function, which is to control the interval between frames and trigger the camera’s shutter at the designated time.
I shoot on Canon, and so I use the Canon TC-80N3 intervalometer. It costs around $130, and one should be all that you ever need. There are also several third-party intervalometers that cost a little less but do the exact same thing. Overall, they are inexpensive tools and one is mostly like another.
Step 1: Compose
Now that you have your tools, let’s pick a subject matter. An obvious choice for your first timelapse sequence would be clouds. They have a mostly consistent rate of speed throughout a single day and are fairly interesting to observe in timelapse. But, just like how in still photography composition is everything, the same is true in video and timelapse. So, don’t just point your camera skyward and start shooting clouds.
Firstly, sit for a moment and observe the direction that the clouds are moving. You want to choose a perspective that doesn’t just have the clouds moving straight across the frame (X-axis only). For our first go, we want to try to choose a perspective that shows the clouds moving along the Y and Z axes. The Y axis is going to be up and down in the frame and the Z-axis refers to the perceived depth of the frame. The most interesting perspective will be of clouds moving towards or away from the camera, which would be along the Y and Z axes.
Next, pick a foreground! We don’t want to show just clouds. We want to create intrigue within the image by contextualizing the sequence both in terms of scale and locale. Your foreground could be a grassy plateau, a cityscape, a mountain range, or anything else that is fairly static. What you may want to avoid (unless its what you’re trying to capture) is placing objects in the immediate foreground that move around a lot, such as a flower in the breeze. Because, once you string your images together, that flower will be twitching around chaotically. So, it is generally better to think wide-angle with big vistas.
With your composition framed, lock your camera down on the tripod and make sure the tripod is secure and not going to fall over or droop over time. If you have a sandbag or other kind of tripod stabilizer, these are great ideas too.
Step 2: Camera Settings
Now that we’ve got a composition, it’s time for everyone’s favorite topic: Camera settings! Firstly, we want to be shooting in Manual (M) Mode. This is very important to reduce flicker. If shooting in an automatic setting, there will be fluctuations in how your camera interprets the scene, creating slight variations in exposure from image to image. The result of this once your images are strung together is a flickery sequence. If lighting conditions change naturally within the scene, hopefully, they will happen gradually enough that it will be a smooth change within the image sequence. Now, let’s pause for a moment and say that rule does not apply when shooting a scene that will have the amount of light changing dramatically, such as sunrise and sunset. The easy workaround for those situations is to shoot in Aperture Priority and try to reduce any flickering in post. There are some tools out there to specifically designed for shooting sunrise and sunset, and there is a technique called ‘blamping,’ but for now, let’s just assume that the lighting is going to remain fairly constant, in which case we want to be shooting in Manual Mode.
Next, we are going to meter the scene and shoot some test images. This is where the ND filter comes into play. We want to stop down the scene with our ND filter because for smooth, fluid motion, longer exposure time will be important to help create a bit of motion blur. The following settings will be a starting point. You will need to tweak your shutter speed to properly expose for the scene.
- ISO: 100 (to reduce noise)
- Aperture: F11-F16 (this is the sweet spot when it comes to lens sharpness)
- Shutter Speed (for clouds): 1/10 – 1/3 of a second (Use that ND Filter!)
- File Type: RAW
These are just some starting points for your camera settings. Each scene will obviously be different, and I understand that you will need to tweak. But, a good rule of thumb is that you want your ISO as low as possible, your aperture in that sweet spot, and your shutter as slow as possible so that you can introduce some motion blur into the frames, improving the fluidity of the sequence.
Step 3: The Intervalometer
So, let’s recap. We’ve got a composition picked out. Our camera is on tripod and locked down. We’ve taken a good exposure reading and adjusted our shutter speed and aperture accordingly. And, we’ve taken a few test shots to make sure we like our composition and have a nominal exposure. It’s time to set our intervalometer!
Most intervalometers are going to have four primary settings, some of which work together to create some more complex shooting patterns. But, we will keep things simple.
Intervalometer Functions:
Most intervalometers are going to have four primary settings, some of which work together to create some more complex shooting patterns. But, we will keep things simple.
Intervalometer Functions:
- Self Timer – This works just like the self-timer on your camera, and in truth, I’m not sure why it needs to be included on an intervalometer. Ignore this function. Its usually labeled as “Self” under the intervalometer modes.
- Intervalometer – This is what we are looking for. It is usually labeled “Int.”
- Long Exposure – This is labeled as “Long.” This function sets your shutter speed for long exposures. Exposure times can be extremely long (like 11 hours long). For this to work, the camera will need to be in “Bulb” mode. It works by holding the shutter open for your designated duration, then closing and immediately reopening the shutter for the next frame in the sequence. Again, ignore this function for now.
- Frames – This sets a maximum number of frames that the camera will shoot. Set this to ‘0’ to allow the camera to shoot continuously.
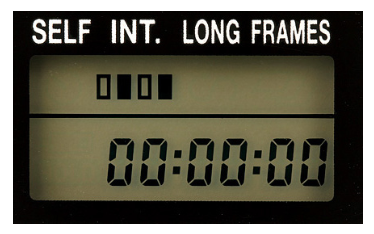
If you just want to get started shooting clouds, set the interval time to 00:00:10, and hit the ‘Start’ button on your intervalometer. The camera should immediately begin shooting a frame every ten seconds. This is a good starting point for your frame rate for clouds, but this will fluctuate depending upon how fast the clouds are moving naturally.
Now though, since your camera is now shooting a frame every 10 seconds, we’ve got some time to talk about frame rates and the number of frames you want to be shooting.
Motion pictures, cinema, movies, whatever you call them, most of these playback at 24 frames per second (fps). And the motion is smooth and natural because they were also shot at 24 fps (except for slow motion and timelapse of course). Cinema has been shot and played back at 24 fps for most of its history. There are exceptions of course, but generally speaking, to achieve the most “cinematic” look possible, you want to be playing back at 24 fps. 30 fps is also a popular frame rate, but only because of the advent of video cameras that were, in their day, unable to record progressive frames. So they shot 60 interlaced frames per second, which when combined, comes out to 30 fps.
As a general rule though, for the most “cinematic” looking footage, 24 fps is your best choice. 30 fps may be a bit smoother in terms of motion, but most people these days unconsciously associate footage shot at 30 fps with video (as opposed to film) and a lower quality of production. Perhaps a topic for another day!
So, back to our clouds. If our camera is shooting at a rate of one frame every 10 seconds, and we intend to play our footage back at 24 frames per second, how long will we need to shoot to get one second of footage? If you answered 240 seconds, you’re right!
Now, obviously, we will want to capture more than just one second of footage. Depending upon what I am shooting for, I usually like to aim for at least ten seconds for each sequence, mainly because if editing together a video, I rarely stick to one shot for more than ten seconds. So, how long will our camera need to roll to get our ten seconds of footage? That’s right, 2,400 seconds, or 40 minutes.
Formula: Desired number of frames (240) x number of seconds per interval (10) = Shooting Duration
Pro Tip: When beginning to shoot a time-lapse sequence, begin with a clean memory card. Also, consider using a slate to mark the beginning and end of your sequences. This will make organizing the frames much easier down the road.
Below is a breakdown of starting point frame rates for different subject matter and how long you will need to shoot to capture 10 seconds. Also, remember, as a rule, the shorter the intervals between frames, the slower the action will be when playing the sequence back. So, in the case of our clouds, if we shot a frame every three seconds, the action of the clouds will be considerably slower than a sequence shooting a frame every ten seconds.
Now that you’ve shot your first ten seconds of timelapse, its time to take those 240 frames and process them into a playable, editable and/or postable video clip. There are dozens of workflows for processing frames into a video, and I am going to go through a couple of the simplest ones to deal with that won’t require you learning a complex new piece of software like After Effects. Now, if you know After Effects or want to learn it, by all means, mention it in the comments section of this article, and I will post a how-to on using After Effects. That said, I do believe After Effects is the most powerful piece of software when it comes to dealing with timelapse frames and gives you the most control over your final output.
Processing Step 1: Lightroom and Basic Color Correct
After capturing the images, they will be imported into Lightroom for some basic adjustments. Things like exposure, recovering highlight or shadow detail, clarity and sharpness will be tweaked to create the look that you want. The key is to select a good base image to work with to make the necessary adjustments. Then, select all of the remaining images and synchronize the settings across the entire sequence.
There will be the option for some more color correction down the road, so for now, just pick one image, get it looking as best you can, then apply those same settings to all the other frames.
Processing Step 2: Exporting from Lightroom
Now that your images have been color corrected, it is time to export them from Lightroom. To do this, select all the images, and while under the ‘Library’ tab, click the ‘Export’ button. This brings up the export dialogue box. From there, you choose where you want to save the images.
Now, this step is very important. Make sure to save all the images from the sequence into a new folder. Otherwise, your computer will be dumping the images all over your desktop or wherever you’ve selected to save them.
For those working on PC, I recommend creating a folder under the following file structure:
Desktop > (Create folder called “Timelapse) > (Create folder called
“Timelapse_01_Clouds_April2019”)
For Mac users:
Pictures > (Create folder called “Timelapse) > (Create folder called “Timelapse_01_Clouds_April2019”)
As you’ll see later, it is important that the image names include a consecutive numbering sequence. You may not need to make any changes since the camera will name the files with consecutive numbers by default. However, if the sequence is somehow interrupted, make sure to change this upon export. Something like “timelapse_001”, “timelapse_002”, and so on, works just fine. If necessary, you can change the file names under, you guessed it, the ‘File Naming’ section.
Under File Settings, select JPEG and set the quality to 80, again to help reduce the file sizes.
Also, this is a good point at which to change your frame size. Under the “Image Sizing” tab in the export dialog box, select “Long Edge.” Then, set the pixels to ‘1,920’ and the resolution to ’72.’ This will ensure that your sequences are not gigantic and won’t take too long to process.
After selecting all of your settings, click the ‘Export’ button to send the images to the designated folder.
Once the export has completed, you will have a folder containing just the images from this sequence.
Processing Step 3A: Importing and Converting to a Movie using Quicktime Pro
This is where we are going to split into our two different workflows. The first I am going to describe is by far the simplest and requires the use of Quicktime Pro. You will need to purchase and download this application from Apple (it works for PC and Mac) from the following link:
https://www.apple.com/hk/en/quicktime/extending/index.html
Quicktime Pro costs about $30, but if you are planning on doing more timelapse or any other video conversions, I highly recommend this program. When I am working with video, I use it all the time.
Now that you’ve got Quicktime Pro installed and opened, got ‘File > Open Image Sequence.’ This will bring up a dialog box where you can navigate to the folder you’ve created.
Select the first image in your sequence, and click ‘Open.’
Next, Quicktime Pro will ask you to select a frame rate. Select the one you want, which is most likely 24 frames per second and click “OK.” Quicktime Pro will now open up your sequence as a movie for the first time! This is the most exciting moment because you are going to see your sequence in motion for the first time. Don’t worry if it is not playing smoothly at this point. It will hopefully resolve any of those issues once it is exported.
Processing Step 4A: Exporting Your Movie
Alright, we are almost done! We’ve got a movie playing back in Quicktime. Now, we just need to export it so you’ll have a single movie file that you can edit, share, or post online.
With your sequence still open in Quicktime, go to “File > Export.” This will bring up the export dialogue box. Quicktime Pro is most powerful here because you can create multiple format types. But, we are going to keep it simple.
Now though, since your camera is now shooting a frame every 10 seconds, we’ve got some time to talk about frame rates and the number of frames you want to be shooting.
Motion pictures, cinema, movies, whatever you call them, most of these playback at 24 frames per second (fps). And the motion is smooth and natural because they were also shot at 24 fps (except for slow motion and timelapse of course). Cinema has been shot and played back at 24 fps for most of its history. There are exceptions of course, but generally speaking, to achieve the most “cinematic” look possible, you want to be playing back at 24 fps. 30 fps is also a popular frame rate, but only because of the advent of video cameras that were, in their day, unable to record progressive frames. So they shot 60 interlaced frames per second, which when combined, comes out to 30 fps.
As a general rule though, for the most “cinematic” looking footage, 24 fps is your best choice. 30 fps may be a bit smoother in terms of motion, but most people these days unconsciously associate footage shot at 30 fps with video (as opposed to film) and a lower quality of production. Perhaps a topic for another day!
So, back to our clouds. If our camera is shooting at a rate of one frame every 10 seconds, and we intend to play our footage back at 24 frames per second, how long will we need to shoot to get one second of footage? If you answered 240 seconds, you’re right!
Now, obviously, we will want to capture more than just one second of footage. Depending upon what I am shooting for, I usually like to aim for at least ten seconds for each sequence, mainly because if editing together a video, I rarely stick to one shot for more than ten seconds. So, how long will our camera need to roll to get our ten seconds of footage? That’s right, 2,400 seconds, or 40 minutes.
Formula: Desired number of frames (240) x number of seconds per interval (10) = Shooting Duration
Pro Tip: When beginning to shoot a time-lapse sequence, begin with a clean memory card. Also, consider using a slate to mark the beginning and end of your sequences. This will make organizing the frames much easier down the road.
Below is a breakdown of starting point frame rates for different subject matter and how long you will need to shoot to capture 10 seconds. Also, remember, as a rule, the shorter the intervals between frames, the slower the action will be when playing the sequence back. So, in the case of our clouds, if we shot a frame every three seconds, the action of the clouds will be considerably slower than a sequence shooting a frame every ten seconds.
- Traffic – Interval: 1 second; Duration 4 minutes
- Crowds of people – Interval: 2 seconds; Duration 8 minutes
- Fast Moving clouds – Interval: 3 second; Duration 12 minutes
- Medium speed clouds – Interval: 5-10 seconds; Duration 20-40 minutes
- Path of the sun – Interval: 30 seconds; Duration 120 minutes
- Star Paths – Interval: 20 seconds; Duration 80 minutes
- Vines or fast-growing plants – Interval: 120 seconds; Duration 480 minutes (8 hours)
Now that you’ve shot your first ten seconds of timelapse, its time to take those 240 frames and process them into a playable, editable and/or postable video clip. There are dozens of workflows for processing frames into a video, and I am going to go through a couple of the simplest ones to deal with that won’t require you learning a complex new piece of software like After Effects. Now, if you know After Effects or want to learn it, by all means, mention it in the comments section of this article, and I will post a how-to on using After Effects. That said, I do believe After Effects is the most powerful piece of software when it comes to dealing with timelapse frames and gives you the most control over your final output.
Processing Step 1: Lightroom and Basic Color Correct
After capturing the images, they will be imported into Lightroom for some basic adjustments. Things like exposure, recovering highlight or shadow detail, clarity and sharpness will be tweaked to create the look that you want. The key is to select a good base image to work with to make the necessary adjustments. Then, select all of the remaining images and synchronize the settings across the entire sequence.
There will be the option for some more color correction down the road, so for now, just pick one image, get it looking as best you can, then apply those same settings to all the other frames.
Processing Step 2: Exporting from Lightroom
Now that your images have been color corrected, it is time to export them from Lightroom. To do this, select all the images, and while under the ‘Library’ tab, click the ‘Export’ button. This brings up the export dialogue box. From there, you choose where you want to save the images.
Now, this step is very important. Make sure to save all the images from the sequence into a new folder. Otherwise, your computer will be dumping the images all over your desktop or wherever you’ve selected to save them.
For those working on PC, I recommend creating a folder under the following file structure:
Desktop > (Create folder called “Timelapse) > (Create folder called
“Timelapse_01_Clouds_April2019”)
For Mac users:
Pictures > (Create folder called “Timelapse) > (Create folder called “Timelapse_01_Clouds_April2019”)
As you’ll see later, it is important that the image names include a consecutive numbering sequence. You may not need to make any changes since the camera will name the files with consecutive numbers by default. However, if the sequence is somehow interrupted, make sure to change this upon export. Something like “timelapse_001”, “timelapse_002”, and so on, works just fine. If necessary, you can change the file names under, you guessed it, the ‘File Naming’ section.
Under File Settings, select JPEG and set the quality to 80, again to help reduce the file sizes.
Also, this is a good point at which to change your frame size. Under the “Image Sizing” tab in the export dialog box, select “Long Edge.” Then, set the pixels to ‘1,920’ and the resolution to ’72.’ This will ensure that your sequences are not gigantic and won’t take too long to process.
After selecting all of your settings, click the ‘Export’ button to send the images to the designated folder.
Once the export has completed, you will have a folder containing just the images from this sequence.
Processing Step 3A: Importing and Converting to a Movie using Quicktime Pro
This is where we are going to split into our two different workflows. The first I am going to describe is by far the simplest and requires the use of Quicktime Pro. You will need to purchase and download this application from Apple (it works for PC and Mac) from the following link:
https://www.apple.com/hk/en/quicktime/extending/index.html
Quicktime Pro costs about $30, but if you are planning on doing more timelapse or any other video conversions, I highly recommend this program. When I am working with video, I use it all the time.
Now that you’ve got Quicktime Pro installed and opened, got ‘File > Open Image Sequence.’ This will bring up a dialog box where you can navigate to the folder you’ve created.
Select the first image in your sequence, and click ‘Open.’
Next, Quicktime Pro will ask you to select a frame rate. Select the one you want, which is most likely 24 frames per second and click “OK.” Quicktime Pro will now open up your sequence as a movie for the first time! This is the most exciting moment because you are going to see your sequence in motion for the first time. Don’t worry if it is not playing smoothly at this point. It will hopefully resolve any of those issues once it is exported.
Processing Step 4A: Exporting Your Movie
Alright, we are almost done! We’ve got a movie playing back in Quicktime. Now, we just need to export it so you’ll have a single movie file that you can edit, share, or post online.
With your sequence still open in Quicktime, go to “File > Export.” This will bring up the export dialogue box. Quicktime Pro is most powerful here because you can create multiple format types. But, we are going to keep it simple.

First, navigate to where you want to save your final movie. This can be wherever you want, but for me, I like to keep things organized like this:
Pictures (or Desktop for PC) > Timelapse > Timelapse_Exports > “FILE_NAME.” And for the file name, give it something that you will remember and correlates to the date or location where it was shot.
Next, at the bottom of the dialogue box, where it says “Export:” select “Movie to Quicktime Movie.”
Then click “Options” to bring up the video settings.
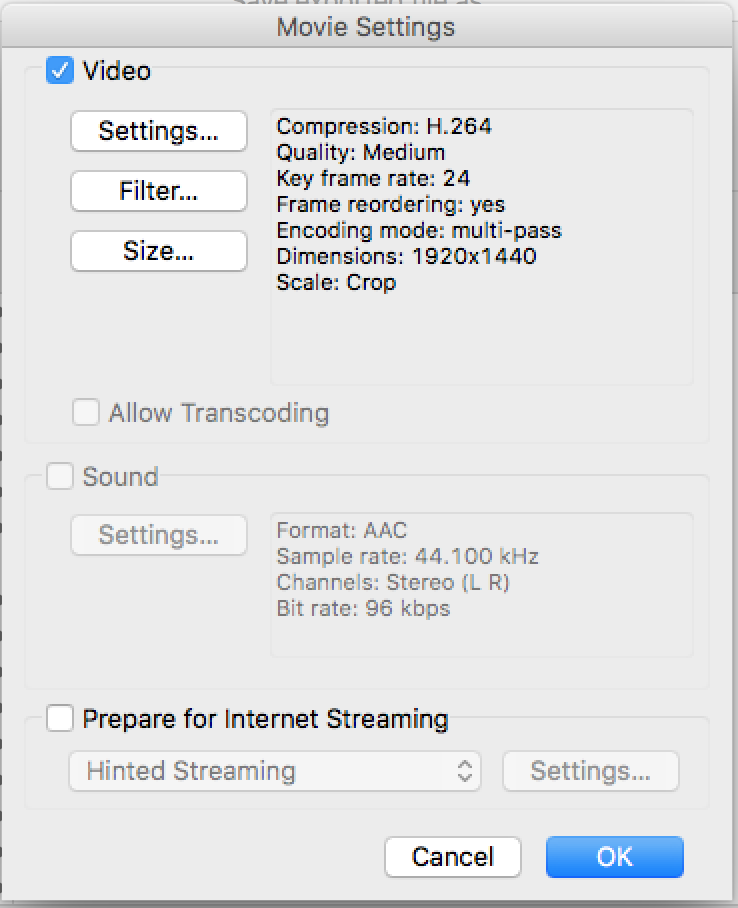
Under settings, select H.264 and put the quality at High. Click OK.

Then click “Size,” and select “Current.”
Hit Ok, and then OK again in the settings box, then hit “Save.” Quicktime Pro will begin the process of exporting your QuickTime. This can take several minutes depending upon how long the sequence is, so be patient.
Once the progress bar disappears, your movie is ready. Go to the folder you selected for export, open your QuickTime and check it out. If it looks good, then, congratulations, you’re done!
Processing Step 3B: Processing Your Frames Using Photoshop
This is the other workflow we are going to discuss. It does not require Quicktime Pro, but instead uses Photoshop, which I’m sure many of you already have installed. This workflow will still make use of Lightroom for color correct. So, steps one and two will be the same, color correcting your images and exporting them into a new folder.
The ability to edit video was introduced in Photoshop CS6 and has carried over into the Creative Cloud versions. Unfortunately, earlier versions of Photoshop aren’t going to have these features. But, the video editing features now in Photoshop are quite impressive. You could practically use it in place of Premier, as it offers video transitions, multiple video layers, and even audio tracks where you can add music to your timelapse sequence.
Once in Photoshop, go to the ‘File’ menu, choose ‘Open’, and navigate to the folder with your images. Select only the first image in the sequence. At the bottom of the dialogue box, click on ‘Image Sequence’. If you don’t see this box, click “options” on the left, then you’ll see the box for “image sequence.” This is why it is important for the image files to be numbered consecutively. After choosing the first image and clicking on the image sequence box, clicking ‘Open’ will import the images into Photoshop as a timelapse video file. If there are gaps in the sequence, then there will be segments of the timelapse video with a blank screen. This is one way in which the two workflows differ. Quicktime Pro will not place blank spaces in the sequence if the files are not numbered perfectly. Quicktime will simply order the frames in alphanumeric order and play them back at 24 fps.

After clicking to open the images in Photoshop, you will be asked to select a frame rate. Clicking the dropdown arrow will reveal a number of options. Again, I typically am going to select 24 fps for the cinematic look; however, the frame rate can be changed later, so it’s not very important at this step.
Opening the image sequence in Photoshop will create a video layer, which is indicated by the filmstrip icon on the layer thumbnail. In order to see the video clip, go to the ‘Window’ menu, and select ‘Timeline’. In the timeline, you can customize the duration of the video clip, watch a preview, add still images complete with transitions, or add music.
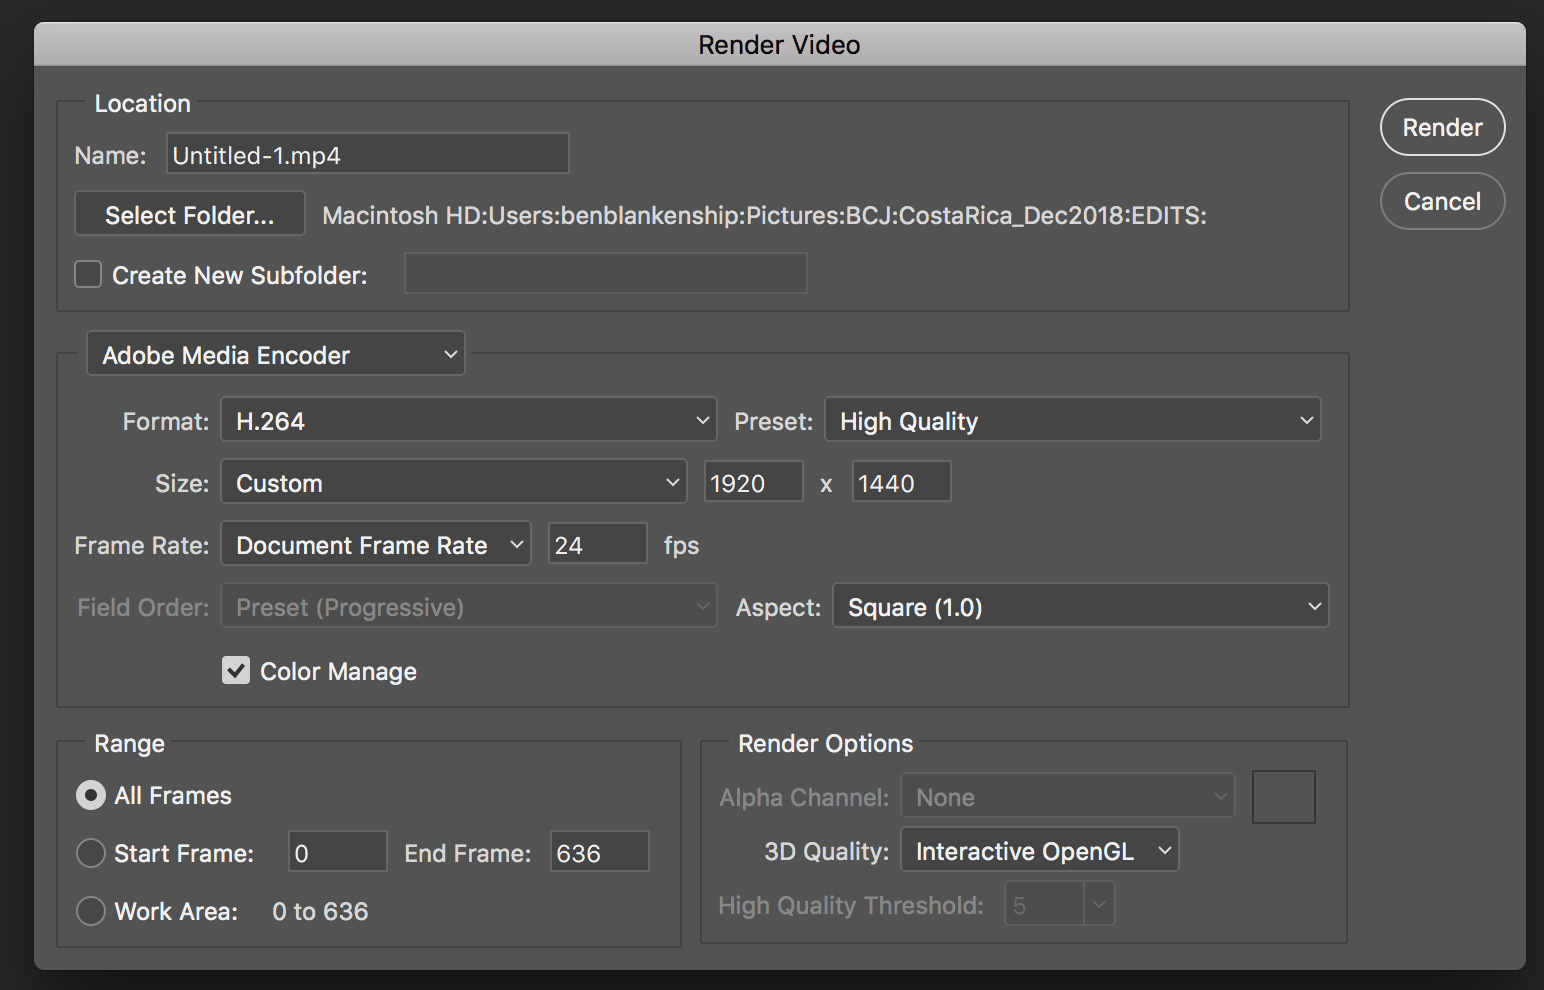
After making all the video edits, or even if you make no changes at all, you can export the timelapse video. To export the video, go the File > Export > Render Video. In the Render Video dialogue box, you will choose a name for your video, point to the location where you want it saved, and select the format and size for the video. I typically go with the H.264 format and high quality. You can also change the frame rate at this point, although I usually stick with 24 fps.
Opening the image sequence in Photoshop will create a video layer, which is indicated by the filmstrip icon on the layer thumbnail. In order to see the video clip, go to the ‘Window’ menu, and select ‘Timeline’. In the timeline, you can customize the duration of the video clip, watch a preview, add still images complete with transitions, or add music.
After making all the video edits, or even if you make no changes at all, you can export the timelapse video. To export the video, go the File > Export > Render Video. In the Render Video dialogue box, you will choose a name for your video, point to the location where you want it saved, and select the format and size for the video. I typically go with the H.264 format and high quality. You can also change the frame rate at this point, although I usually stick with 24 fps.
Pro Tip: Cropping your sequence
One thing to note is that, if you did the image resize correctly when you exported from Lightroom, you should leave the ‘Document Size’ the way it is when exporting from Photoshop, which should be reading 1920×1440, which is full HD at a 4:3 aspect ratio. This is because your camera natively shoots in a 4:3 aspect ratio, even though true HD is 1920×1080, a 16:9 aspect ratio.
So, if you are planning on cutting your timelapse sequence into an existing video edit that is in true HD (1920×1080), you will need to crop your timelapse sequence. And, Photoshop is the best tool to do this with.
To crop your sequence, all you need to do is use the crop tool in Photoshop on your video layer before you export. In the top left of the screen, you can tell Photoshop to crop it to exactly 1920×1080 to eliminate the guesswork.
Pro Tip: How does the camera move when the BBC shoots timelapse for Planet Earth?
This is a great question and one that deserves mentioning, because if you get inspired to really start pursuing shooting timelapse, then you are going to want to think about introducing some camera movement!
The way productions like Planet Earth create panning, tilting, and craning timelapse shots is by using a device referred to as a Motion Control device (MoCo for short), and also known as a slider. The term MoCo is falling out of favor these days, and slider is taking its place more and more. How these work though is like this. The camera sits on a tripod head on a track, which is attached to a small, computer-controlled motor. The user can program the slider to move the camera along the track at a speed corresponding to the frame interval. The result is that when the frames are arranged in a sequence, there will be a camera move, making for a very dramatic shot!
The actual logistics are a bit more complicated than this, but that is basically how it works. Motorized sliders for time-lapse are becoming smaller and more affordable every day. The Rhino brand slider is about $600 for instance.
Wrapping Up
Does this seem convoluted, complicated, or difficult? Perhaps if you’re not accustomed to using these video tools, it might seem that way. But, I assure you that with a bit of trial and error you will quickly master the workflow. And, the rewards of shooting an amazing timelapse sequence absolutely makes it worth the effort.

We offer world-class travel photography
experiences around the world.
Each tour is bundled with lodging, meals, and transportation between workshops included, allowing you to focus on photography instead of the stress of traveling.
experiences around the world.
Each tour is bundled with lodging, meals, and transportation between workshops included, allowing you to focus on photography instead of the stress of traveling.
Get Our Trip Catalog
Receive a trip catalog that highlights all of our upcoming photo tours and workshops.Schedule a Trip Consultation
Meet with a photo experience coordinator, and experience a personal touch to your booking experience.Landscape Guide
Receive a FREE Landscape Cheat Sheet Written By a Pro Photographer.Webinars
Our regularly hosted webinars provide photography instruction from our own guides on a wide range of topics.Education Portal
Explore our library of articles that cover everything from common questions, to in-depth guides on how to achieve that perfect shot.
Backcountry Journeys
Connecting Passionate People To
Exceptional Experiences.
Exceptional Experiences.
Business Hours:
Mon-Fri, 8AM-4PM MT
928-478-1521
adventure@backcountryjourneys.com
Mon-Fri, 8AM-4PM MT
928-478-1521
adventure@backcountryjourneys.com
arrow_drop_down_circle
Divider Text
All Images & Content Are Property Of Backcountry Journeys Photography Tours, Workshops & Safaris LLC - Copyright 2026
About Us
Receive a Digital Trip Catalog
Find an upcoming photography tour with our interactive catalog.