Mon - Fri: 8 am - 4 pm MT

About Backcountry Journeys
Why Choose Backcountry Journeys
If you're considering a photography trip, hear why Backcountry Journeys delivers the best experience in the industry.Frequently Asked Questions
If you're new to photography trips, or new to BCJ, you can find our common travel questions here.Fitness Levels
Our trips vary on physical intensity, and by reviewing our fitness levels, you can find out which trips may be more challenging, or aligned more closely with your comfort level.Meet The Crew
We've built an amazing team of experienced guides, and dedicated office staff that elevate your travel experience. Get to know their backgrounds, and hear their stories.Loyalty Program
We reward our frequent photo adventurers with exclusive discounts on amazing photography trips.Contact Us
If you need to get in touch with our office staff, or have additional business inquiries, you can find our information here.Refer a Friend
Know someone perfect for one of our tours? Recommend them through this quick form.Stay Up To Date On All Things
Backcountry Journeys
Backcountry Journeys
Our Photography Community
Our Webinars
Our regularly hosted webinars provide photography instruction from our own guides on a wide range of topics.Our Education Portal
Explore our library of articles that cover everything from common questions, to in-depth guides on how to achieve that perfect shot.Community Testimonials
We're proud to foster an amazing group of photo travelers, and here you can find their stories from their past adventures.Resources For Photographers
About Our Company
Resources For Photographers
About Our Company
Focus Stacking: A Useful Technique For Landscape Photography
Published February 17, 2020
Focus stacking is one of the most important intermediate photography skills that you can learn.
It will increase your creativity in the field and allow you to create more depth in your images. It is a fairly simple technique, but it does require the use of post-processing applications.
Focus stacking for landscape photography was adopted from macro photographers, who first experimented with the technique. It allowed them to overcome the focus limitations of their camera and create small scene images where they could control what was in focus (ex. a flower or insect). Landscape photographers use the technique in a similar fashion. There are certain scenes and compositions where it is optically impossible for a camera to take a single shot where everything is in focus. A basic example is wildflowers in the foreground with mountains in the background. This is actually the situation where I use focus stacking the most.
Envision your camera just inches away from foreground flowers, at that point, you have to make a choice. Do you want the flowers in focus and have the mountains totally blurred, or do you want the mountains in focus and the flowers blurred? Focus stacking enables the photographer to choose both. Let’s dive a little deeper into the method and then go through an example.
What Is Focus Stacking?
Focus stacking is a technique that allows you to maximize depth of field and ensure overall image sharpness. It involves capturing two or more images with different focal points and merging those images together using a post-processing application (I use Adobe Photoshop CC). The merging and blending process uses only the sharpest/in-focus areas of each respective image. The final result is a single image that is tack sharp from foreground to background. It is similar to exposure blending, but in this case, images with different focal points are merged versus different exposures.
Why Should You Focus Stack?
The two main benefits are increased depth in your image and complete sharpness. Without a doubt, the ability to focus stack increases the number of creative compositions available to you in a particular scene as well. It allows you to place your lens just inches away from an element and still be able to produce a shot that is sharp from front to back. This leads to more potential framing opportunities and more interesting foregrounds. If you think about it, you have more foregrounds available to you if you use this technique; you just need to think smaller. A wide-angle lens placed inches away from a small object will actually make that object look very prominent, making it a possible foreground element in your composition. Using the technique has undoubtedly increased my own creativity.
The other big benefit is the ability to ensure maximum sharpness. Yes, you can find your hyperfocal distance for a scene and shoot at narrow apertures like f/22, but hyperfocal distances take time to learn and narrow apertures detract from your image quality. Hence, with focus stacking, you can fire off two to three frames and if your initial frame is lacking sharpness in the foreground, mid-ground, or background, you can blend an additional exposure with a different focal point to compensate (ultimately creating a final image that is completely sharp).
When Should You Focus Stack?
Focus stacking is oftentimes not necessary, but it is almost always an option. It is a technique you should employ in specific scenarios:
- Photographing elements that are very far apart, such as flowers and a distant mountain
- Photographing layered scenes with a telephoto lens, such as a forest
- Macro Photography
- Positioning a wide-angle lens inches away from an element
- Photographing with the goal of printing large images
The above scenarios are when I like to focus stack. I use it the most when using my wide-angle lens and photographing subjects that are very far apart from each other. I have friends who use the technique exclusively just to ensure they have the best sharpness possible for large scale prints.
How Do You Focus Stack?
Focus stacking requires some pre-meditation and vision, as you must capture the required exposures in the field to later merge them together while post-processing. I will share my basic workflow for focus stacking, and from there, it is up to you to practice and experiment to figure out a focus stack workflow that works best for you.
In-Field Considerations
- I shoot the majority of my focus stacked images around f/11-f/16. Usually, f/8-f/11 is the ‘sweet spot’ on a lens and at those apertures, images will have the best quality. However, the trade-off is depth of field. Shooting at f/16 gives you a greater depth of field than at f/8, meaning more is in focus at f/16 and that makes your life easier during post-processing. If there is no movement in your scene, shoot at f/8 or f/11, just keep in mind you will need more exposures.
- Make sure you have exposures covering the entire focal plane of the scene, foreground to background. Sometimes I only need 2 images, other times I need 5. Every scene is different.
- Use manual focus combined with live view and the zoom buttons to focus. Using live view and zooming in on an element allows you to nail perfect focus every time. Zoom in on the element and adjust your focus ring until that element is in focus. Repeat for different areas of the scene. Experiment with this
- If you need to shoot fast (i.e. beautiful light is fading fast) simply ‘shoot blind’. I do this a lot. Start with your focus ring turned all the way to its closest focusing distance. Then, take a shot, rotate the focus ring so it is closer to infinity, take a shot, rotate focus ring again, and repeat until you get to infinity. I do not use live view for this and it allows me to take 8-10 images (covering my focal plane) very quickly. In post-processing, I can then go back and pick the images that I want to use. I usually take 6-8 shots and end up using only 3-4.
- Shoot at f/22 if you have to. You will lose image quality at f/22, but the trade-off is f/22 gives you the greatest possible focus range. For instance, if your lens is 6 inches from a flower, at f/16 if you focus on that flower it will still be out of focus, but at f/22 that flower will be in focus. (Note: general example, every lens is different, but the point is at f/22 you have the maximum focus range possible from your lens. You will have more in focus for each exposure and it will allow you to get as close as possible to your foreground subject.)
- Consider the wind. This technique is very hard when it’s windy because your scene is not static from exposure to exposure. When it is windy, I will bump up my ISO to get a fast enough shutter speed to freeze the motion. I also try to shoot at f/16-f/22 so each exposure has more in focus and I don’t need to blend as many images together. For instance, at f/8 I might have to blend 5 images together for front-back sharpness, but at f/16 I might only have to blend 2-3 images for the same sharpness. Often times, focus stacking is deemed totally useless when it is windy and objects are moving. It requires much skill and time in Photoshop and seeking out a different composition might be the best choice.
In the Digital Darkroom
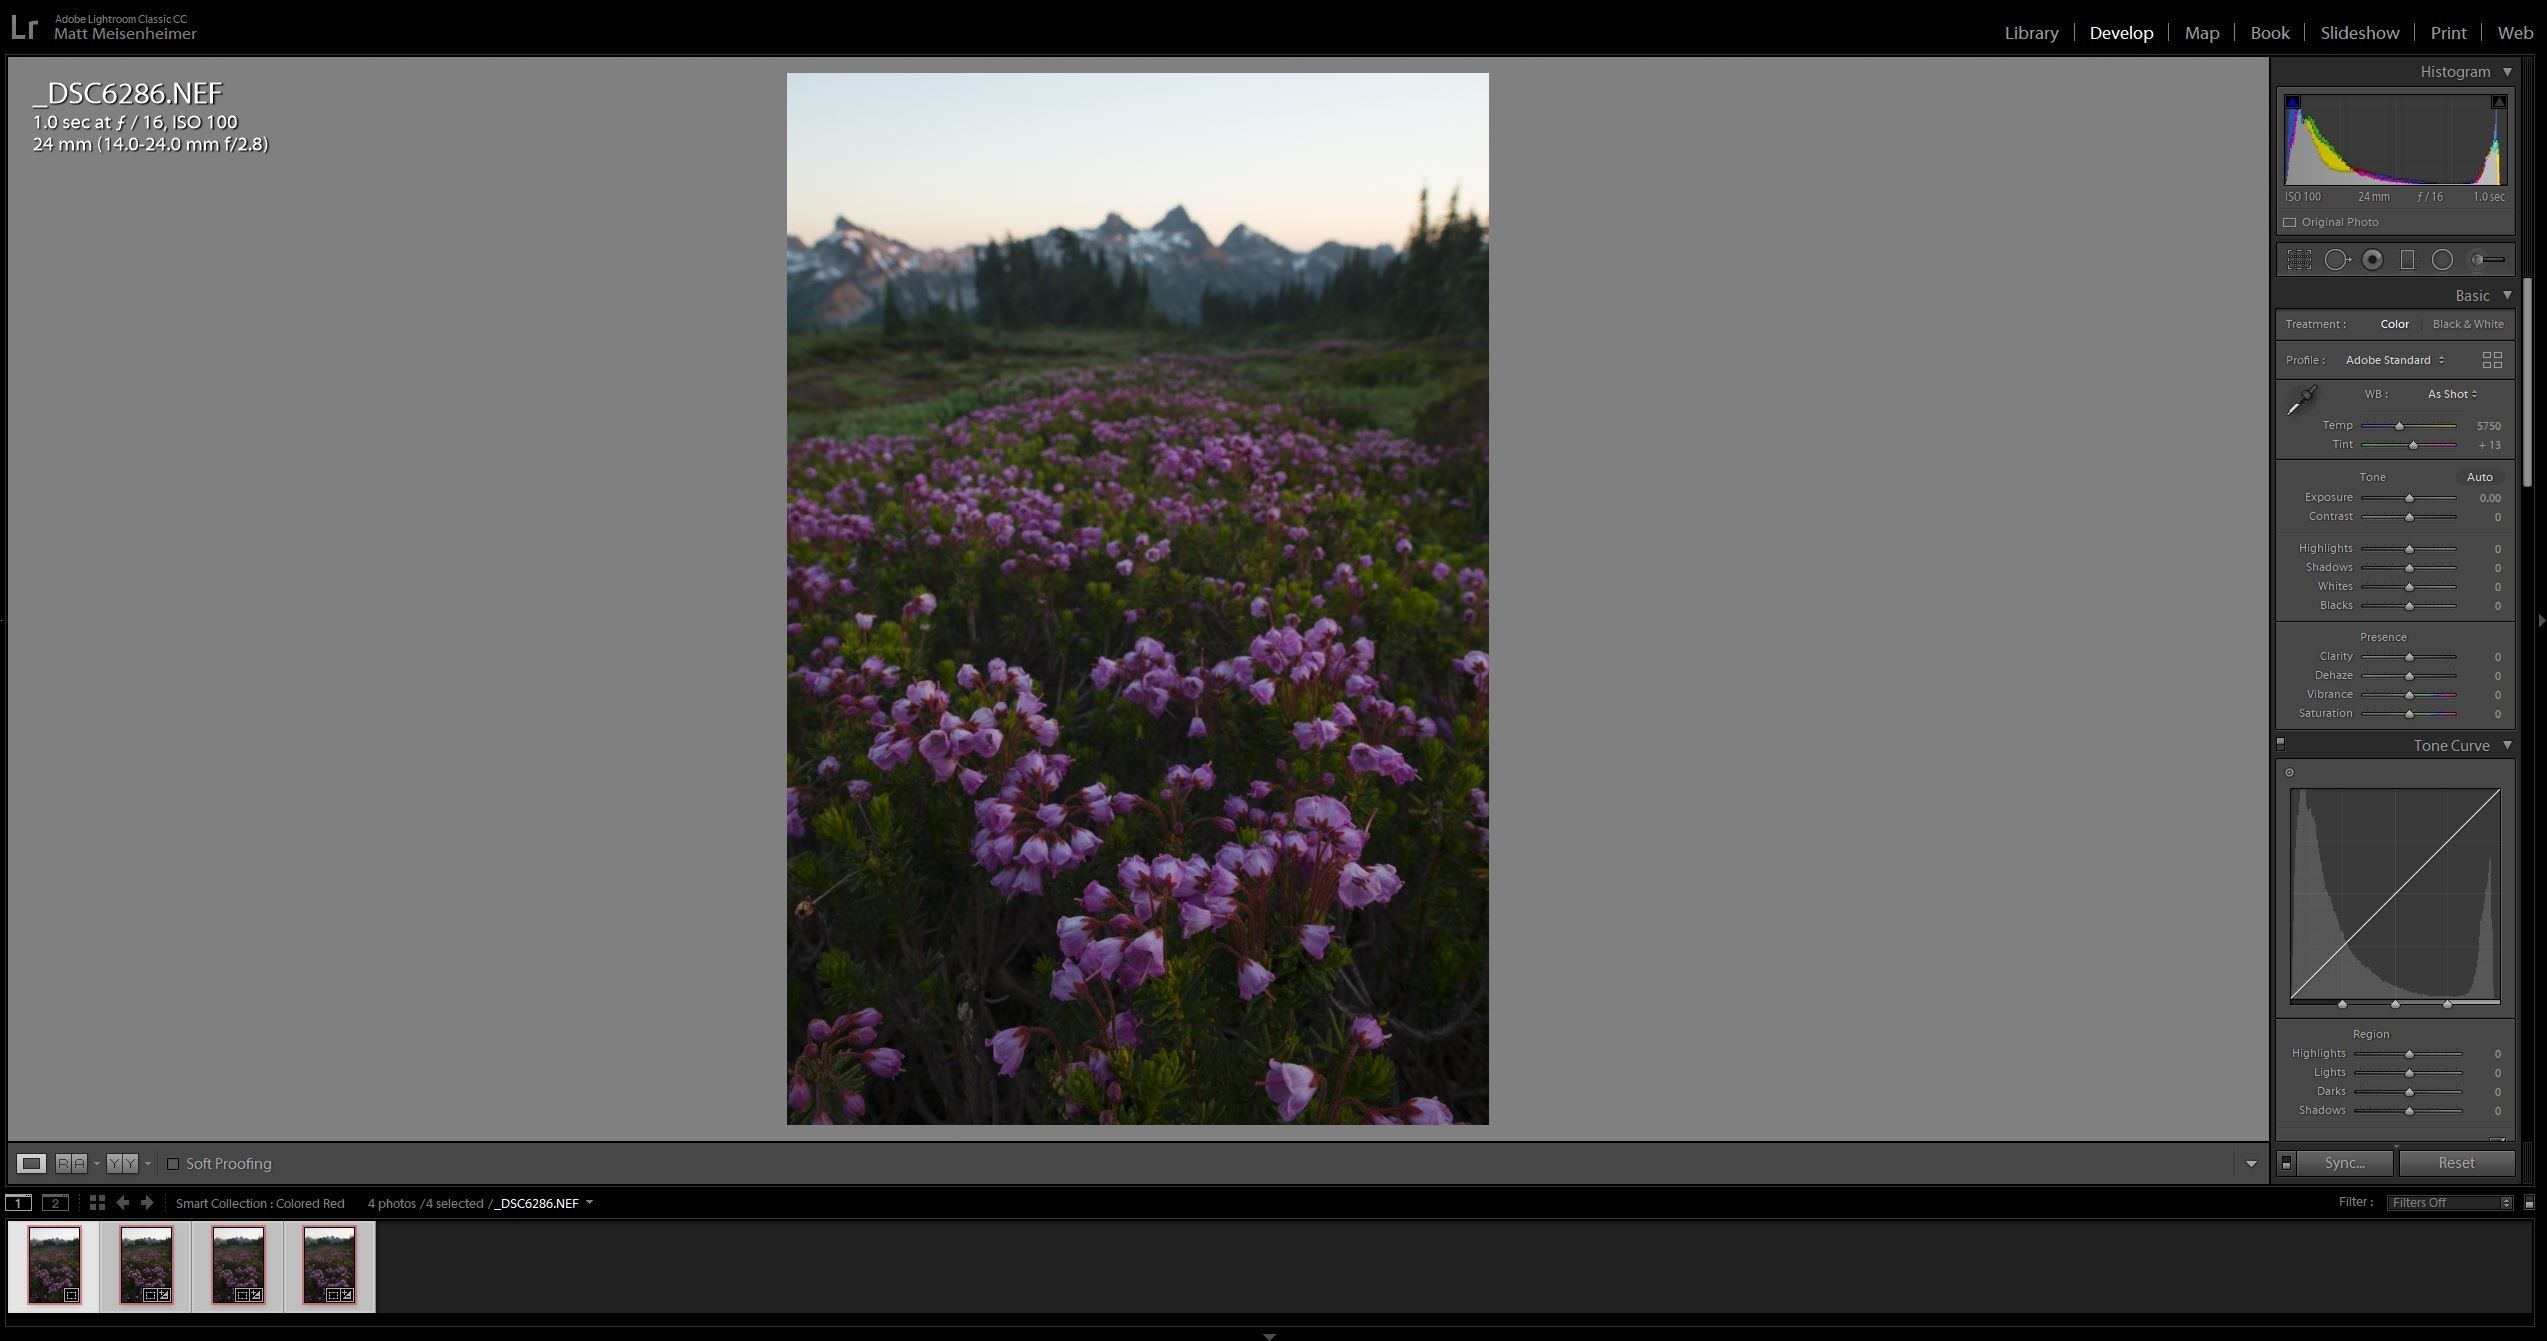
Here’s an example I have put together to show how to merge and blend focus stack exposures in post-processing. I use Adobe Lightroom CC and Adobe Photoshop CC. I believe there are other applications that are capable of focus stacking, but I prefer the Adobe suite.
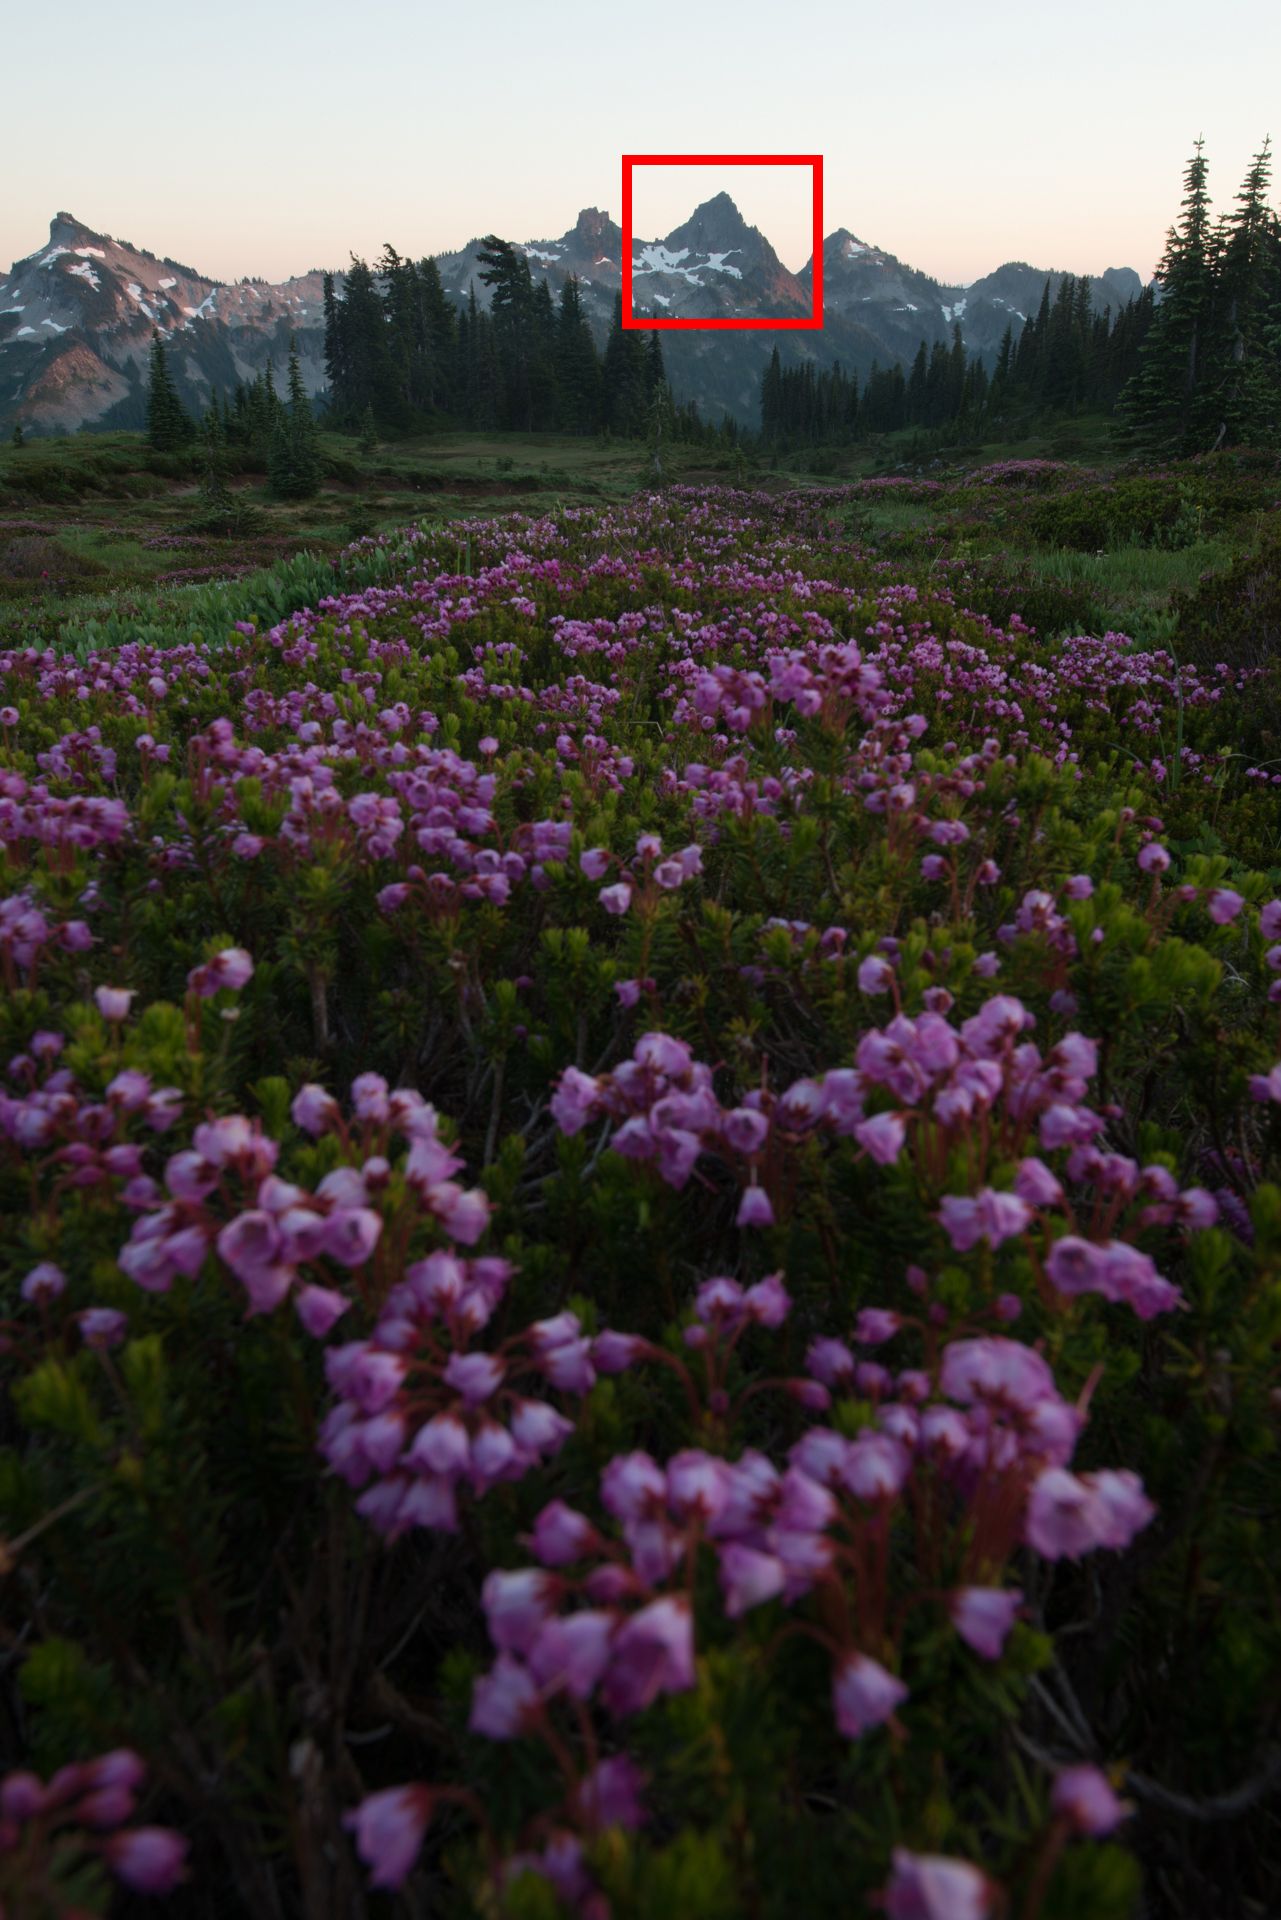
Below are a group of exposures that I took of the Tatoosh Range of Mount Rainier National Park. I was using a Nikon D800e, a Nikkor 14-24mm f/2.8, and my lens was very close to the foreground flowers. Thus, to ensure the entire scene would be sharp, I needed to focus stack. It was not windy so I was not concerned with my shutter speed and I shot at aperture f/16. I took four exposures that covered the focal plane of the scene.
Steps
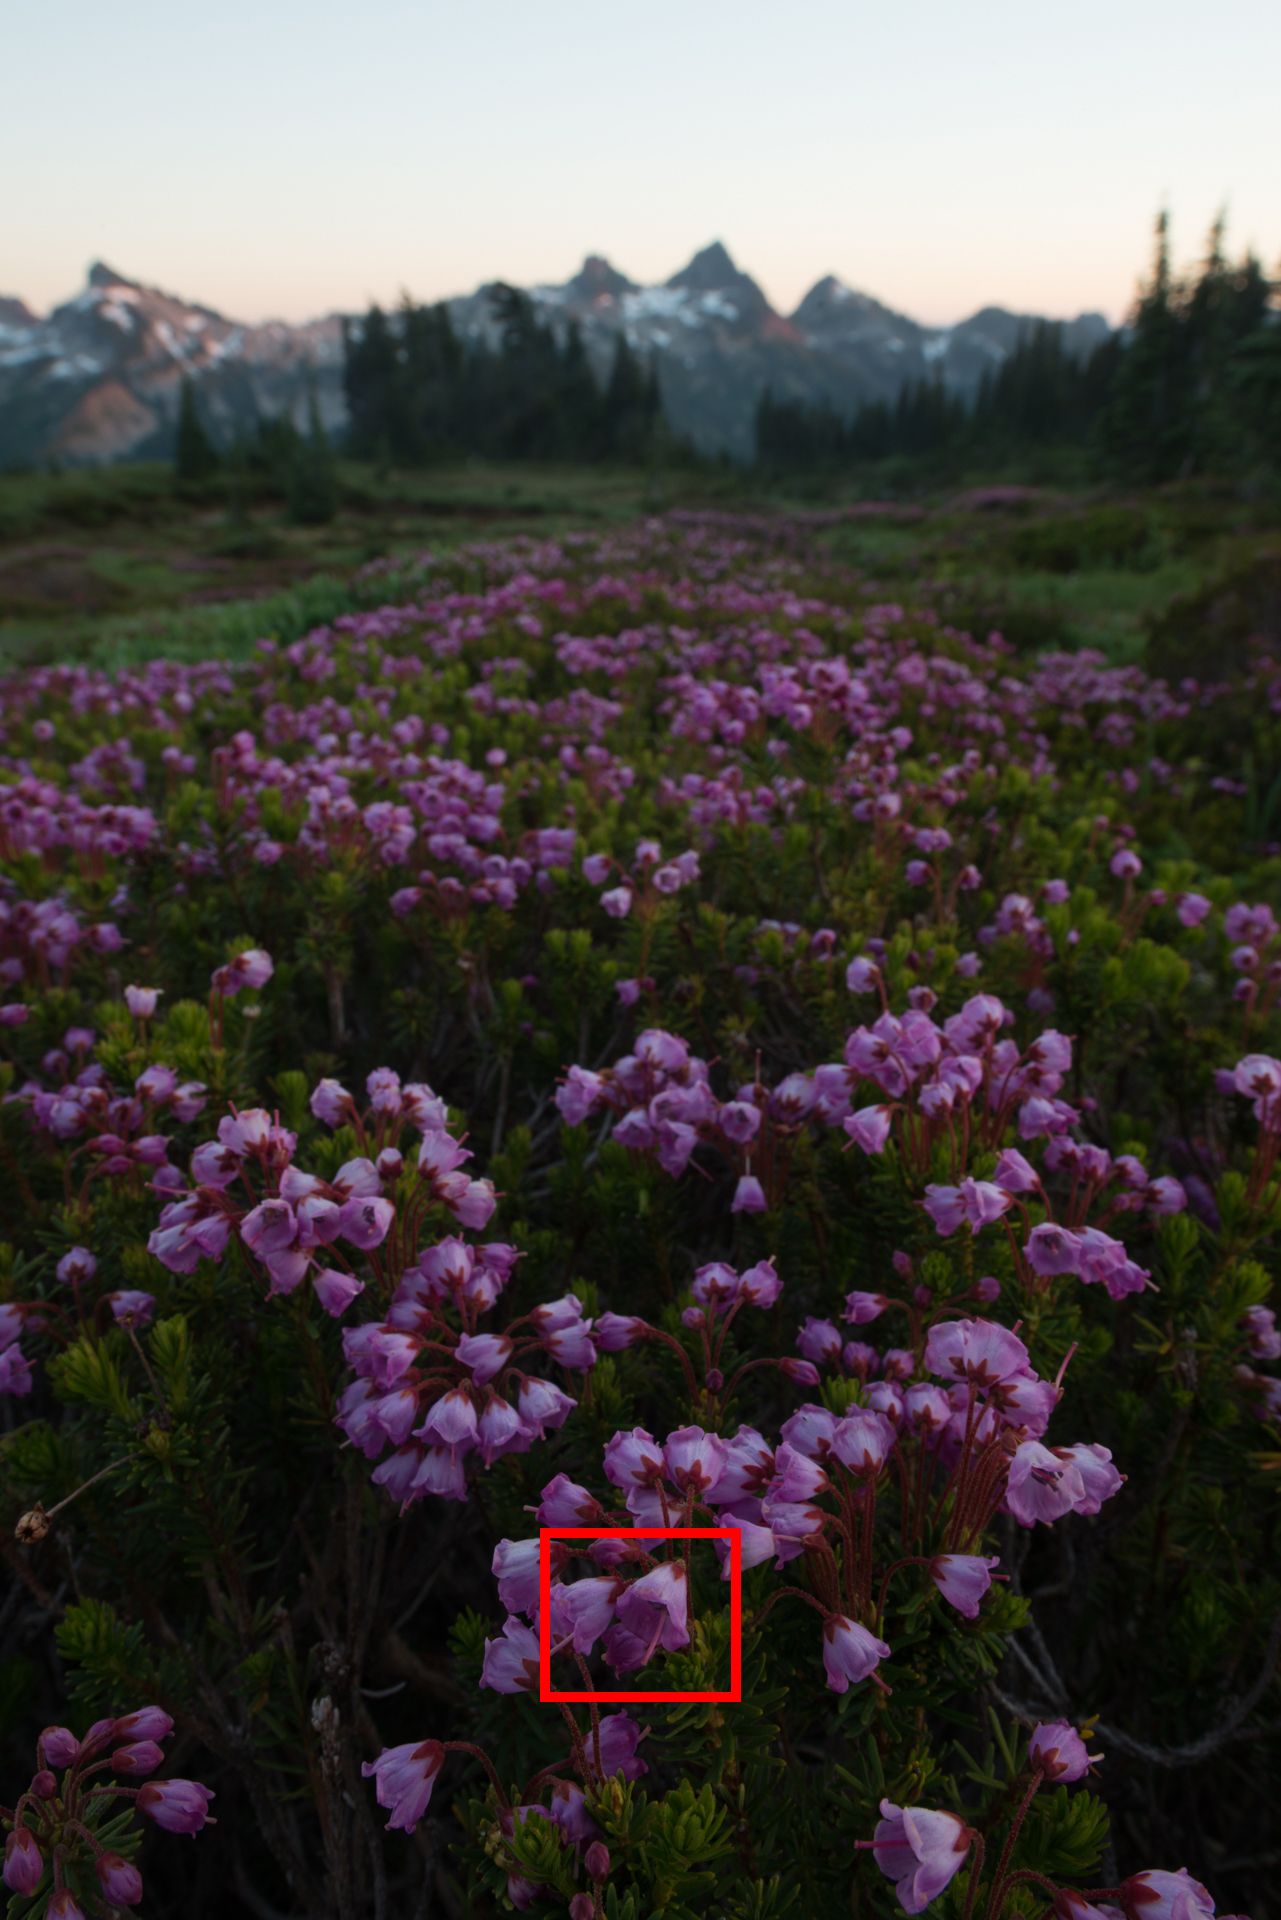
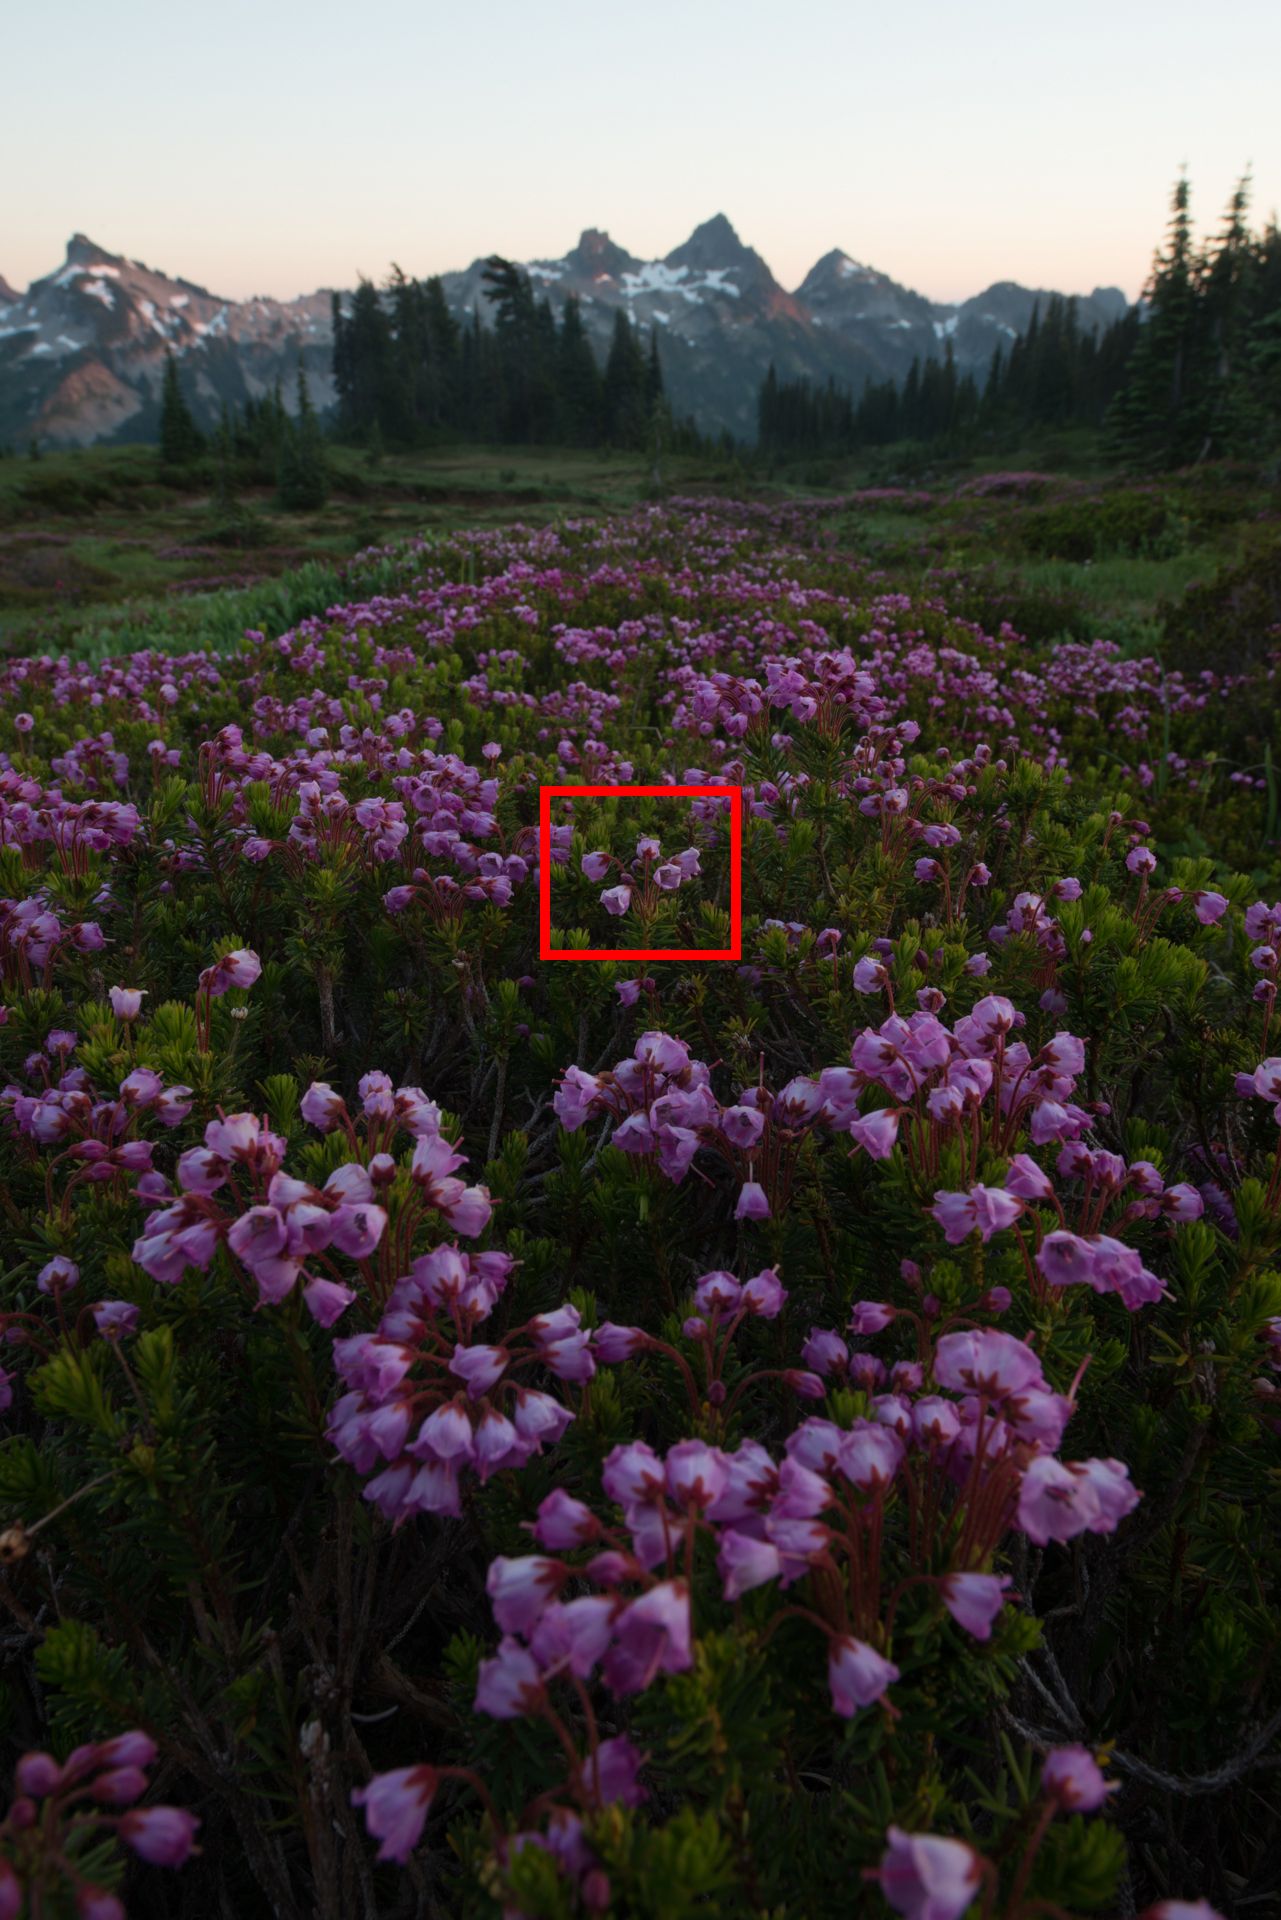
- In the field, take multiple images with different focus points to ensure you have images that cover the focal plane. Do not change your exposure settings from image to image. Each image should have the exact same camera settings, you are only changing the focus point from image to image. Using live view, I captured 4 images with 4 different focus points that covered my scene. Below you can see where I focused.

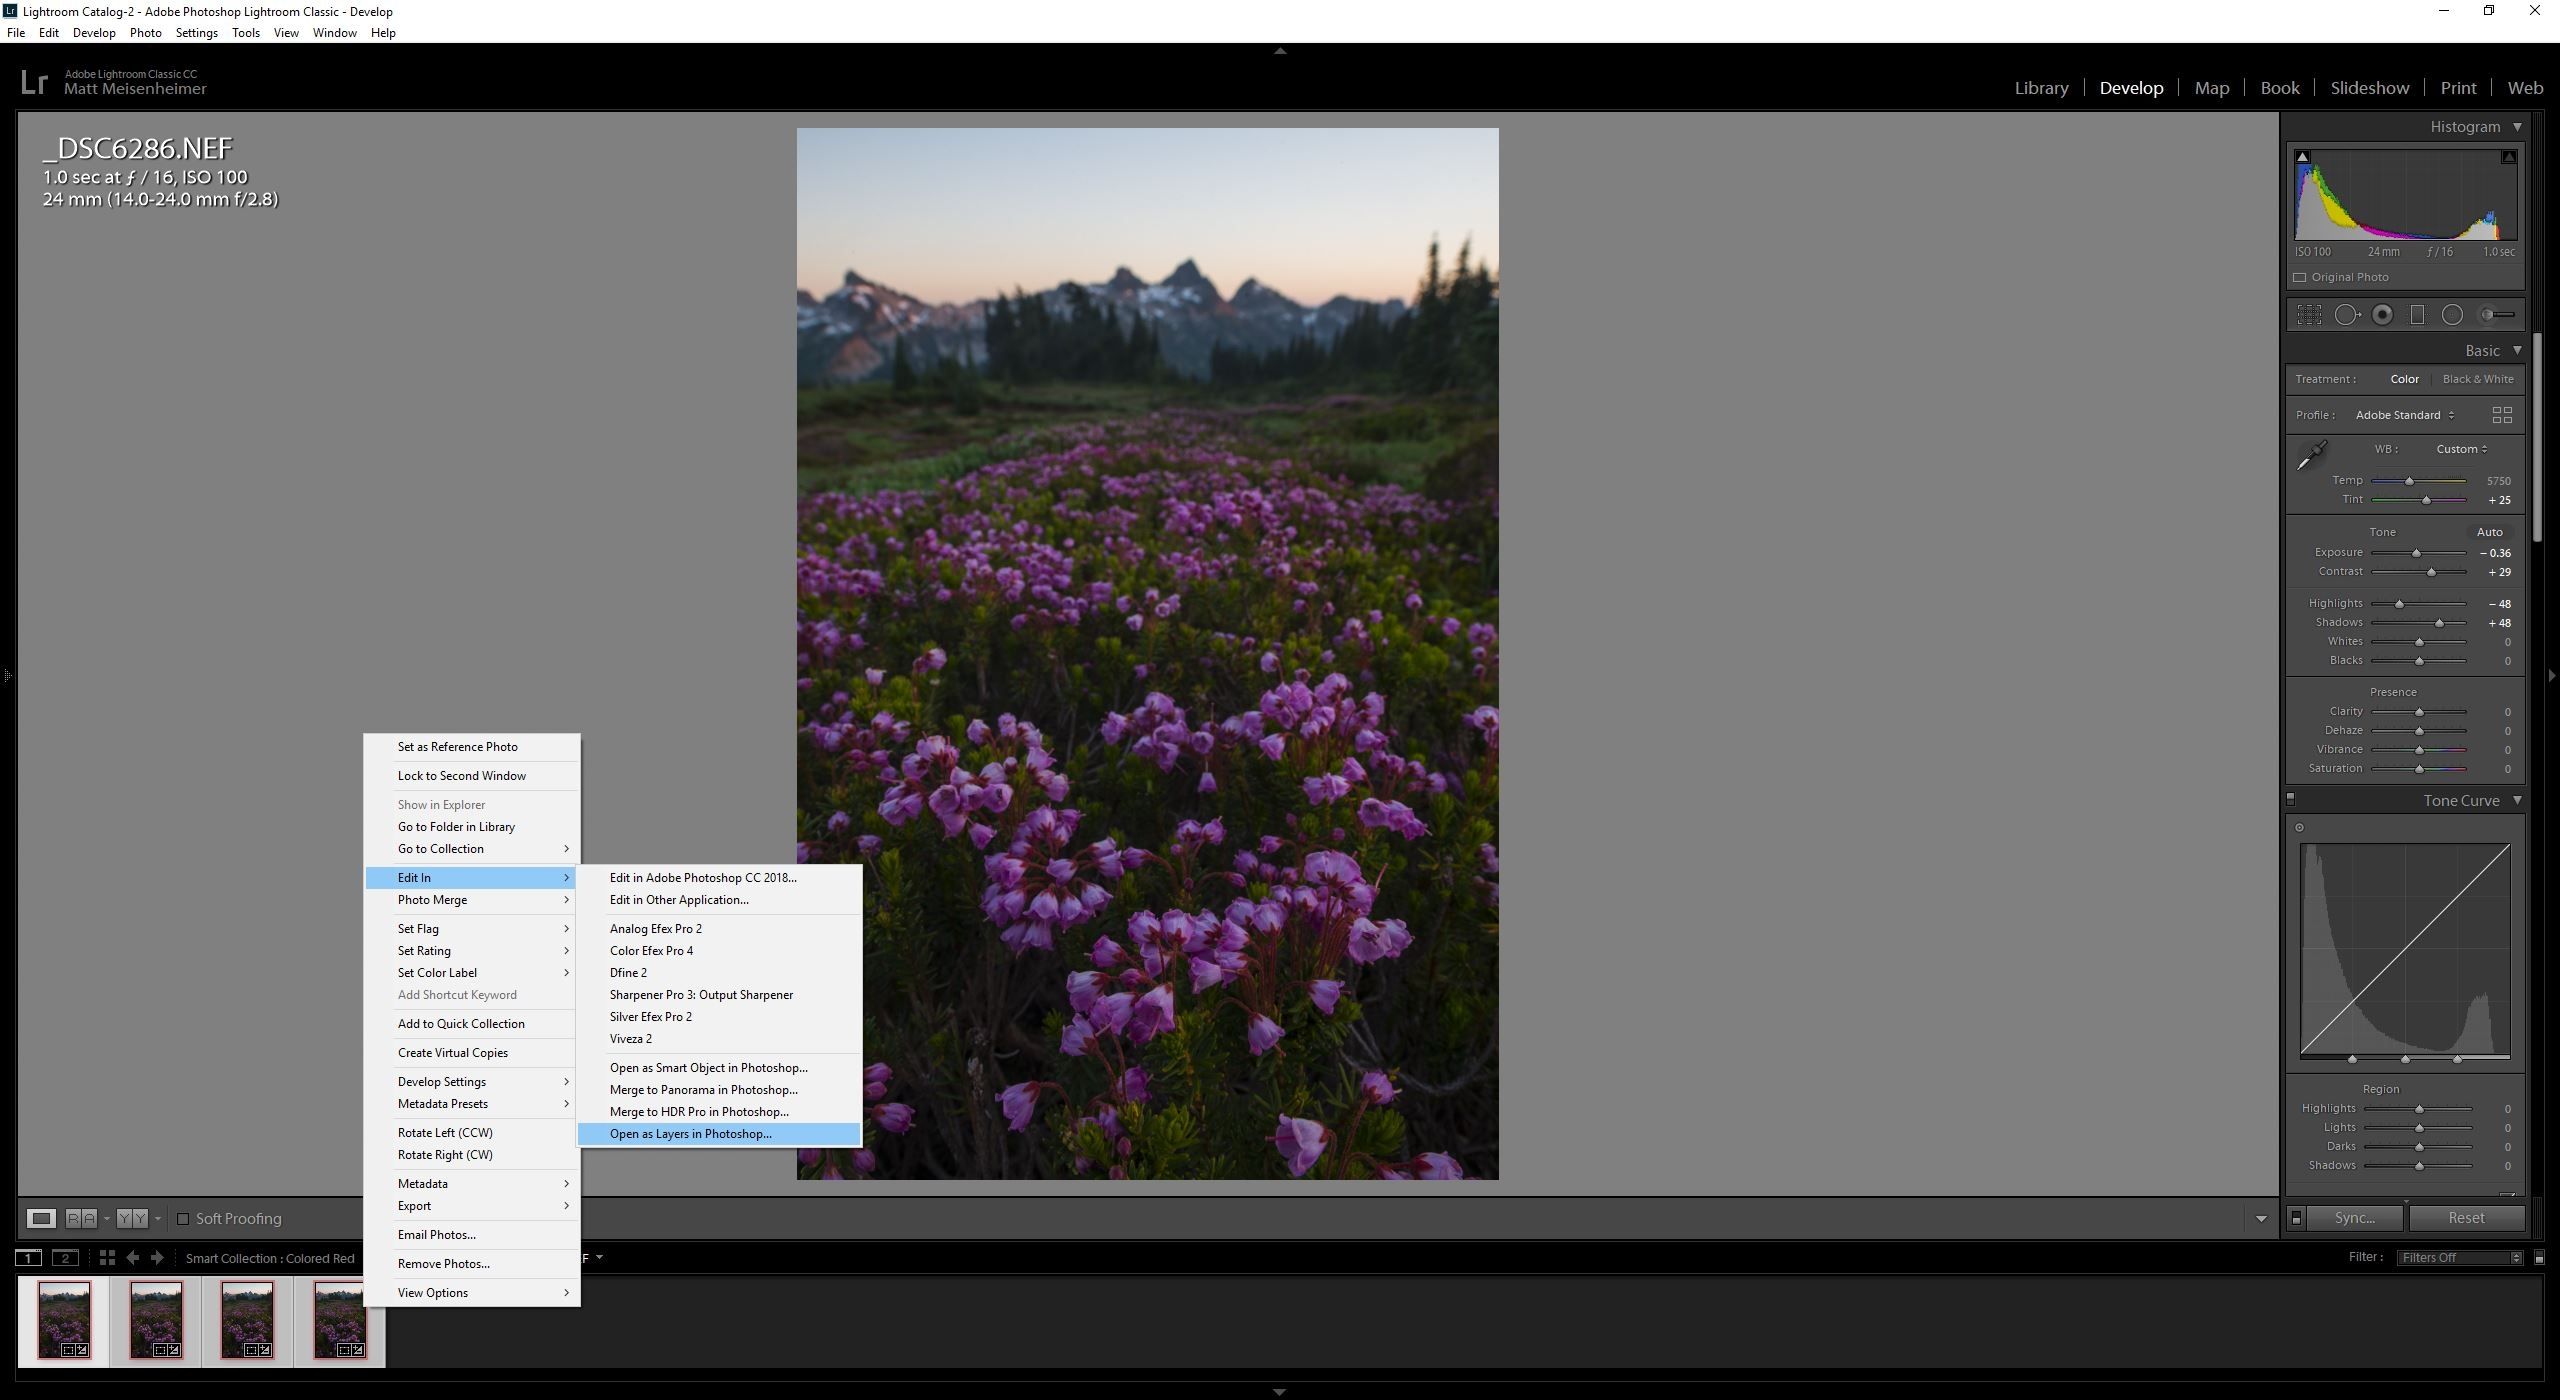
Open Adobe Lightroom and import your images. Make any adjustments necessary (crop, color, luminosity, etc.) Select all images and sync your adjustments.

Select all images, right-click, and select ‘Open as Layers in Photoshop’.
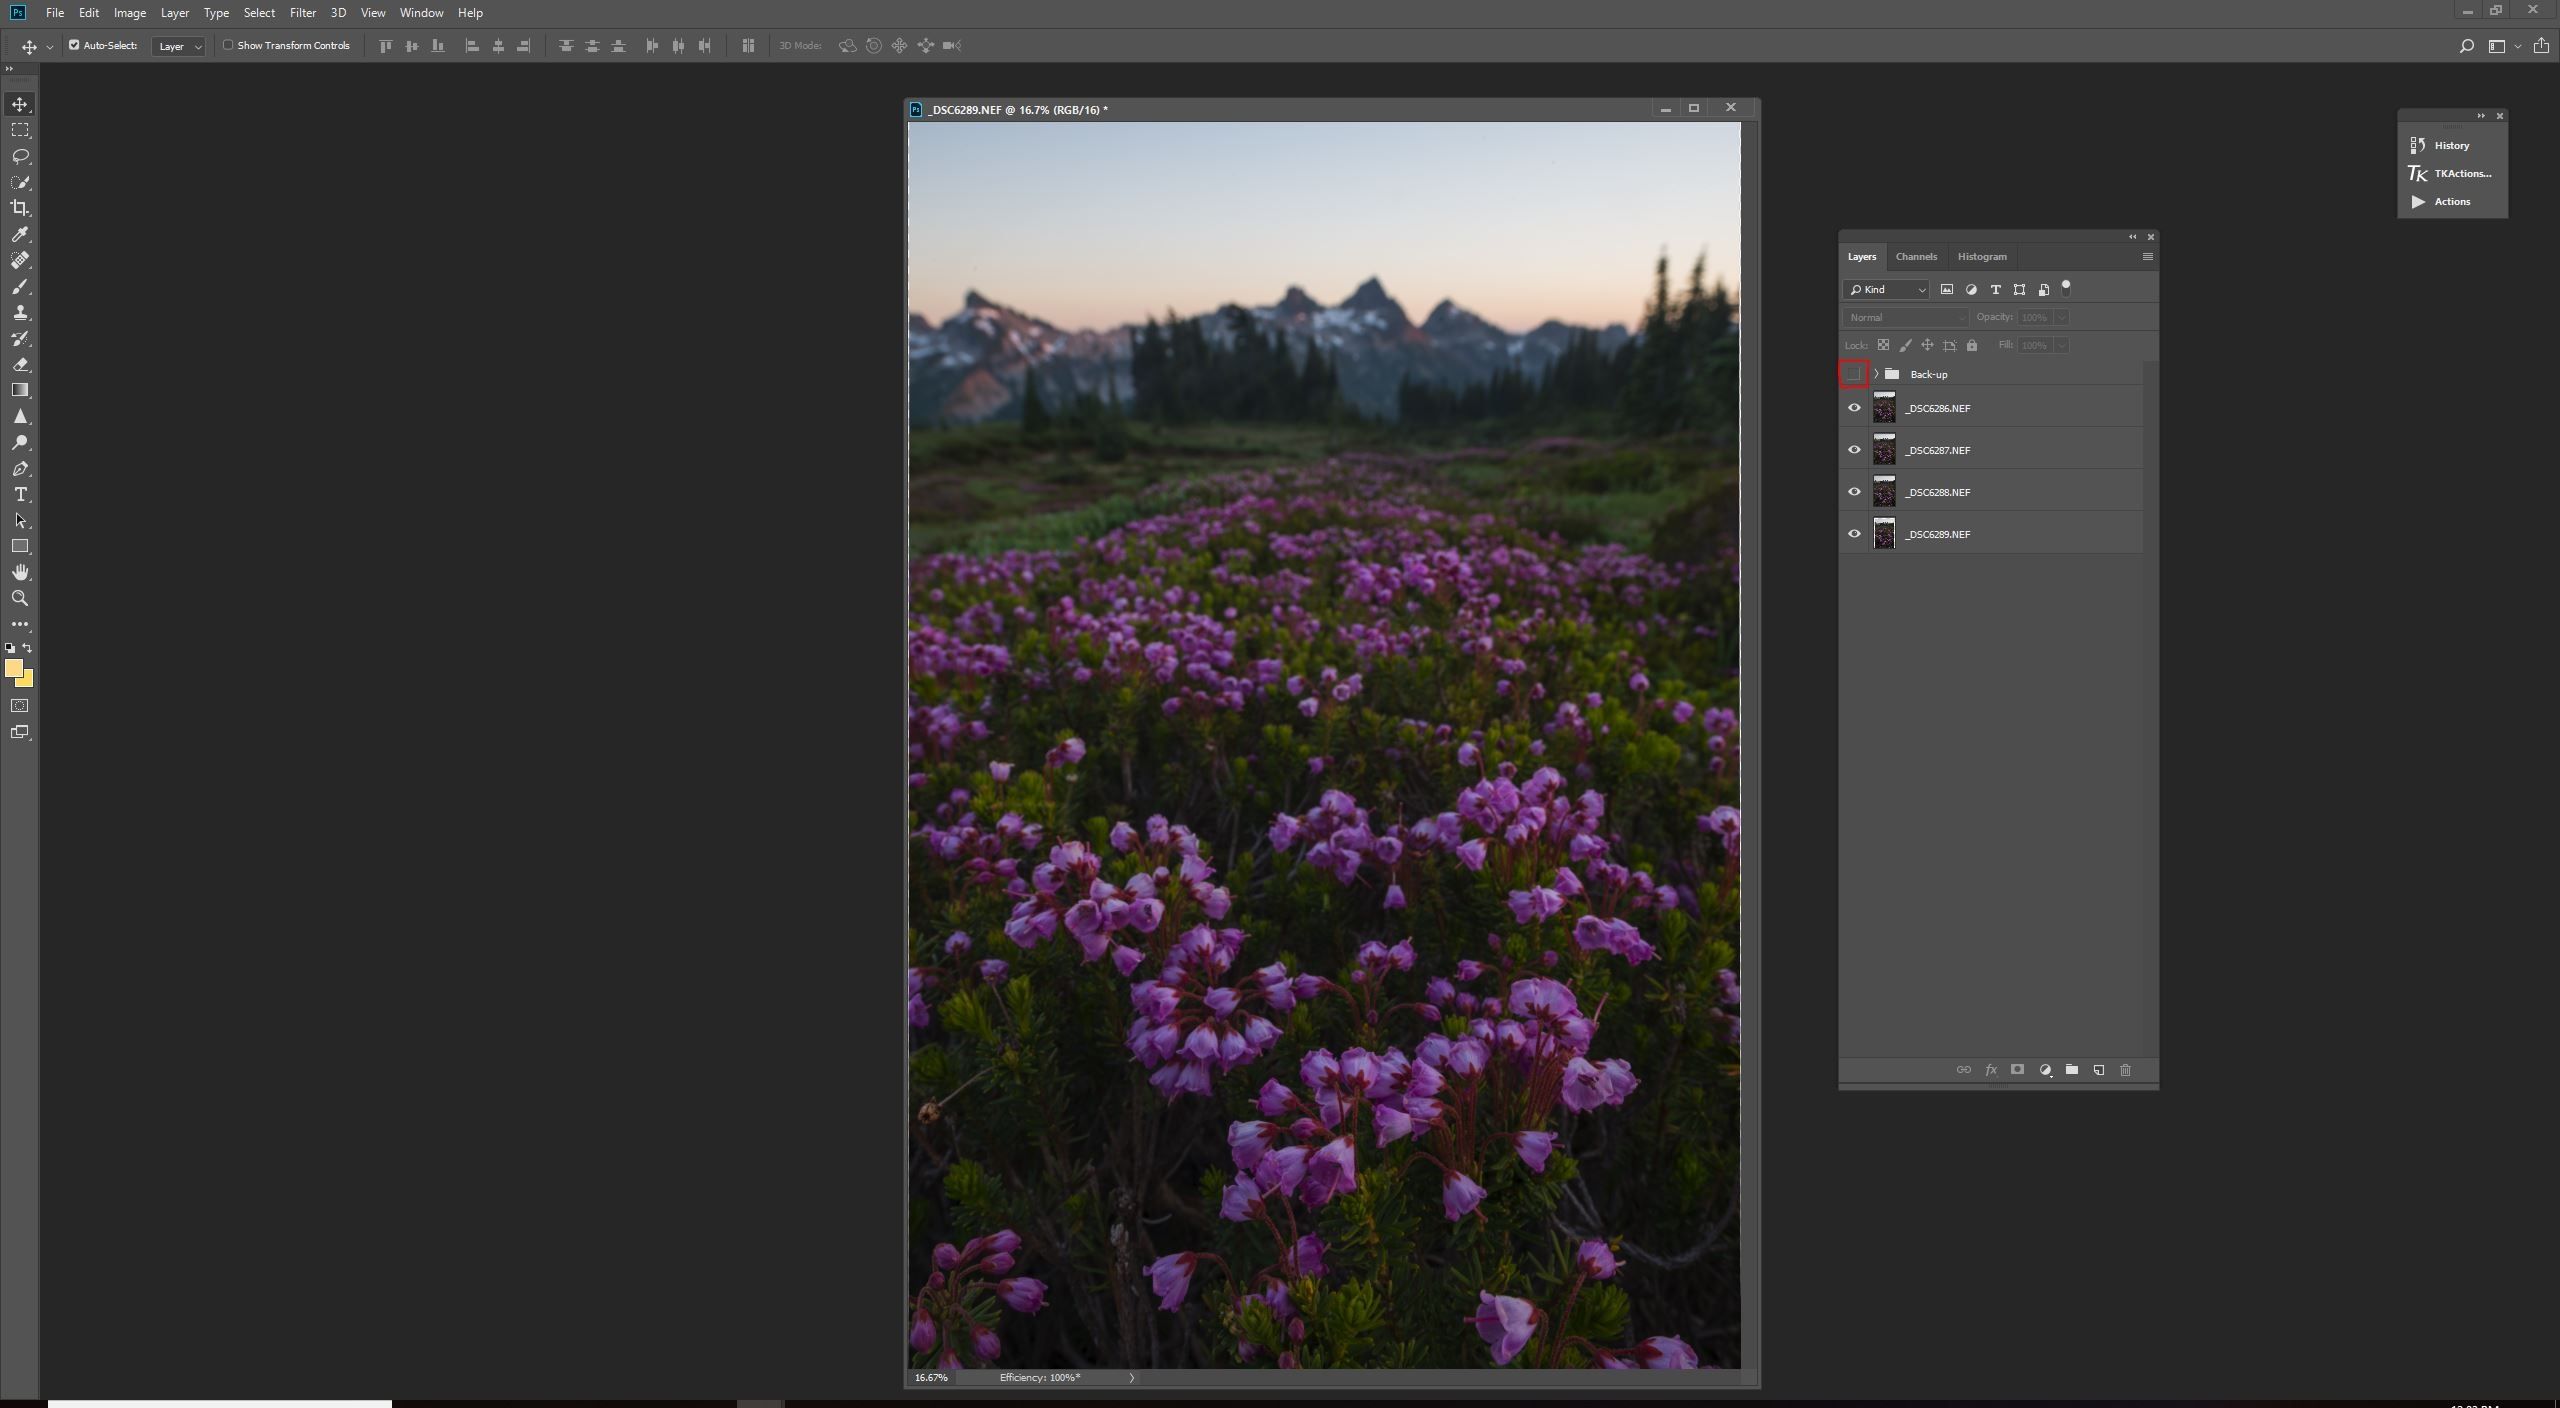
Selected images will open in Adobe Photoshop CC and be stacked together. Make sure all images are selected (select one image and press Ctrl-A/Command-A) and auto-align them by going to Edit -> Auto-Align Layers


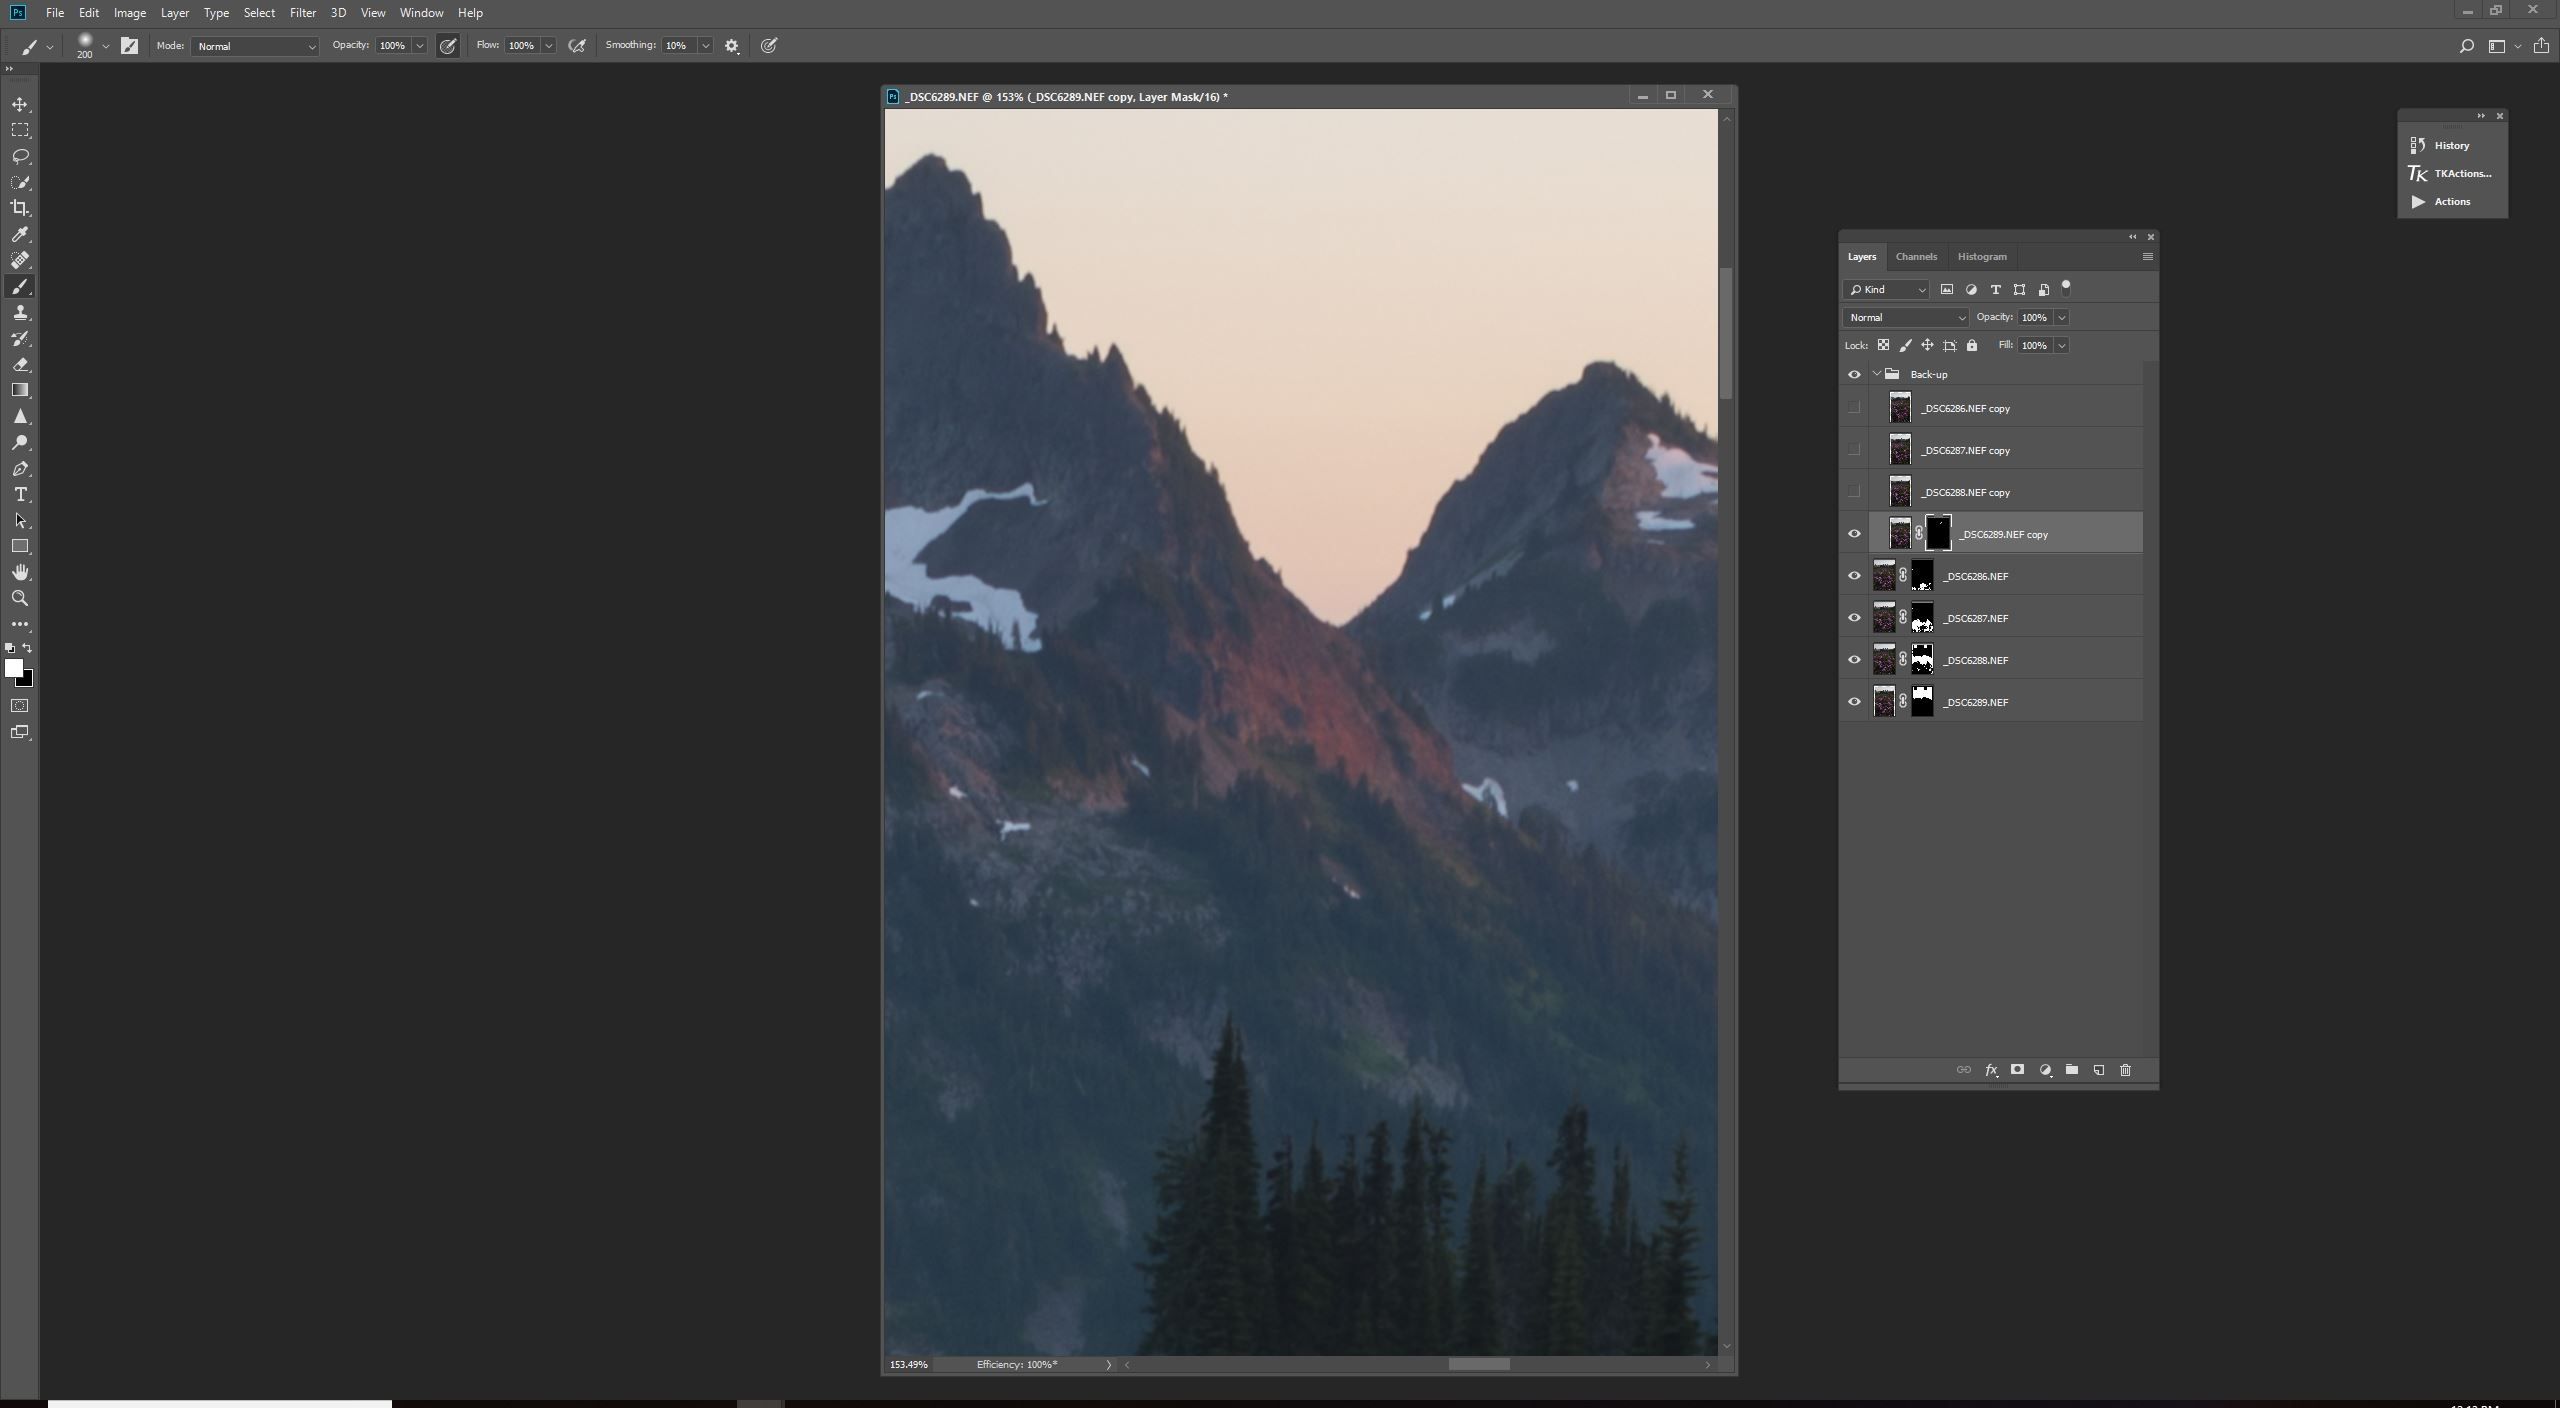
Create a back-up of your aligned images by selecting all the images, press Ctrl-J/Command-J to make a copy, and then select the copies and group them by pressing Ctrl-G/Command-G. You should now have your original images and a group with copies of your original images. Turn off the ‘eye’ so the group with copies is hidden. I will show you why having a copy of your original images is important later.
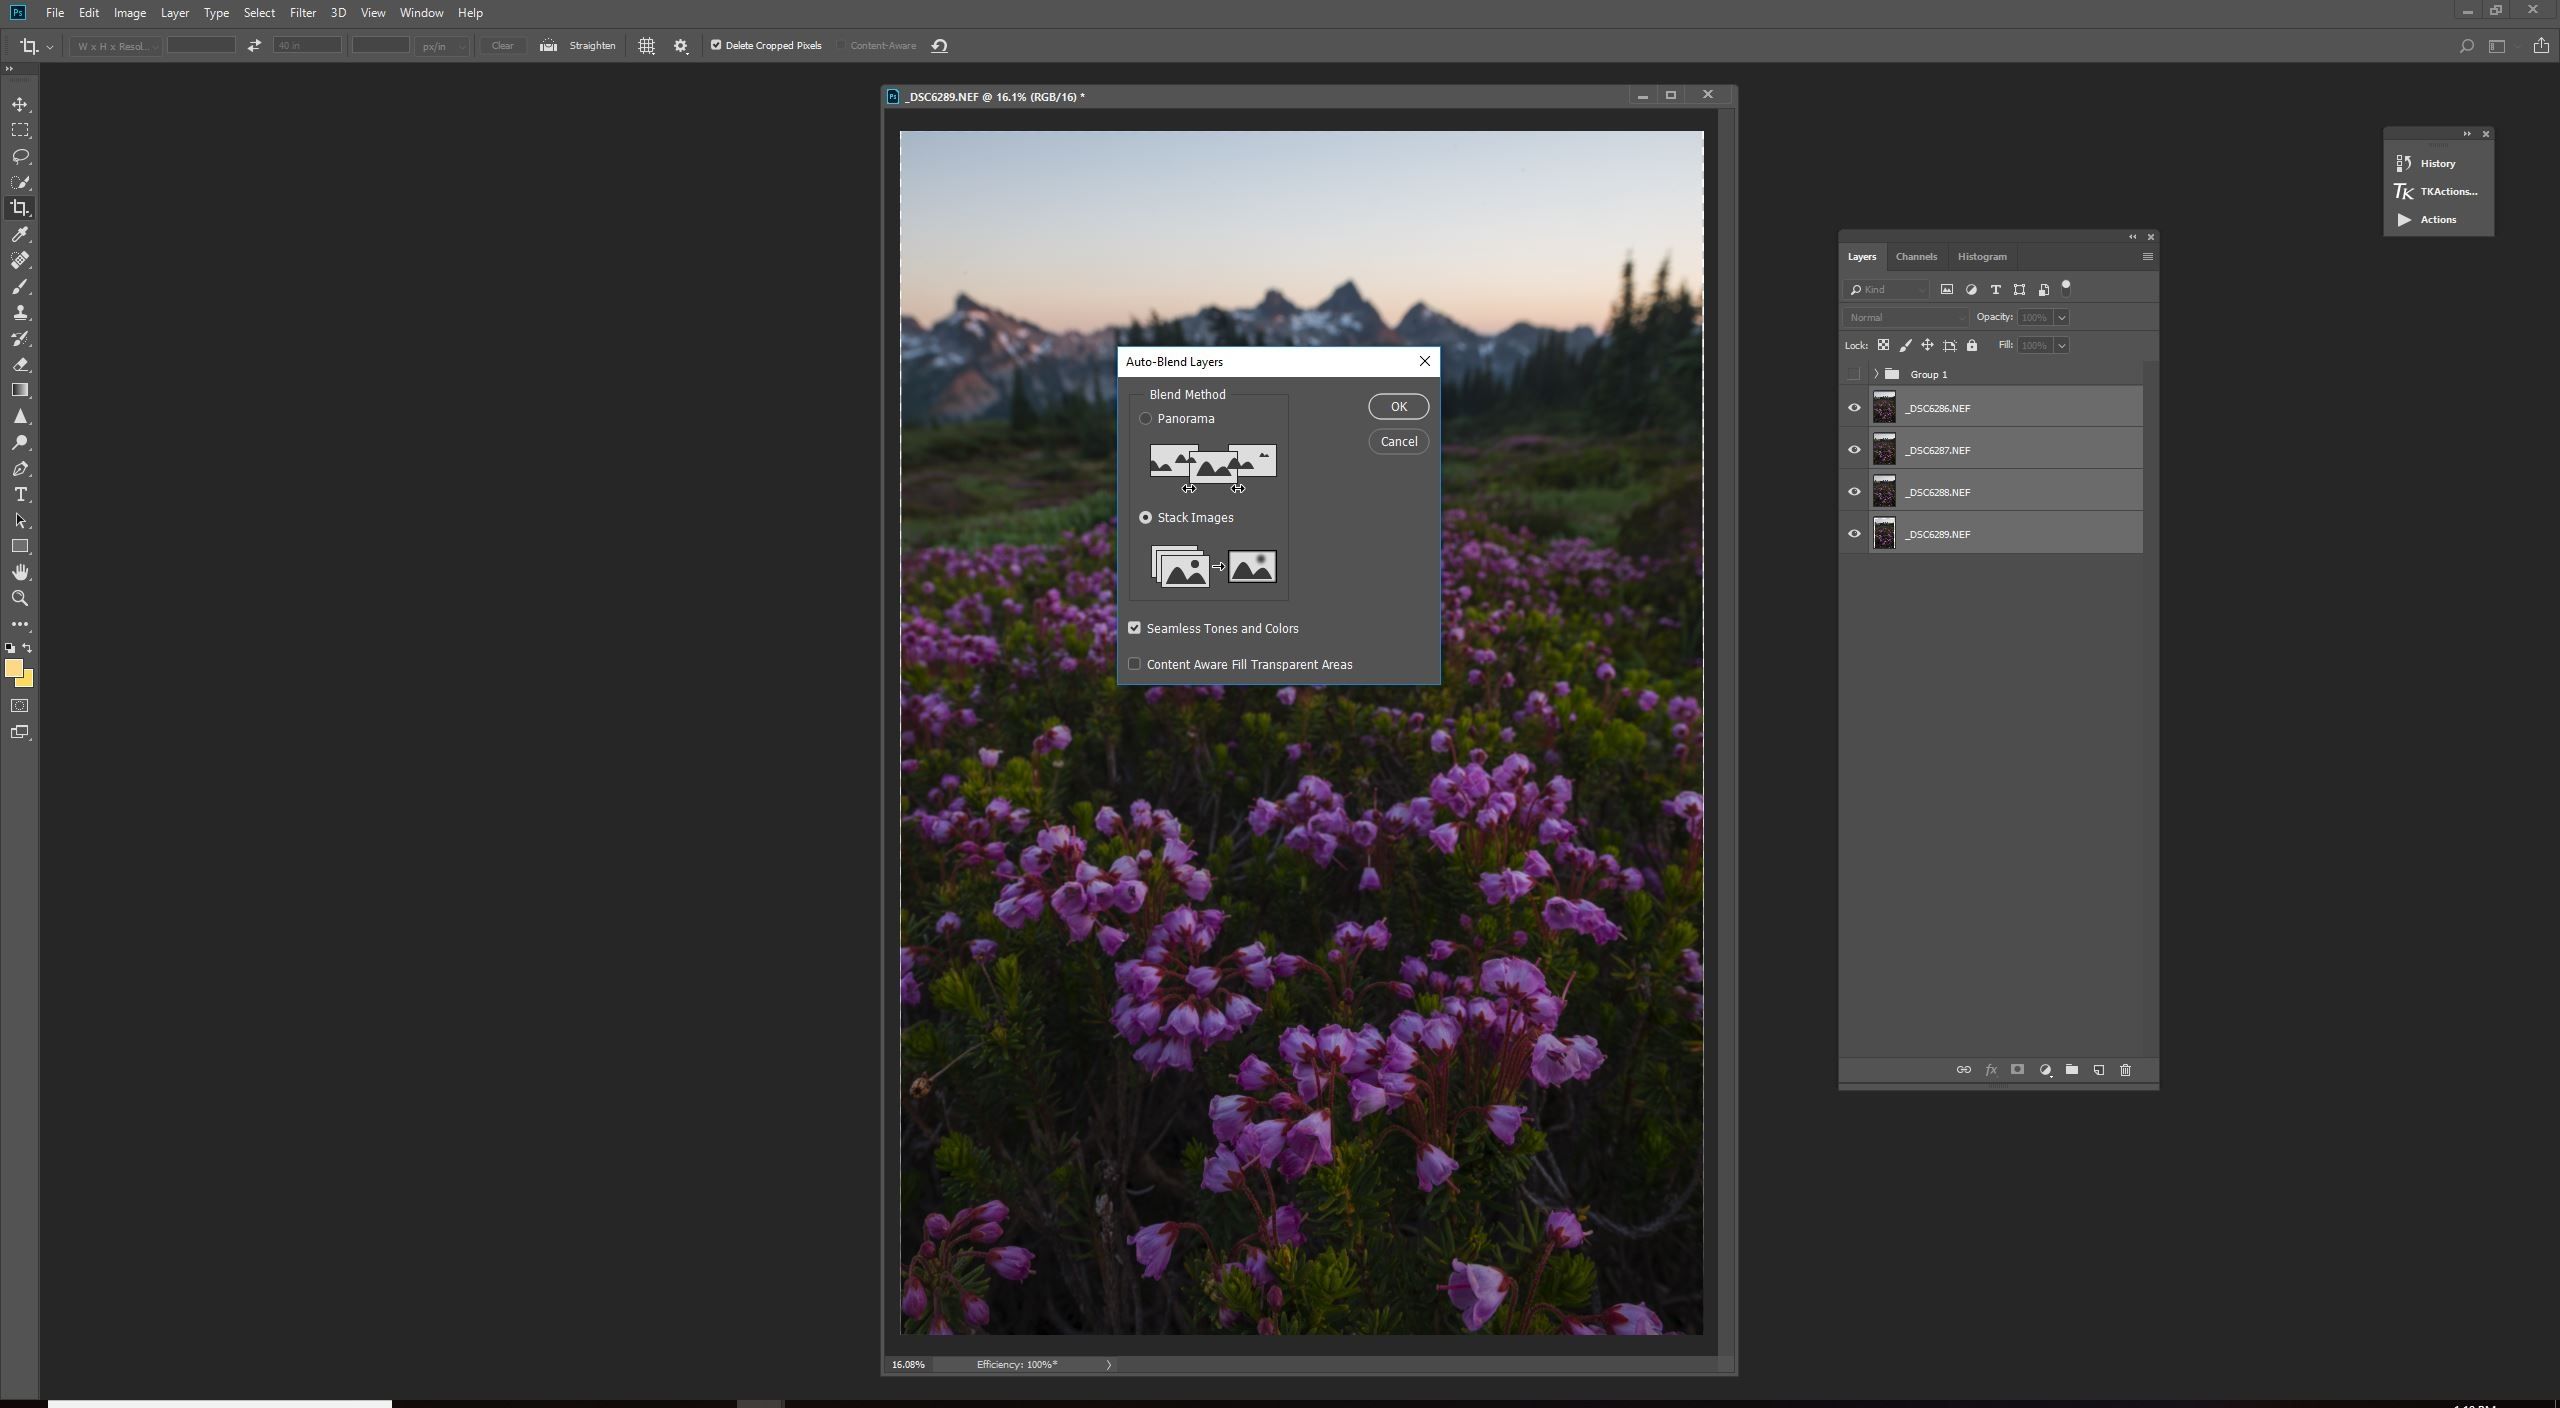
Select all your original images once again and go to Edit -> Auto-Blend Layers. Make sure ‘Content Aware Fill Transparent Area’ is unchecked.
Your images will now be blended together using Photoshop’s algorithm. You will see a mask attached to each of the original images (we will discuss masks more in a future article). Essentially, the focus stack is done. Simple, right? Photoshop is not always perfect though and it does make mistakes. This is where the copies of the original files come in.
I noticed a small area on the background mountains where Photoshop did not merge images correctly. This is common and usually, you do have to do some manual touch up. To fix, expand the group of copies and turn the ‘eye’ on/off to find the exposure that is needed. The image that has the background sharp is needed and that happens to be image 4 of 4 in my group.

Turn the ‘eye’ on image 4 so it overlays over our focus stack. Apply a black mask by clicking on the ‘New Layer Mask’ button (below) and then pressing Ctrl-I/Command-I. The first rule of masking is ‘Black conceals and white reveals.’ The black mask conceals the image and we will paint white onto the black mask to reveal on the areas we want.

Select the brush tool by pressing ‘B’ and make sure your foreground color is set to white and brush opacity is 100%. Now paint over the areas that need to be fixed with the brush. Now check any other areas that need touching up and follow the same process.
After touching up, you are all done. Merge all the images together by going to Layer -> Flatten Image. You can export this image or continue to make adjustments in Photoshop.

Repeat the process and practice a lot. It takes time to learn.
Summary
Focus stacking can be a very useful technique and it is relatively simple with good conditions. There is a slight learning curve, both in the field and in the digital darkroom. It is a technique that can become second nature and with a little practice something that you are able to apply whenever the situation deems necessary.
Exposure blending and focus stacking are the two most important techniques that I have learned during my journey in photography. For one, they help overcome the limits of the camera, and two, they both require some knowledge of the most important aspects in Photoshop – layers, and masking. Thus, I recommend learning and practicing both techniques, as you will not only improve in the field, but you will also get better with Adobe Lightroom CC and Photoshop CC. I hope this overview helps you out and gives you an idea of how powerful focus stacking can be. It is a great way to add something new to your arsenal. Let us know below if you have any questions. Focus stacking is much easier to teach in person so if you are still confused, consider joining us on a future workshop. During many of our landscape photography workshops, we go through in-field examples of focus stacking and exposure blending and also work on blending and merging in post-processing.

We offer world-class travel photography
experiences around the world.
Each tour is bundled with lodging, meals, and transportation between workshops included, allowing you to focus on photography instead of the stress of traveling.
experiences around the world.
Each tour is bundled with lodging, meals, and transportation between workshops included, allowing you to focus on photography instead of the stress of traveling.
Get Our Trip Catalog
Receive a trip catalog that highlights all of our upcoming photo tours and workshops.Schedule a Trip Consultation
Meet with a photo experience coordinator, and experience a personal touch to your booking experience.Landscape Guide
Receive a FREE Landscape Cheat Sheet Written By a Pro Photographer.Webinars
Our regularly hosted webinars provide photography instruction from our own guides on a wide range of topics.Education Portal
Explore our library of articles that cover everything from common questions, to in-depth guides on how to achieve that perfect shot.
Backcountry Journeys
Connecting Passionate People To
Exceptional Experiences.
Exceptional Experiences.
Business Hours:
Mon-Fri, 8AM-4PM MT
928-478-1521
adventure@backcountryjourneys.com
Mon-Fri, 8AM-4PM MT
928-478-1521
adventure@backcountryjourneys.com
arrow_drop_down_circle
Divider Text
All Images & Content Are Property Of Backcountry Journeys Photography Tours, Workshops & Safaris LLC - Copyright 2026
About Us
Receive a Digital Trip Catalog
Find an upcoming photography tour with our interactive catalog.